The fields of Illinois
When you are driving through Illinois, you see a lot of corn, and I mean a LOT of corn. This is coming from someone who lives in Indiana, there is so. much. damn. corn. in Illinois. Not to be a bummer, but when I see this much corn, and when I think back to what this place must have looked like a few hundred years ago, I can’t help but feel like something has been robbed from us here. As someone with a deeply vested interest in ecology, these kinds of things are always on my mind.
Pre-settlement Illinois was dominated by wet tallgrass prairie, wetlands, and poorly drained glacial soils. This contiguous piece of prairie was so large it influenced weather itself. There are first-hand accounts from the early 1800s of a light rainfall occurring every day at roughly 2-3pm like clockwork throughout the prairie. Its likely that the billions of stomata opening and transpiring water across the prairie throughout the day played a direct role in helping form these rainstorms, as it was noted in these accounts that when the prairies were eventually drained, these rainstorms became far more sporadic and intense. Inhabited by millions of prairie chicken, countless bison, and a truly staggering amount of plants, insects, and fungi, it would have been a beauty unlike anyone alive today has seen.
When the European settlers first got to LeSalle County, IL they noted that even on top of the tallest glade they could find, there wasn’t a tree to be seen across the entire horizon. The yearly fire ecology of the region ripping through the dry prairies in the fall or winter kept any trees starkly in-check, burning them away, while the prairie plants lived on below the ground as roots. I find myself in a beautiful remnant of this once-empire-sized ecosystem now.

Pause. Isn’t this article a repair log for a sputter coater? Why are we talking about remnant ecosystems? Well, I find myself in this ecosystem today through a serendipitous combination of many different factors. Namely, I drove up to Chicago this morning to get us a new sputter coater for the lab. We really need one of these, we will get to that in a second. Among other factors, when I got done in Chicago, I realized one of my biggest inspirations for getting into ecology, Joey Santore, was going to be giving a talk at a place called Pizzo Native Nursery, which was almost on my way home, that very evening. I had already picked up the sputter coater and I figured the opportunities that could present themselves there for our program OpenIDI would be well worth the detour.
Pizzo Native Nursery is a place I have always respected, a few years ago when I owned a house up in Goshen, I used some of Pizzo’s seed stocks to restore a native prairie to what was once my turf grass lawn. Its a native nursery yes, but it also sits adjacent to a 40 acre remnant ecosystem of this once gargantuan prairie. A lot of the seed stocks I used came from this prairie, so in a way, I was going to get to meet the genetic parents of the plants I so lovingly tended to years ago. Having the opportunity to meet all of these wonderful and talented botanists and ecologists in one day, while also running an errand for the lab, was like something from a dream to me.
We spent the evening walking the remnant, talking about the difference between different Silphiums, how the buffalo carved paths through the landscape, and spending some time with an incredibly rare cast of plants. Jack Pizzo, the owner of the whole operation, talked with me for a bit about our program OpenIDI and how we could maybe do some taxonomy work together once a few more of our DNA tools are up and running. Its an exciting prospect, and one I hope to follow up on when we have the right tools. Getting to answer questions about the species that inhabit this living fossil sounds more like an honor than anything.
I got back home late at night, and got the sputter coater loaded into the lab. I ended my night with a renewed sense of excitement for answering these huge questions we still have about the world around us, anxious to get back to work on this machine.
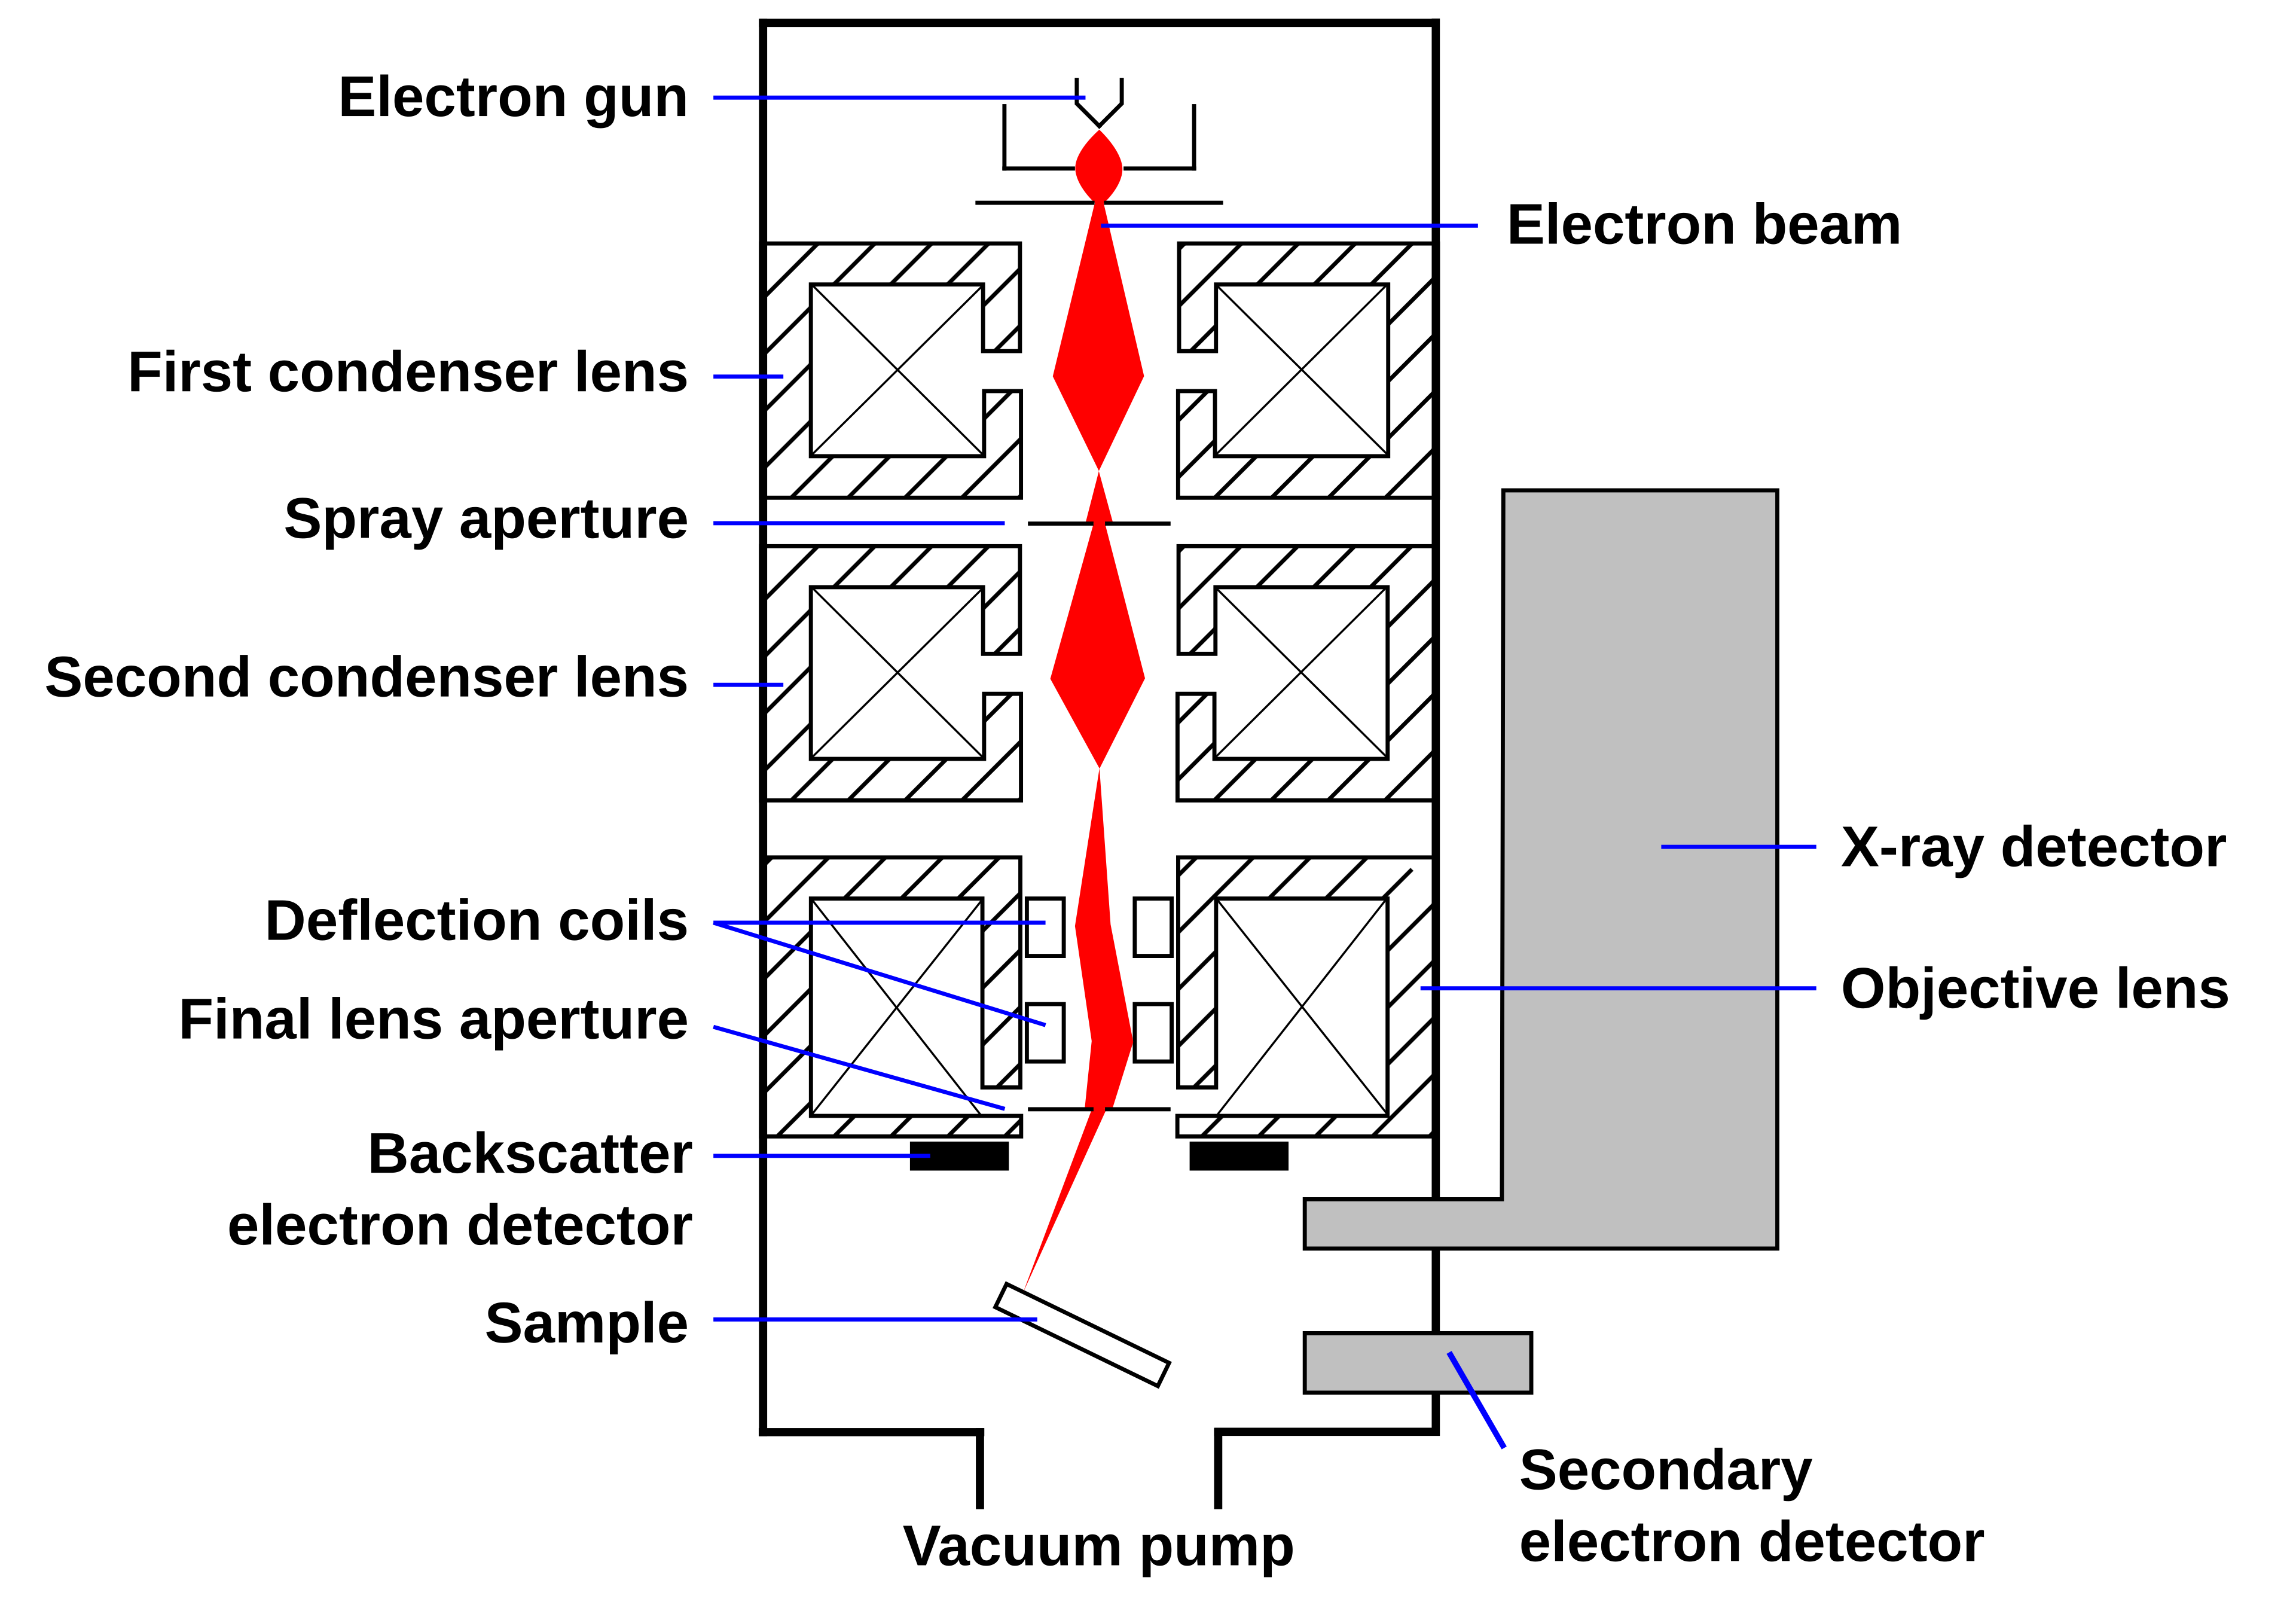
So why do we even need one of these things anyways? What is it for? Well, to understand that, we have to delve a little bit into some electron optics stuff and think about how electrons behave inside of a SEM.
If you don’t want to read about electron optics, you can use the sidebar to skip down to the next relevant section that interests you.
E-Beam Imaging: A charged topic ⚡
Electron Microscopes draw an image by shooting high energy electrons at a sample. As they hit the sample they knock other electrons loose from atoms near the sample surface. This process is referred to as secondary electron emission, and these secondary electrons are picked up by a detector called the secondary electron detector, which is primarily what we use to draw the image with in traditional SE imaging modes.
When we are preparing samples for SEM (Scanning Electron Microscopy) one of the most important steps is coating that sample in a thin conductive metal layer (often gold or palladium). If our samples don’t have a conductive path to ground, we will experience charging and visual distortions across our sample.
What is charging?
If you’ve ever tried to hold two negative poles of a magnet together, you’ve felt a repulsive force. We are dealing with an electrostatic version of that negative-negative repulsion on a microscopic level.
When we shoot the surface of an object with these high energy electrons in a vacuum, and there is no conductive path to ground, those electrons can’t dissipate. They begin to accumulate in localized regions within the near-surface of the sample.
This buildup creates a local negative surface potential and an accompanying electrostatic field. This new field interacts with both the incoming beam as well as the low-energy secondary electrons being emitted from the sample surface. Since these secondary electrons are so low energy, even these really small changes in surface potential can have a measurable effect on their trajectories. This sometimes funnels more secondary electrons than expected into the detector, and sometimes can repel them away from the detector entirely. This creates the brighter and darker contrasting spots we see in images exhibiting charging.
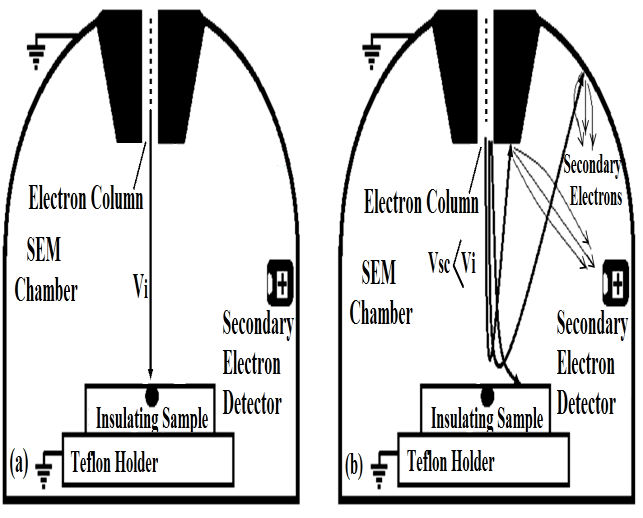
A great video by nanographs, showing this effect as described in the diagram above at the extreme. In this case the entire sample is overcharged, and the SEM ends up imaging the chamber itself instead of the sample. This is a fun effect to see, but its not very useful in most cases.
This repelling charging effect isn’t the only type of charging that can occur, but it does cause the most problems in SE (Secondary Electron) imaging modes.
Coating our samples, especially biological ones, greatly improves the signal and contrast you get out of your scope when scanning by cutting back on all of the field distortions that are caused by charge buildup.
How do we coat our samples?
There are many methods and materials to achieve fine metallic or carbon coatings on samples, this process is called Physical Vapor Deposition (PVD). Currently in our lab at the time of this writing the only way we can achieve PVD is through High-Vacuum-Evaporation, which works ok for most things, but is not without its drawbacks.
The Humble DV-502 High-Vacuum Evaporator
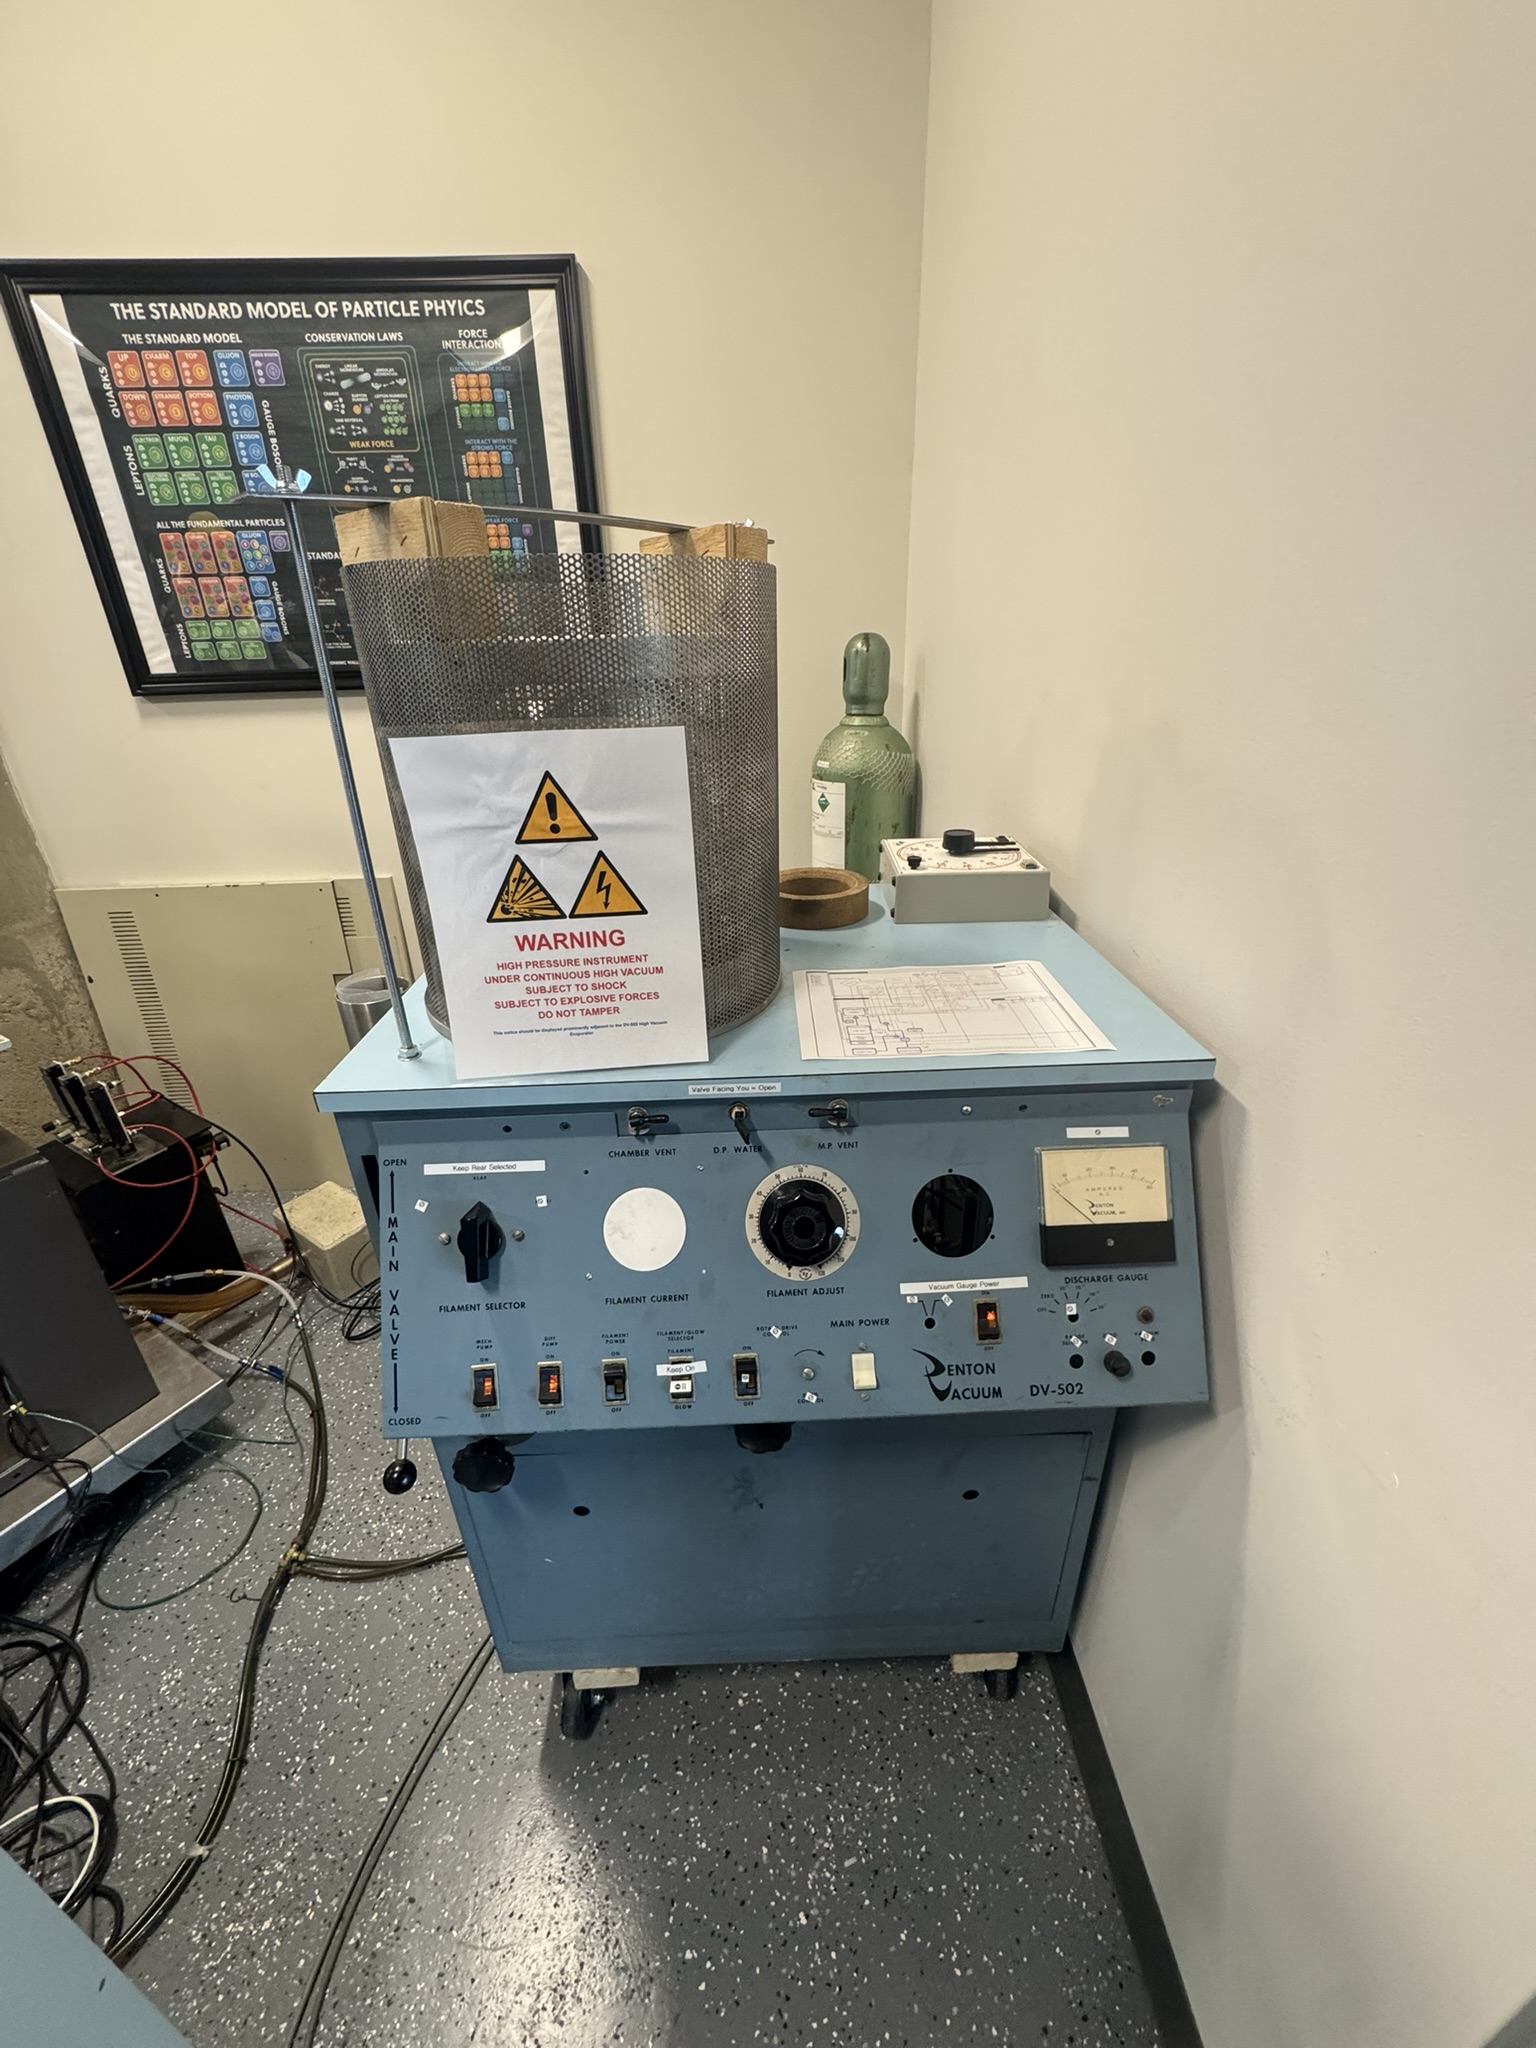
We achieve thin films on this machine through the following process:
- We first mount our sample upside down in the evaporator, so that the side we want to coat is facing the bottom of the chamber.
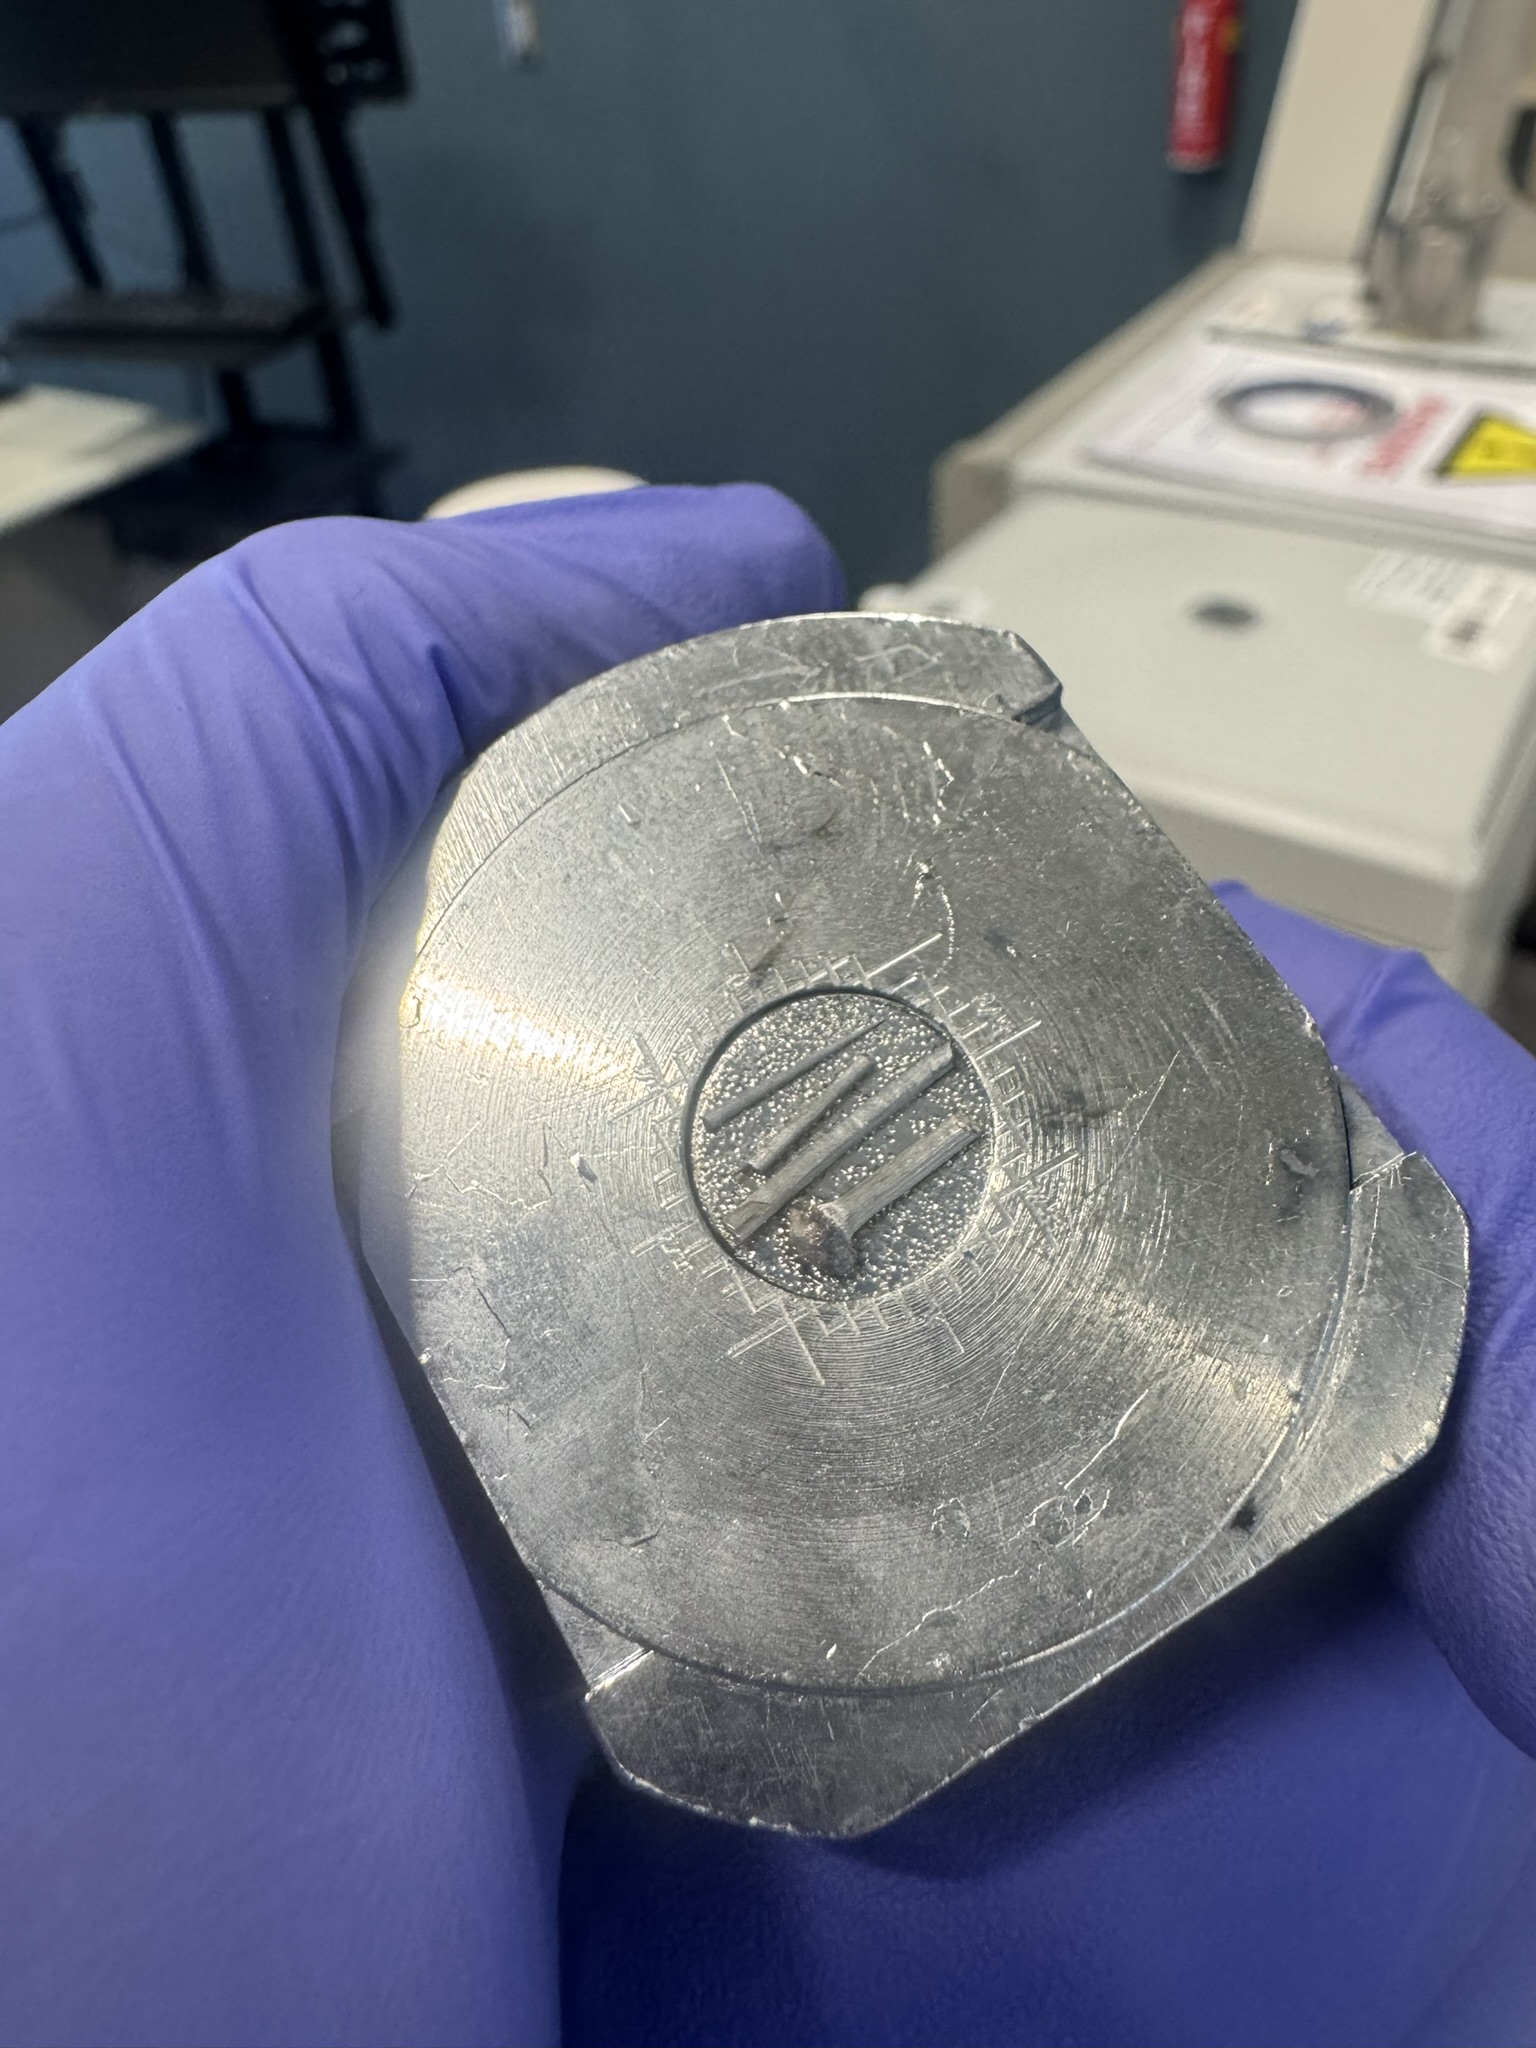
- We load up a tungsten boat that resides in the bottom of our chamber with a small piece of precious metal, typically silver. This faces towards the sample we mounted in step 1.
- We suck the air out of the chamber to a base pressure in the 10-6 Torr range. (It’s worth noting that our diffusion pump on this machine is currently 🍞 toast. So right now its more of a medium-vacuum-evaporator, we get to about 10-4 Torr typically, it’ll get its own post soon don’t worry 😛)
- Once the air is out, we heat up a tungsten boat to mind-boggling temperatures of ~1500°C-2000°C.
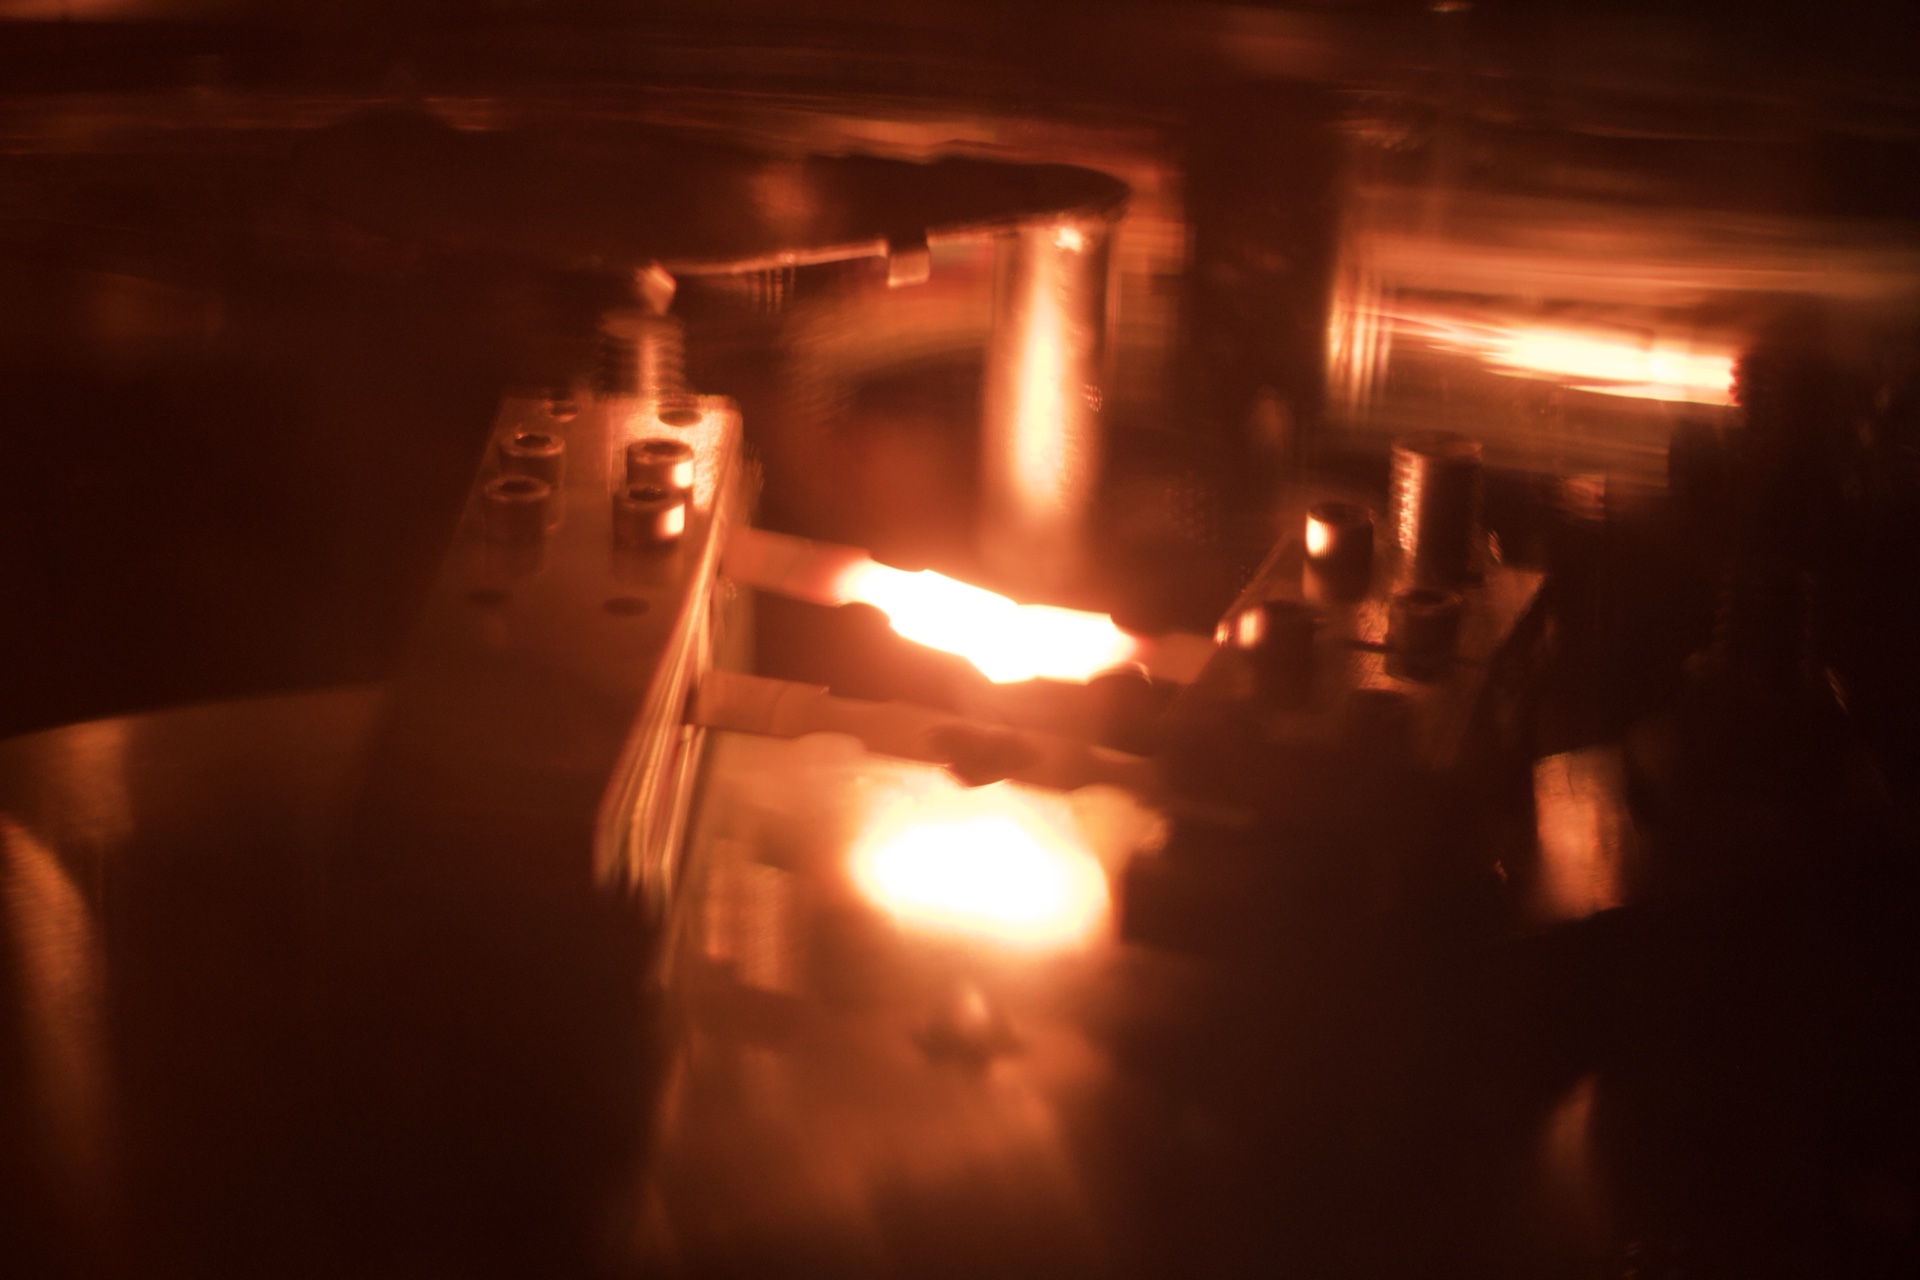
- With the air out of the chamber, and our tungsten having heated our silver to its evaporation point, a process called thermal evaporation begins. The metal evaporates in a line-of-sight fashion, and any part of the sample exposed to this line-of-sight will be coated in said metal.
- After 30-40 seconds of this, we have a nice thin film on our sample!
DV-502 Drawbacks
This process works great, but it has a few drawbacks that make it less than ideal for routine SEM sample preparation, especially when working with large samples, or more precious metals like gold.
Drawback 1: Ballistic Shadowing
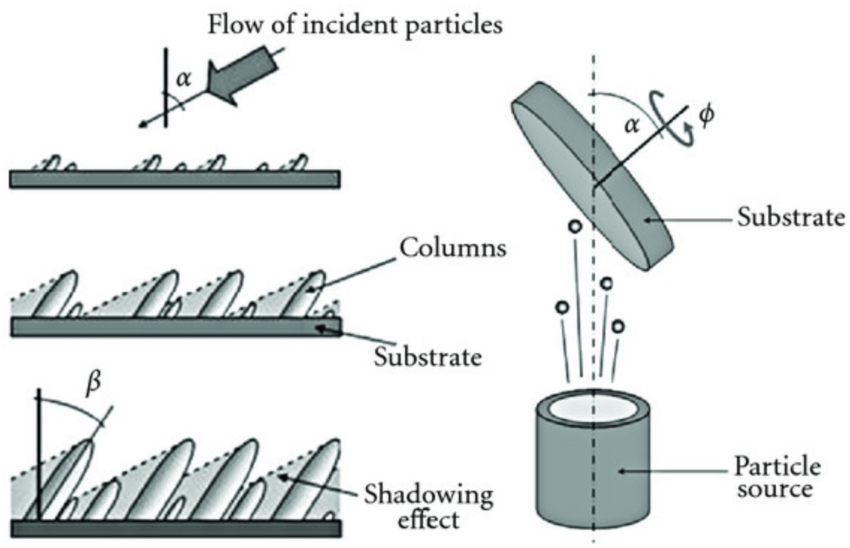
The geometry of the evaporating metal is quite interesting, the atoms flying off of the molten silver travel out ballistically line-of-sight through the chamber. Think of it almost like shining a flashlight into the chamber, but whatever that flashlight touches is instantly getting atoms of your metal deposited on it. Unfortunately, just like with light, any part of your sample covered in a “shadow” that doesn’t have direct line of sight to the molten silver, will not get coated / will be left in the shadows. This is referred to as the “ballistic shadowing effect”.
Ballistic Shadowing can be mitigated to an extent by rotating your sample while it is being coated, but our chamber doesn’t have the right feed-throughs right now for that, so we are a bit more limited.
Drawback 2: Cost of precious metals
To be honest, we could coat with gold right at this very second, the problem with this tungsten boat design is that this metal gets VERY hot and evaporates VERY quickly. Silver is one thing, we can get a good 2-3 minutes out of a small chunk of silver that costs us only a few bucks. Gold is a much different story, if we evaporated the amounts of gold in this machine that we do silver, it would cost many tens of dollars just to coat our small sample, that cost with silver is under a dollar per sample. We don’t really want to be destroying this much gold just to evaporate fractions of a percentage of that material onto our sample. It just doesn’t make economical sense.
Drawback 3: Silver kinda sucks as a coating
Silver works… fine? for a while. Its better than a lot of other metals, but it is also prone to oxidation. If you are only imaging something once, its a great option. If you want to scan that thing again in a year, silver might not be your best bet. The oxidation will degrade the coating which is going to worsten charge dissipation and can cause charge artifacts to start showing back up.
How do we fix these problems?
So, we need a system that isn’t susceptible to ballistic shadowing, and doesn’t require us to evaporate large amounts of material to get a good coating, and won’t immediately destroy any gold we put in it. How can we fix all of these problems at the same time?
Enter the Sputter Coater
These systems use a low atmosphere flushed with argon, combined with a gold (or other precious metal) sputter target, to make a plasma of argon ions that knock gold off of the target. These neutrally charged gold atoms then deposit on the samples in a scattered fashion that will cut back on ballistic shadowing effects.
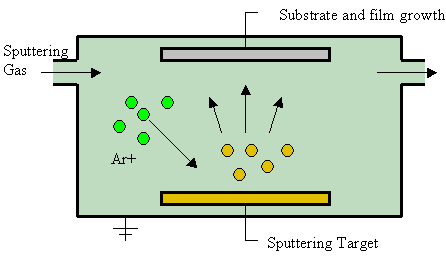
This process wastes far less gold than evaporative coating, as the gold target is not heated to the point of evaporation, but rather is bombarded by argon ions generated in a plasma. These ions knock gold atoms off of the surface of the target (target in this context just means the sacrificial piece of gold that is getting its atoms knocked onto our sample). These neutral gold atoms then travel through the low-pressure argon atmosphere, undergoing collisions that broaden their trajectories before they deposit on the sample. Because their paths are more randomized by these collisions, they approach our sample at a greater variety of angles than they would in an evaporative system. As a result of this we end up with reduced ballistic shadowing effects on our sample.
So, seems like we kind of need a sputter coater, right?
Acquiring our sputter coater
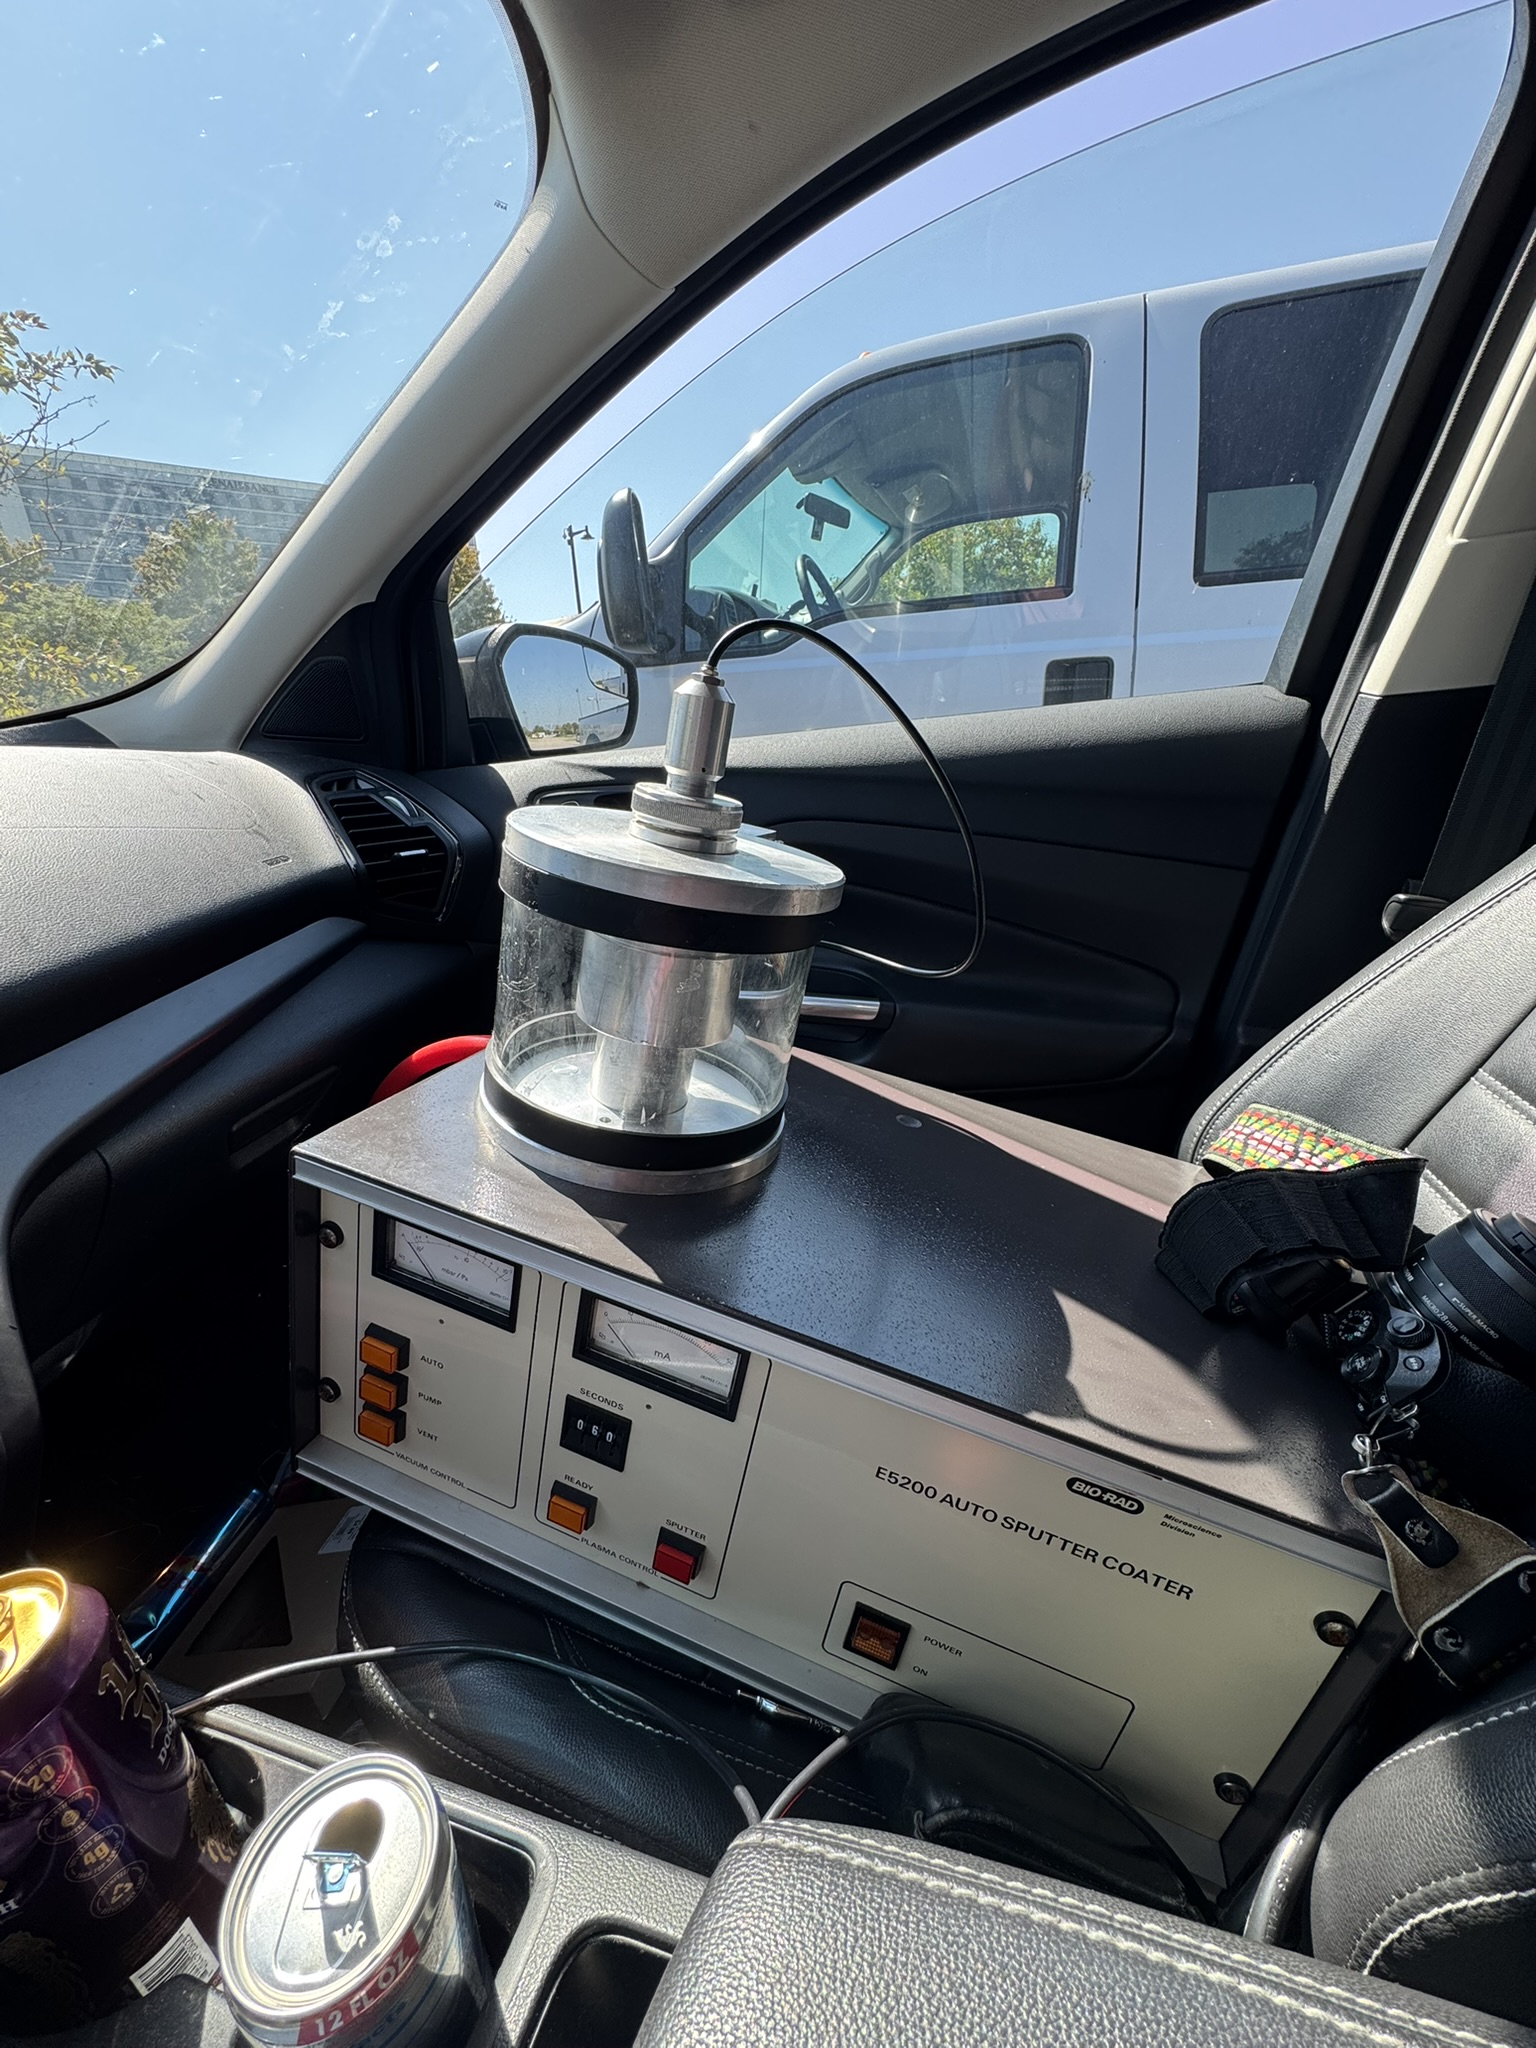
We recently purchased a second hand sputter coater so that we can accomplish fine grained gold coating inside of our lab. I got a great deal on it from another member of the SEM community. I paid $500 for the whole system. This is by some measures a lot of money for what I got, a husk of a non-functional machine, but when you look at what PVD systems go for new, $500 seems like a great deal.
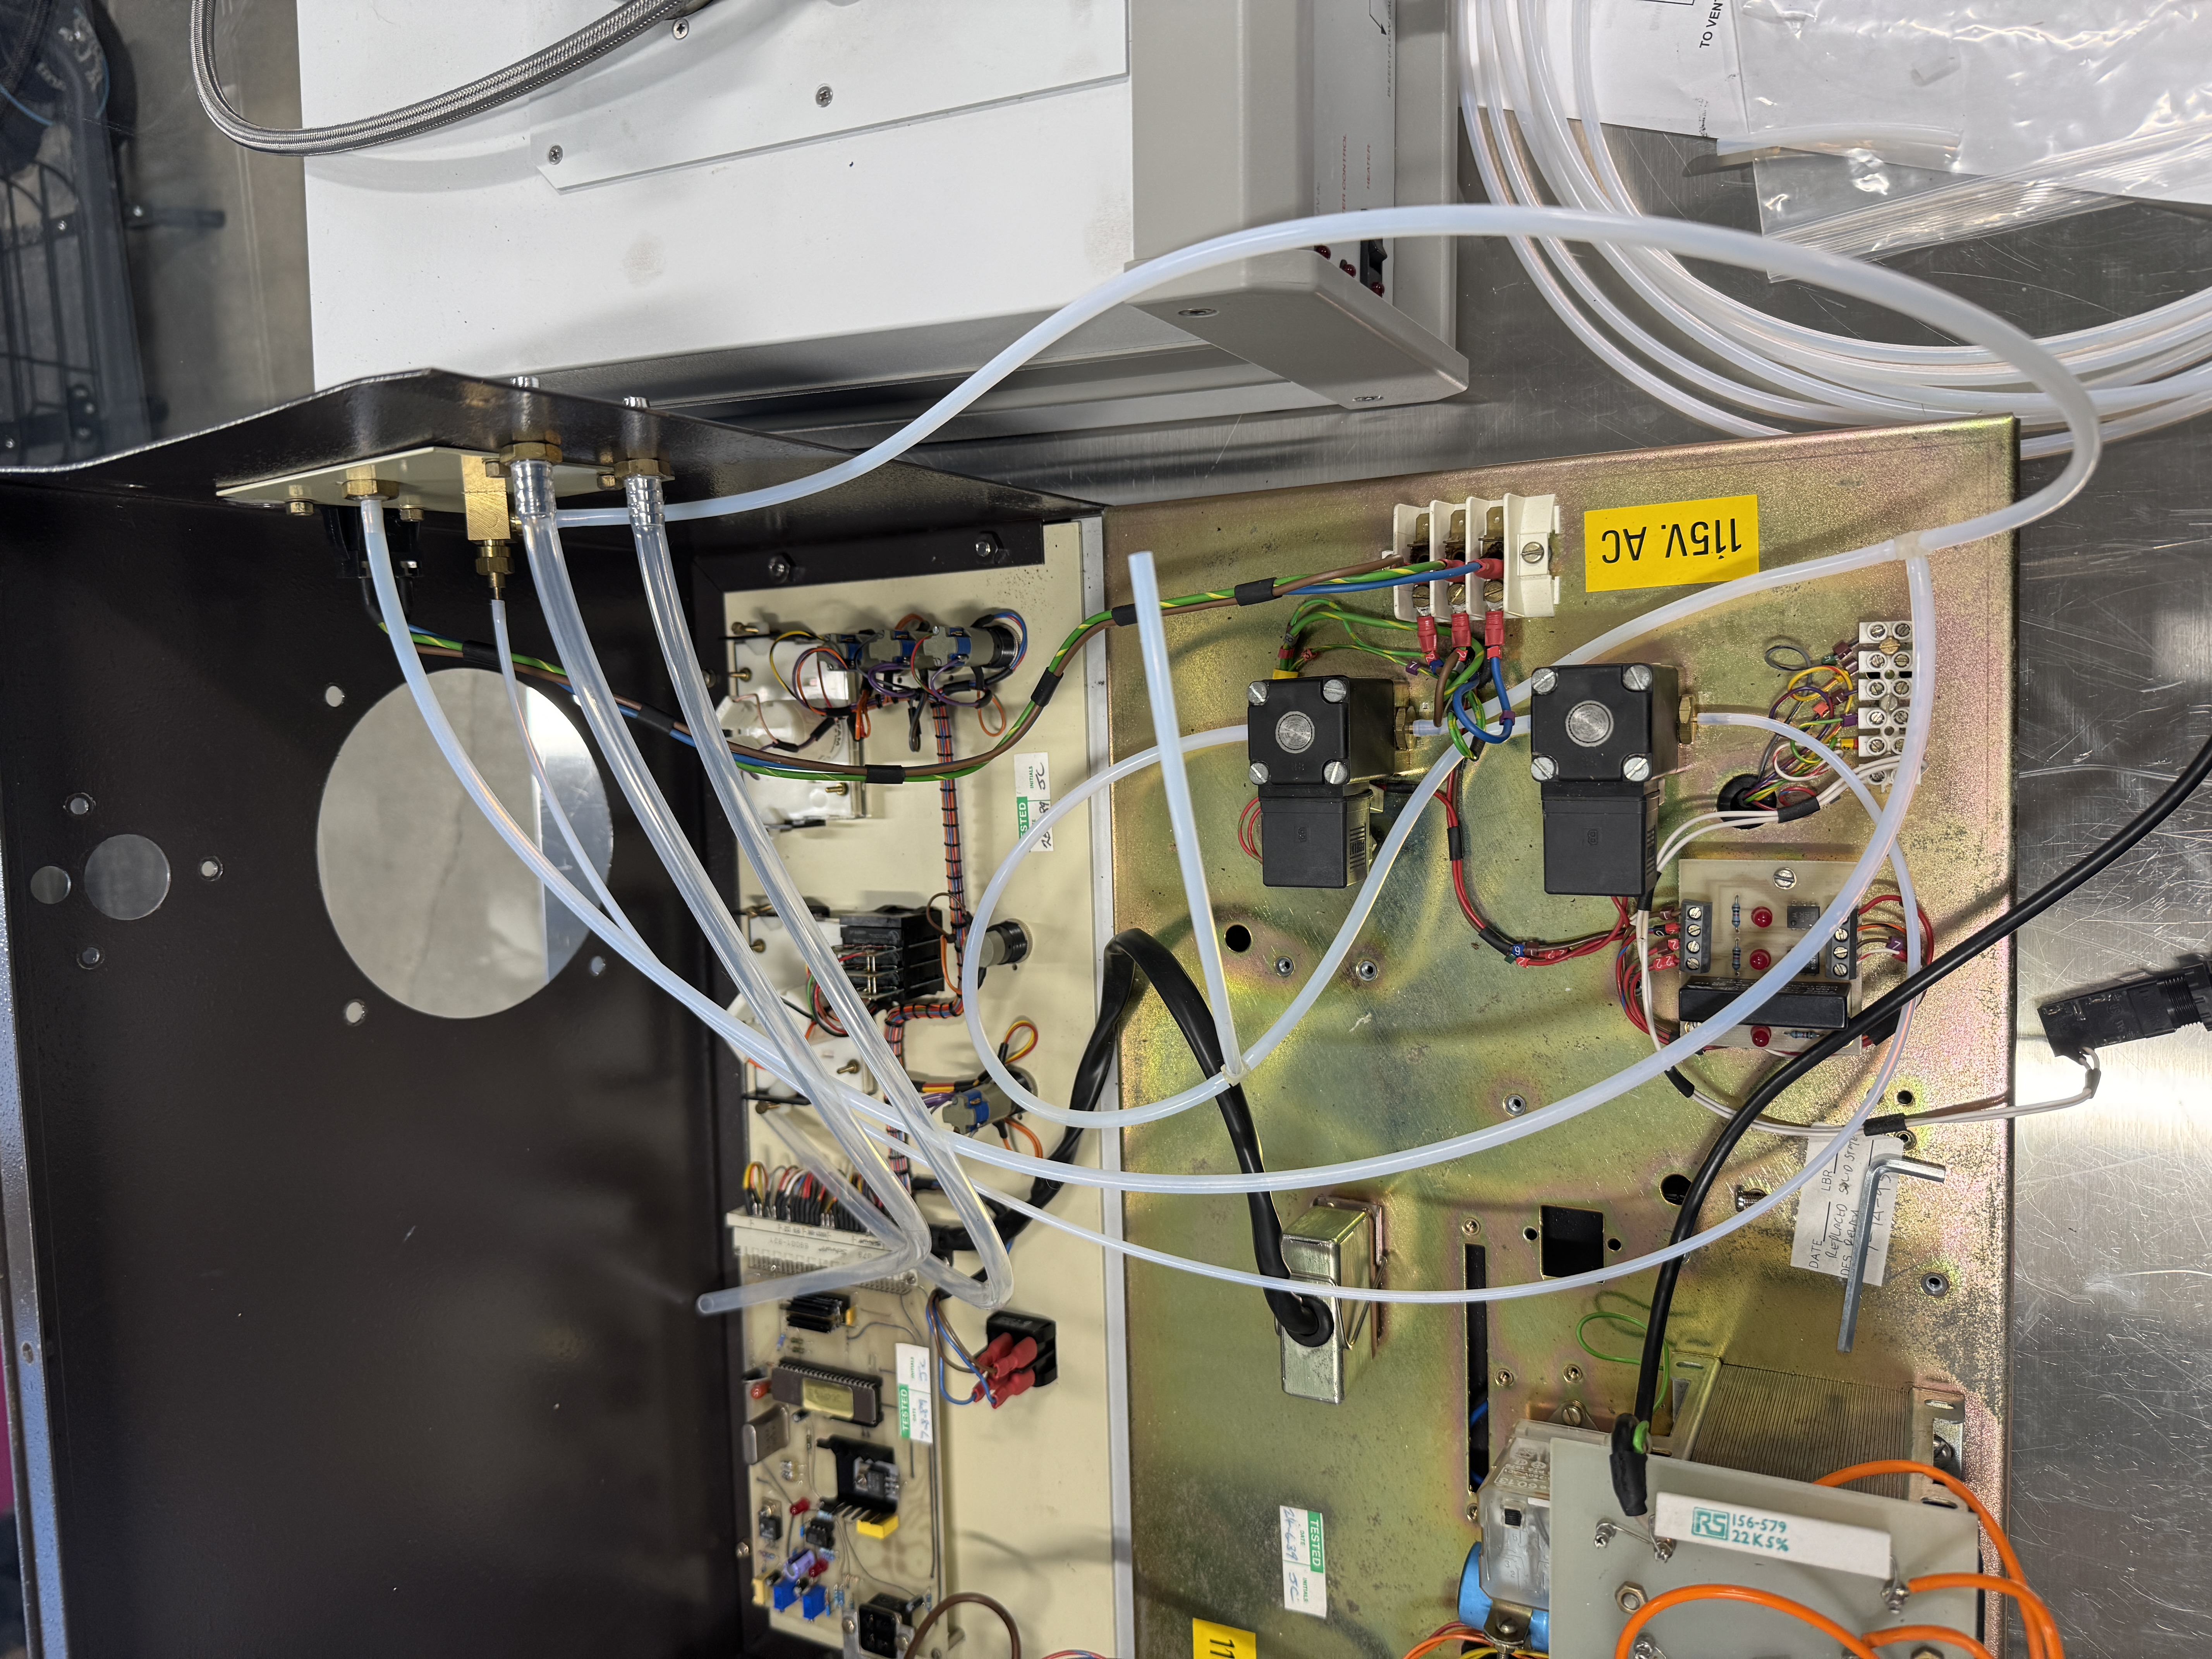
Opening it up when I get back to the lab, I notice its sputter head is a bit unusual, compared to most of what I have seen floating around. The plasma geometrey is a bit different and we see these large magnets presumably to assist with plasma confinement.
It was manufactured by a company called BioRad here in the US. This BioRad coater was likely produced some time in the mid-eighties, the schematics in the manual I got with this have a date of 4-22-81. The company has since moved on from this sort of equipment, and centers strictly around life sciences now. The last service sticker inside is from 1998, it has likely been at least that long since it has seen official service.
There are quite a few problems that must be fixed with this machine before it will operate correctly, these issues are tracked below in the “Repair Log” section.
Repair Log
This is a working list of every issue with this machine, and the status of each repair. This list will be updated as we make progress on each issue. Issues prefixed with a ✅ have been completed, and issues prefixed with a ⚠️ are still in progress.
Current Priorities:
Currently, the most important thing is to get this system vacuum capable again, and then to get a good plasma going with a cheap metal foil. Once we verify that works, we will proceed with ordering the gold target.
✅ Glass Dome Chipped
When we first got this coater, there was a large ~1mm chip on the bottom edge of the chamber glass. This was a huge issue as it obviously would not seal to vacuum in this configuration, and also created a significant implosion risk.
We took this glass over to S&S Optical here in town, who lapped down the entire surface of the bottom glass about 2mm. This resolved the chip which will let us pull vacuum, and also eliminated the risk of violent disassembly of glass components. As an aside, these guys were some of the most professional and knowledgeable people I have had the pleasure of talking to. These guys are working on some insane projects partnered with national laboratories. To call S&S a glass company would be insulting, they are straight up optical wizards and I am pretty sure they can make anything out of glass. Shoutout to my man Scott!
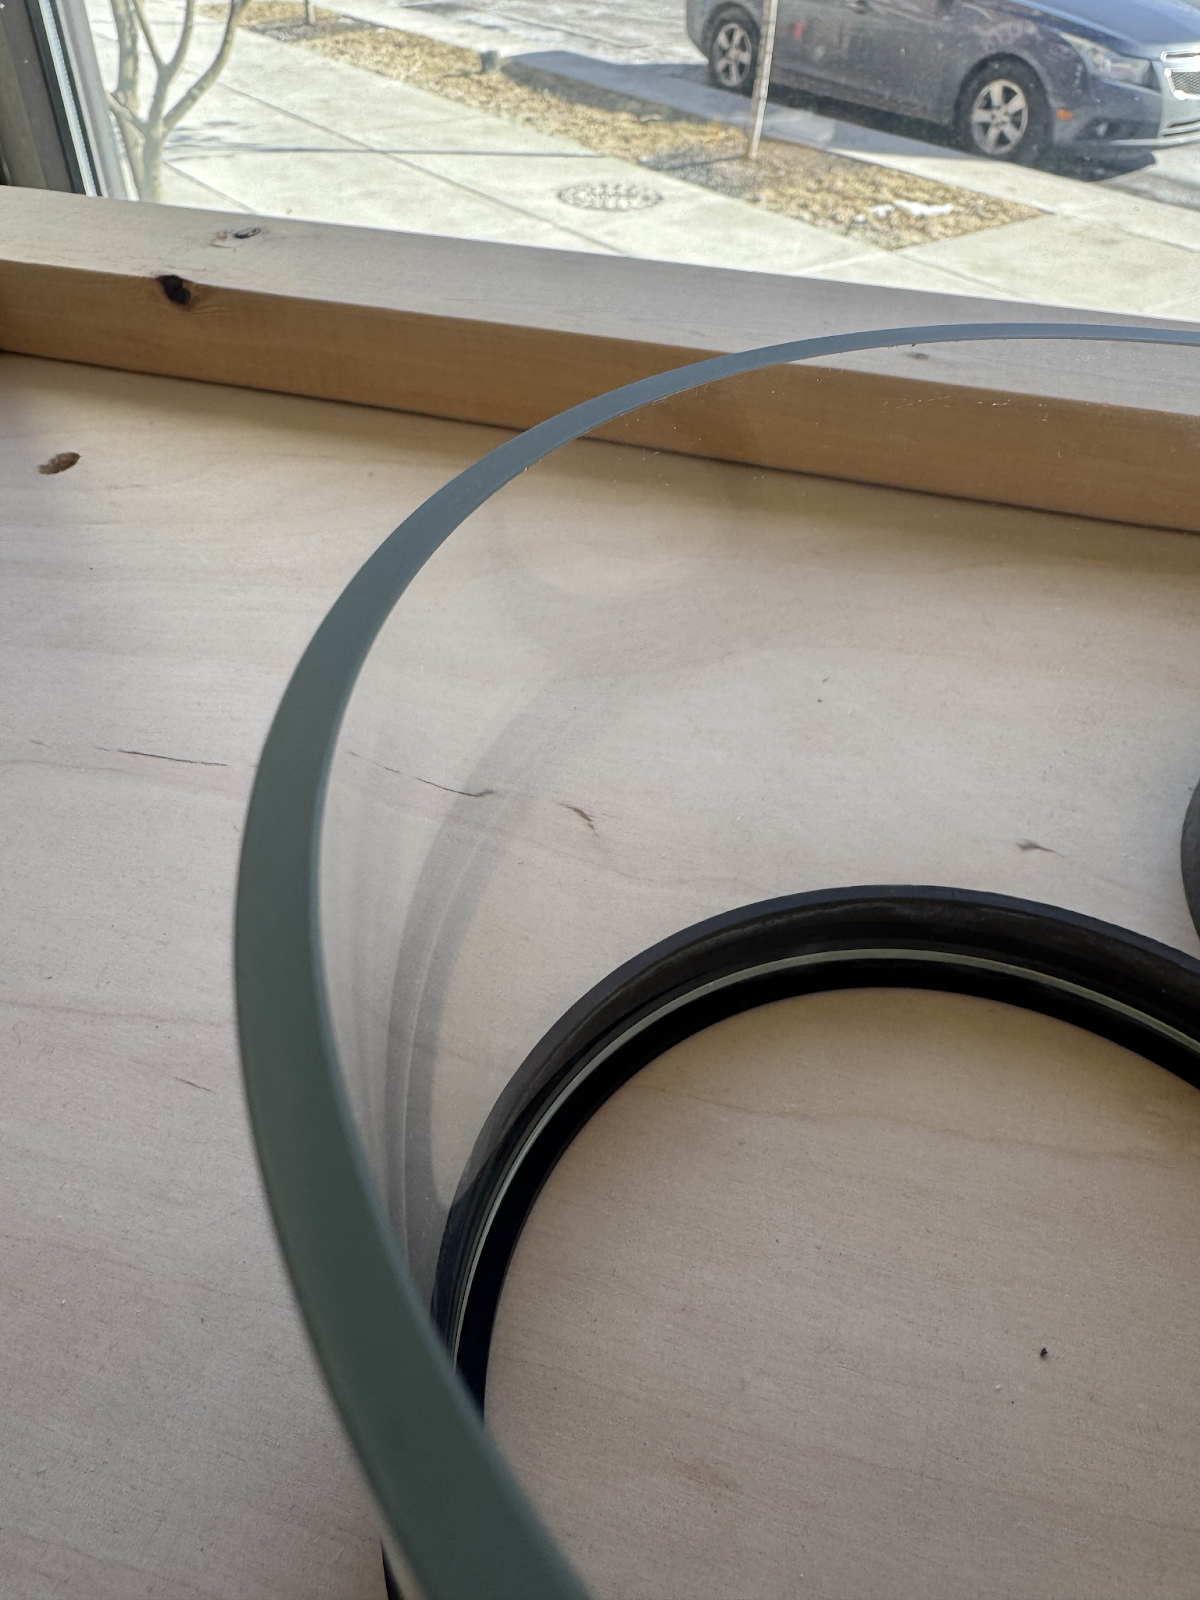
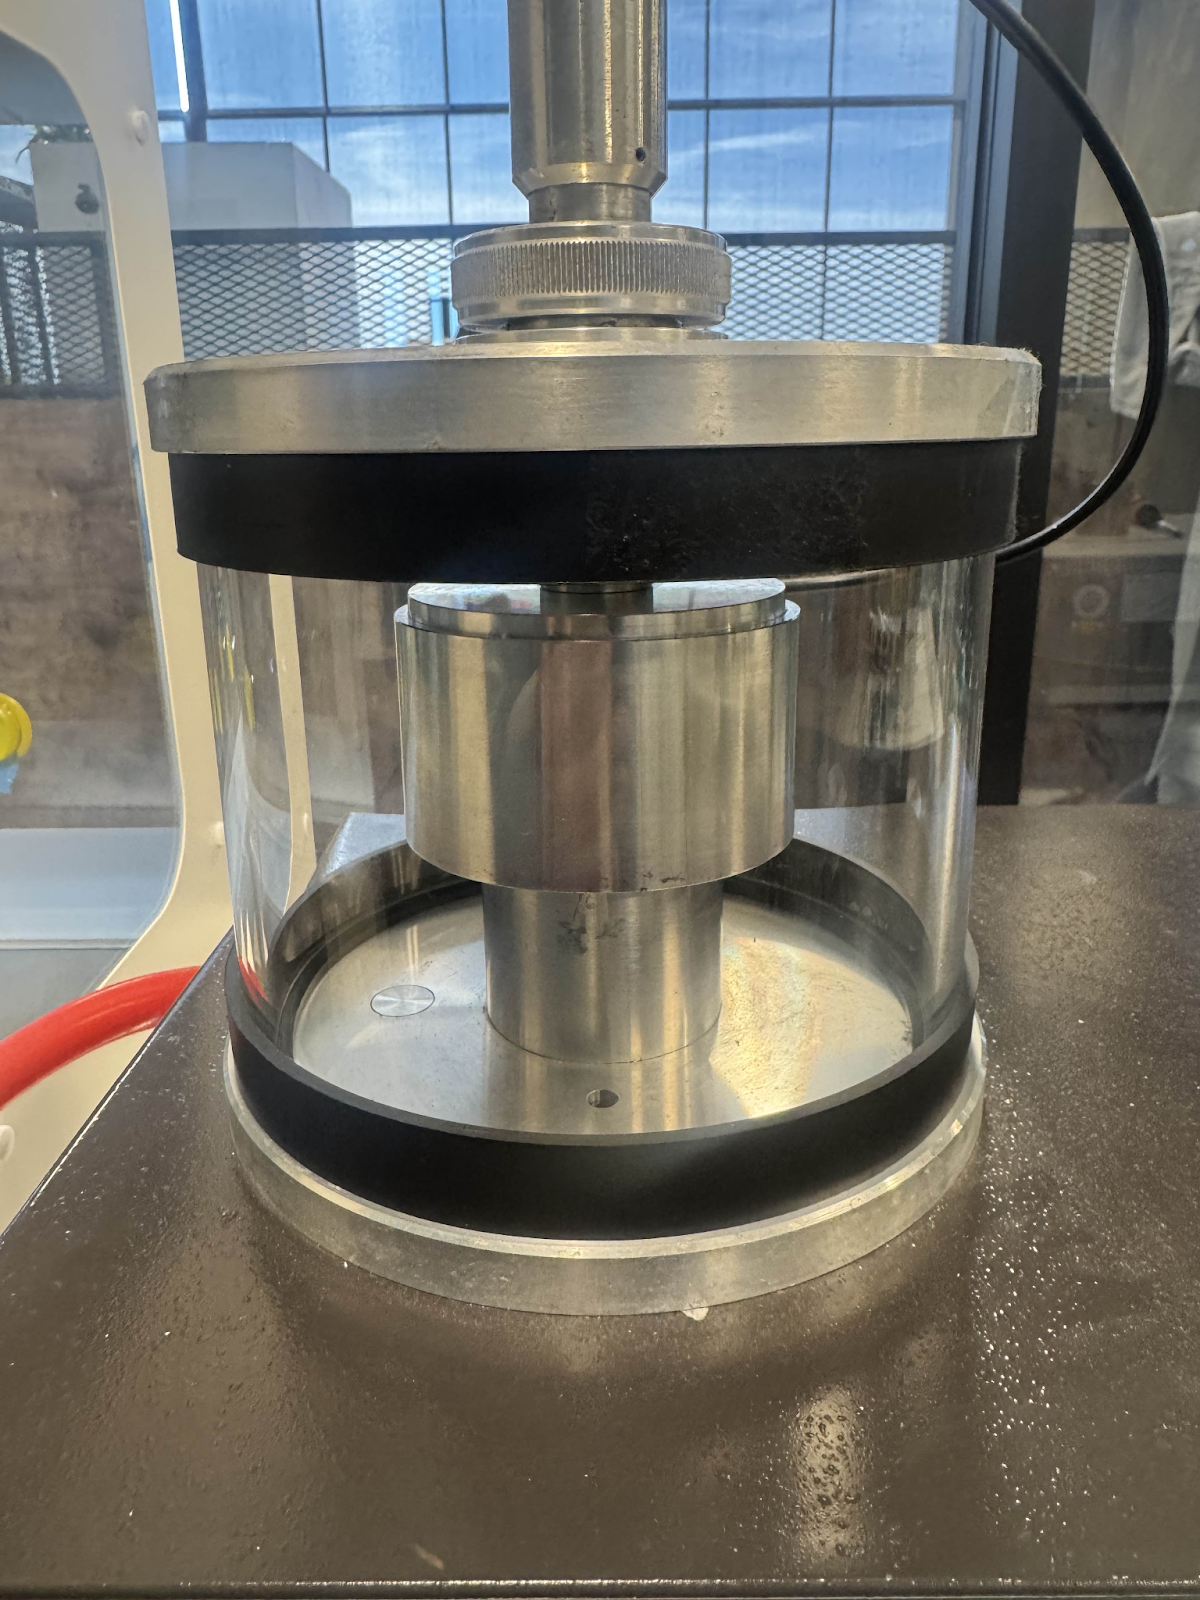
Even with the missing 2mm, the glass fits perfectly inside the assembly still. There is a lot of slack both in the hinge, and a lot of room to move components up and down in the stack to get them sitting at the correct heights. From a construction standpoint, the chamber is ready to go!
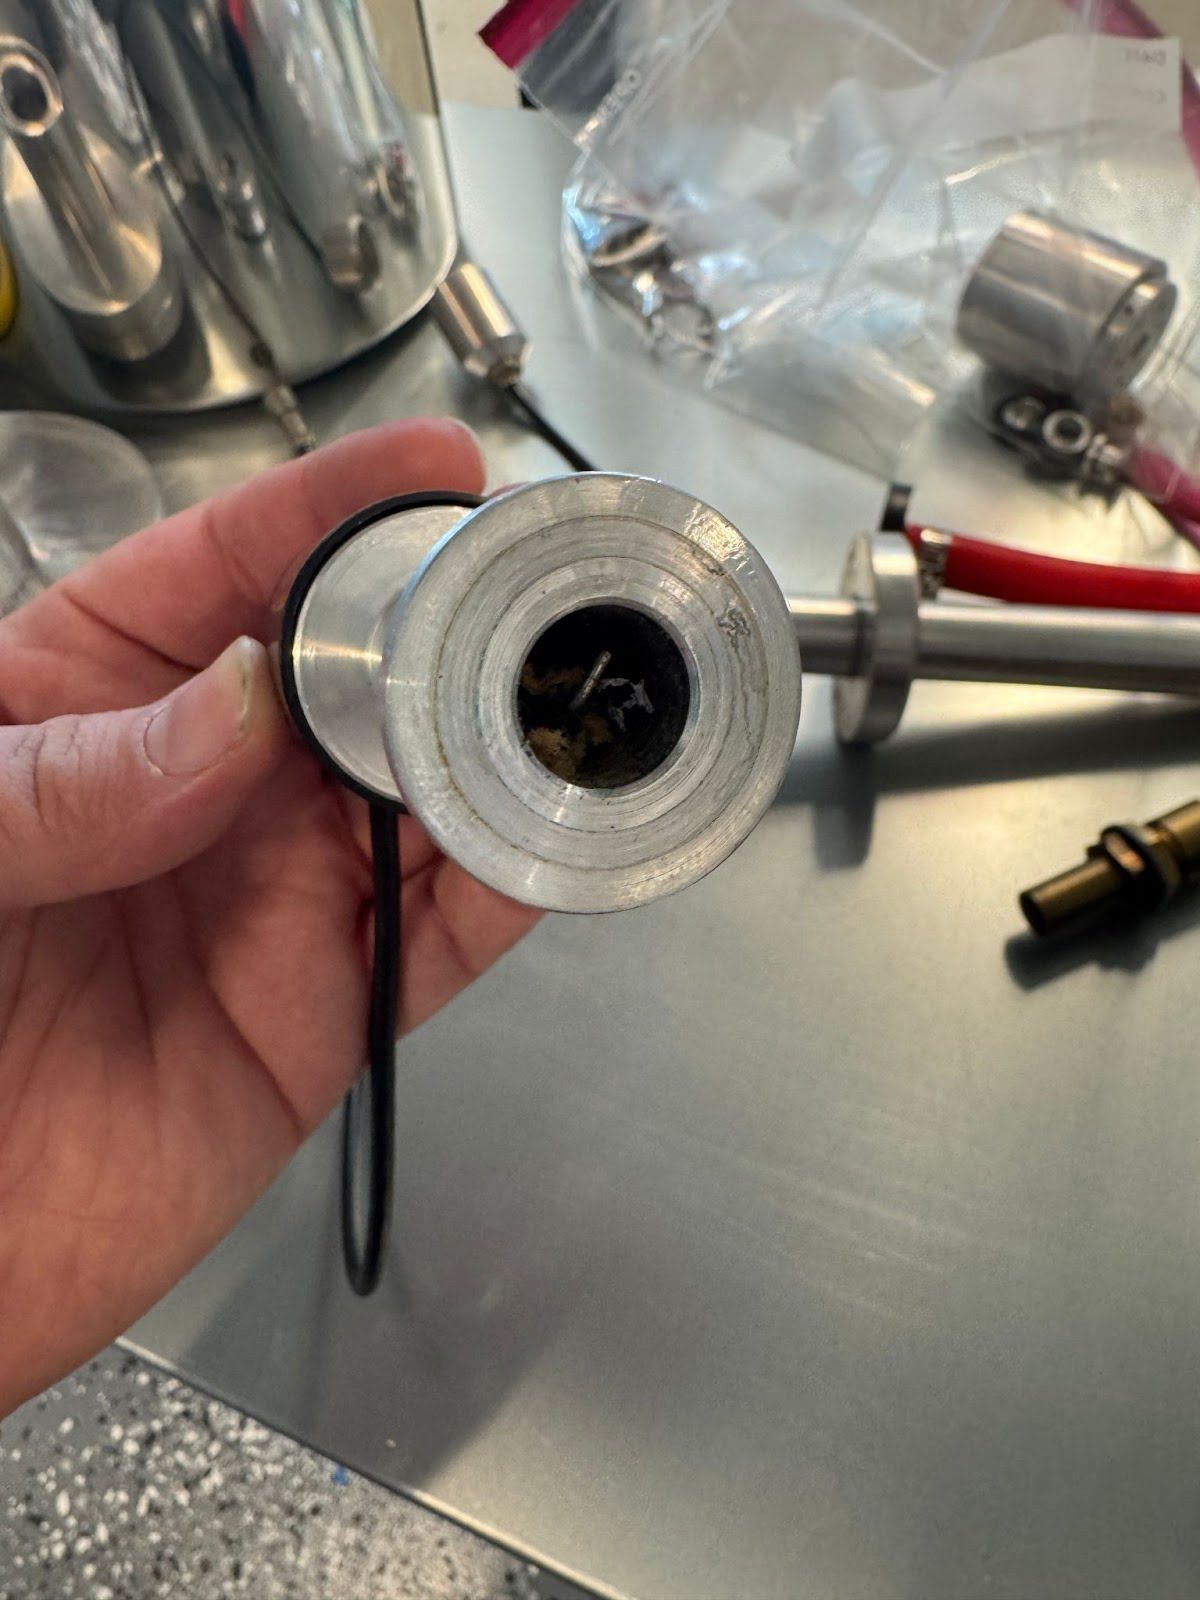
⚠️ Missing Gold Target
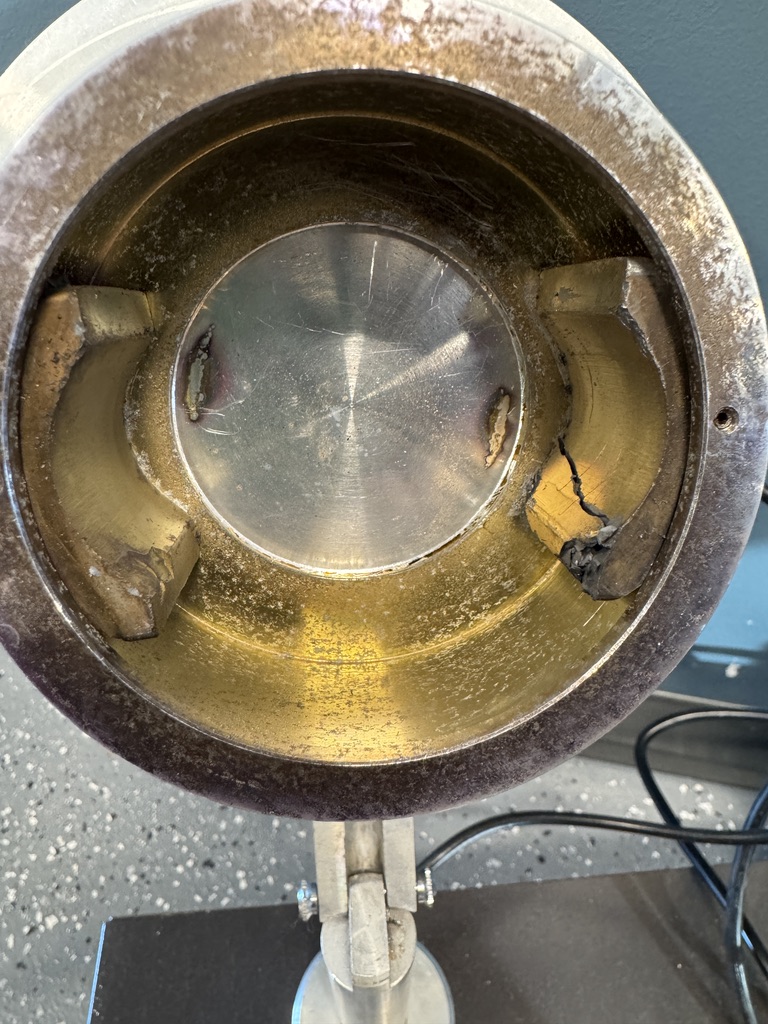
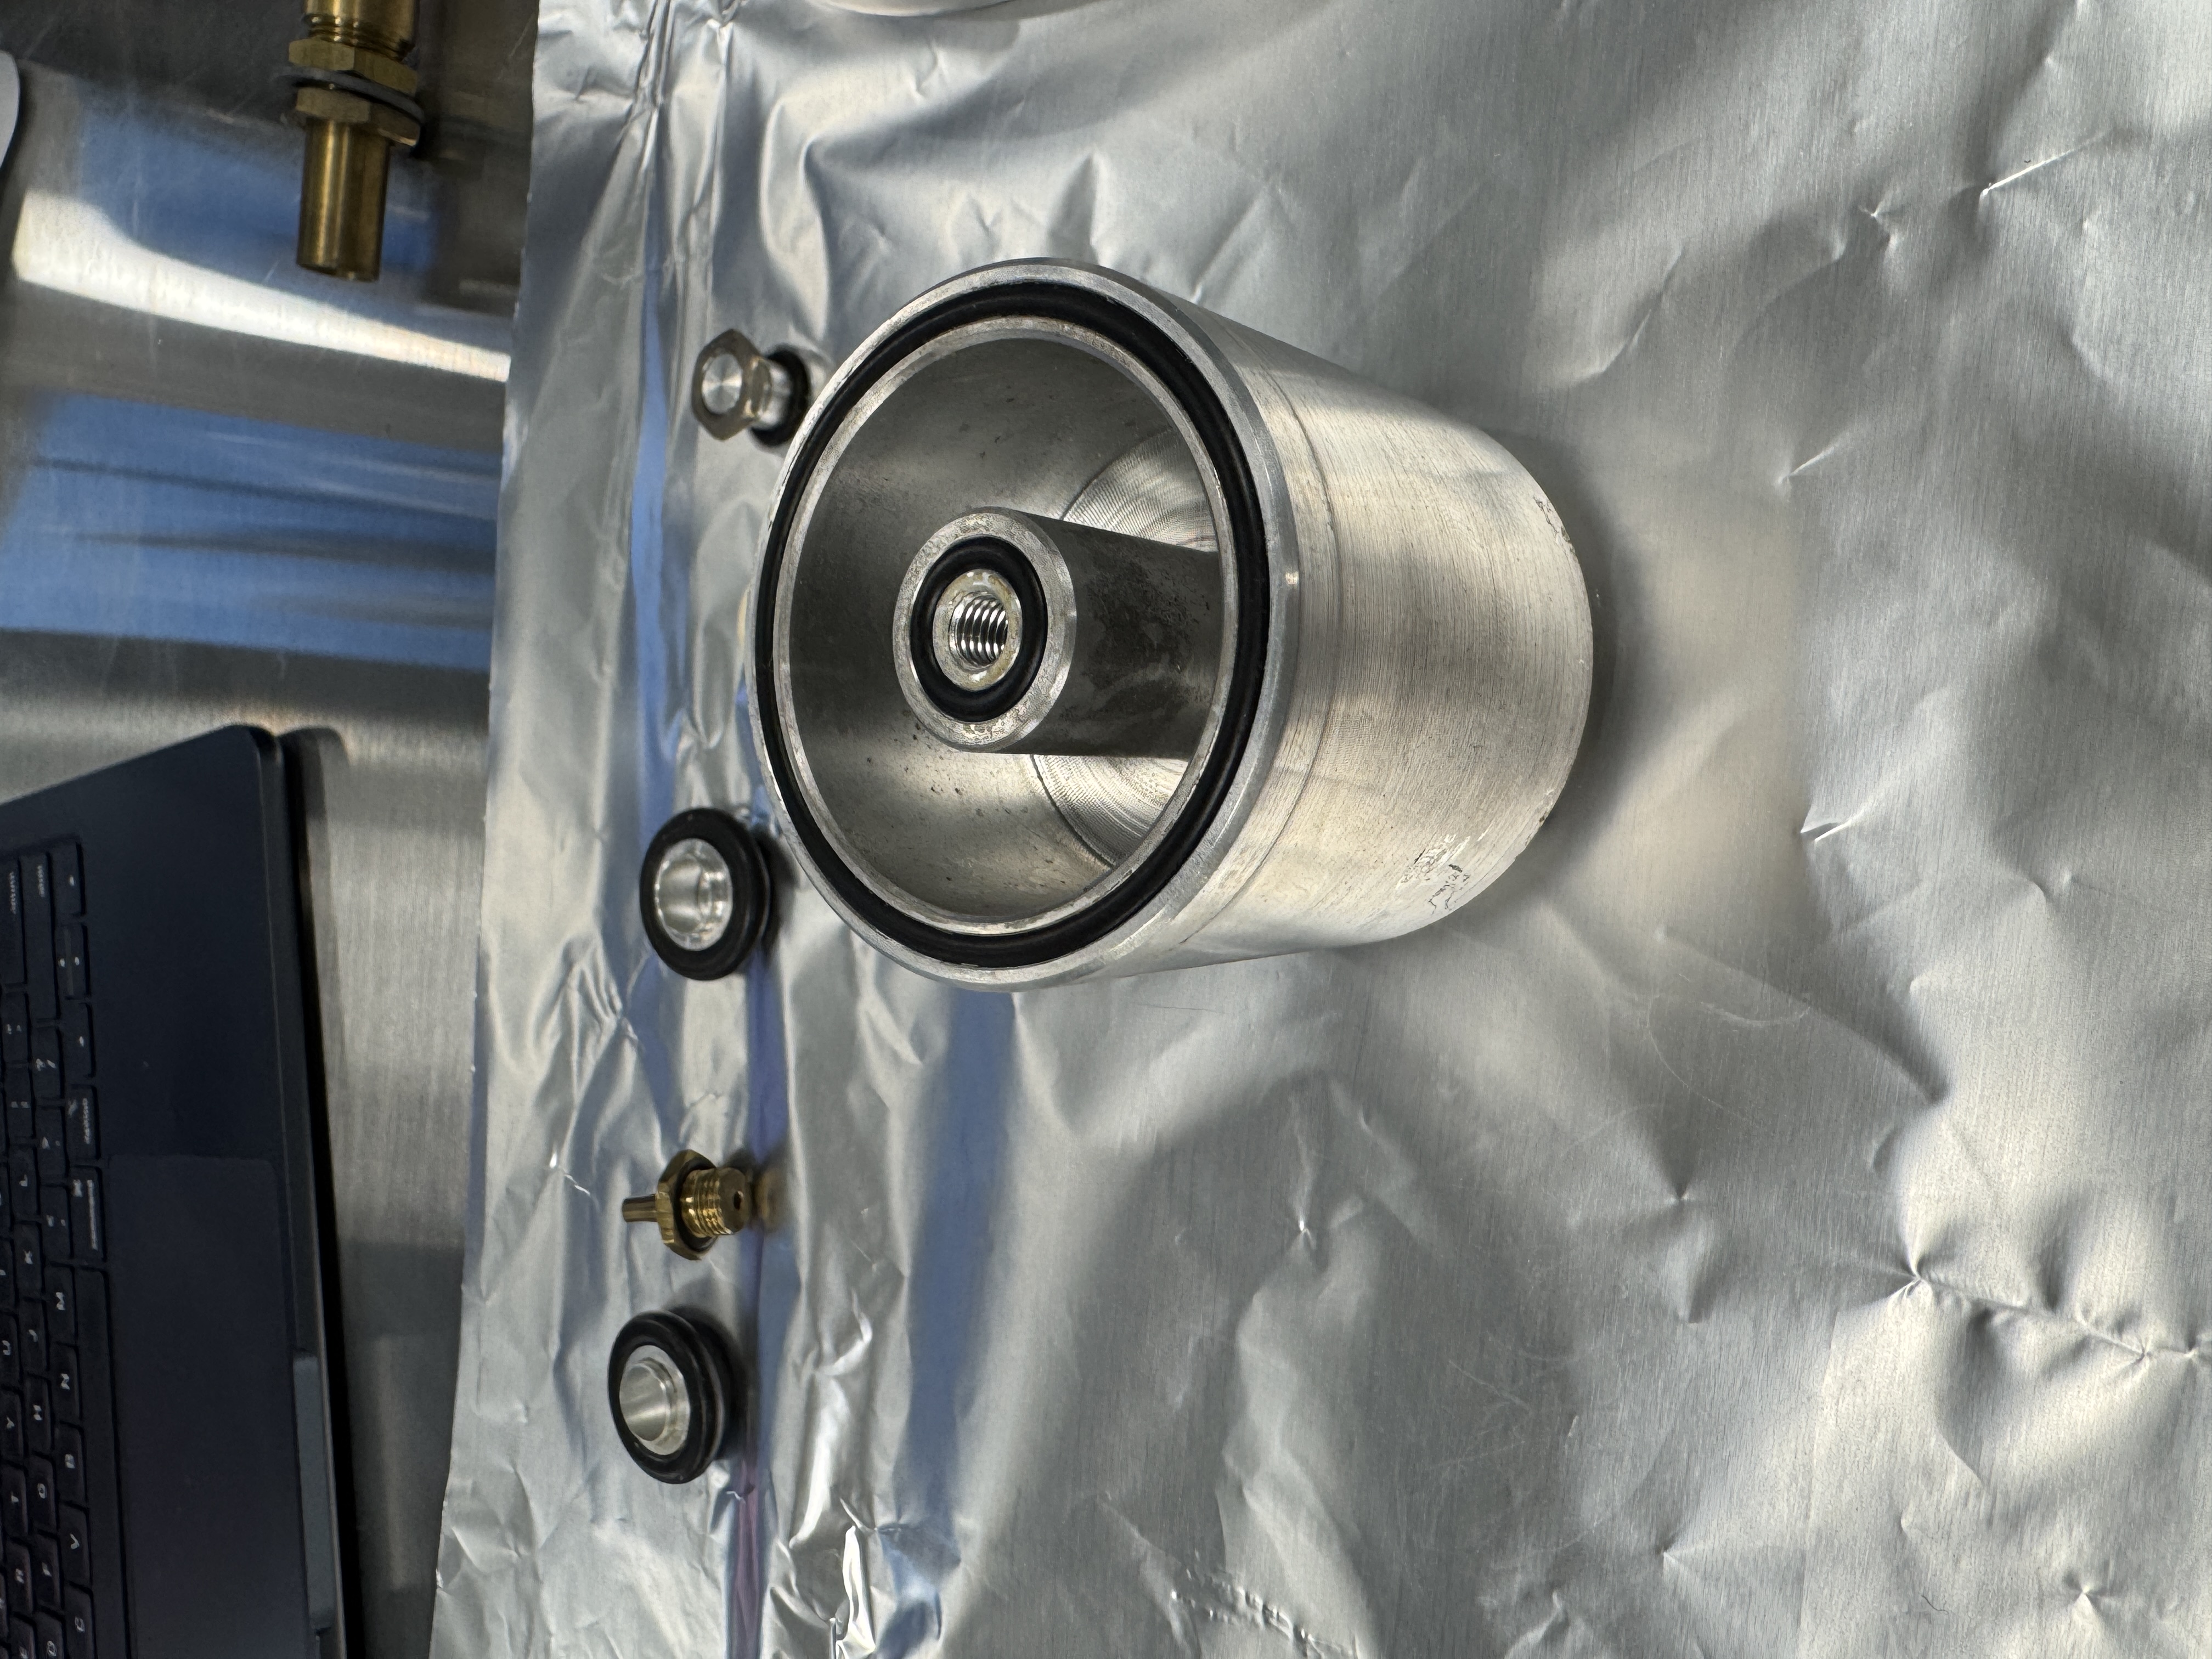
The gold target that originally came in this machine is missing. We were able to disassemble the sputter head and learned we need a disc that is 57mm to cover the entire magnetron.

Shown here is the exposed sputter head, there is a slip ring that screws around this to secure / press the gold target up against the magnetron. The surface of this disc is exactly 57mm across, this leaves me to believe it was originally designed for 57mm sputter targets, which are still source-able. I was originally planning on making a target from a gold coin, but if I can find one for a reasonable cost, I would prefer to just go pre-made.
The slip ring that surrounds this has an additional lip on it to secure and hold the edges of the target down. This ring is roughly 1.5mm thick, which gives us about 1mm of play in the size our target can be below 57mm and still be effectively clamped into place.
I reached out to a couple companies for quotes on a 99.99% Au 57mm target. I initially reached out to Birmingham Metals, which was quick to get me a quote. Unfortunately, I supplied them with the wrong target thickness so my quote came back much more expensive than I was expecting. After more searching, I found that EMS sells the exact target size I need for this machine.
Once we can confirm this machine actually makes a plasma, we will order this target as the last step of our rebuild process, and hopefully will be sputtering away!
Action Items
- Confirm machine makes a good plasma from a different target (aluminum might be a good test target)
- Order the gold target from EMS
- Install the gold target in magnetron housing
⚠️ Dirty Pirani Gauge
After disassembling the vacuum system and pulling the Pirani gauge out, I noticed it was absolutely chaulk full of random debris. This is not great. We need to gently clean what we can with low airflow and hand tools, and then get it into an ultrasonic cleaner. The gauge itself should be replaceable by a similar model if cleaning doesn’t yield a good result.
Using the same procedure we used to clean the SEM gun internals more or less should do the trick. If not, it uses a standard vac connector from back in the day.
Action Items
- Run cleaning procedure on Pirani gauge
- Test gauge and ensure it still functions properly in the rebuilt system
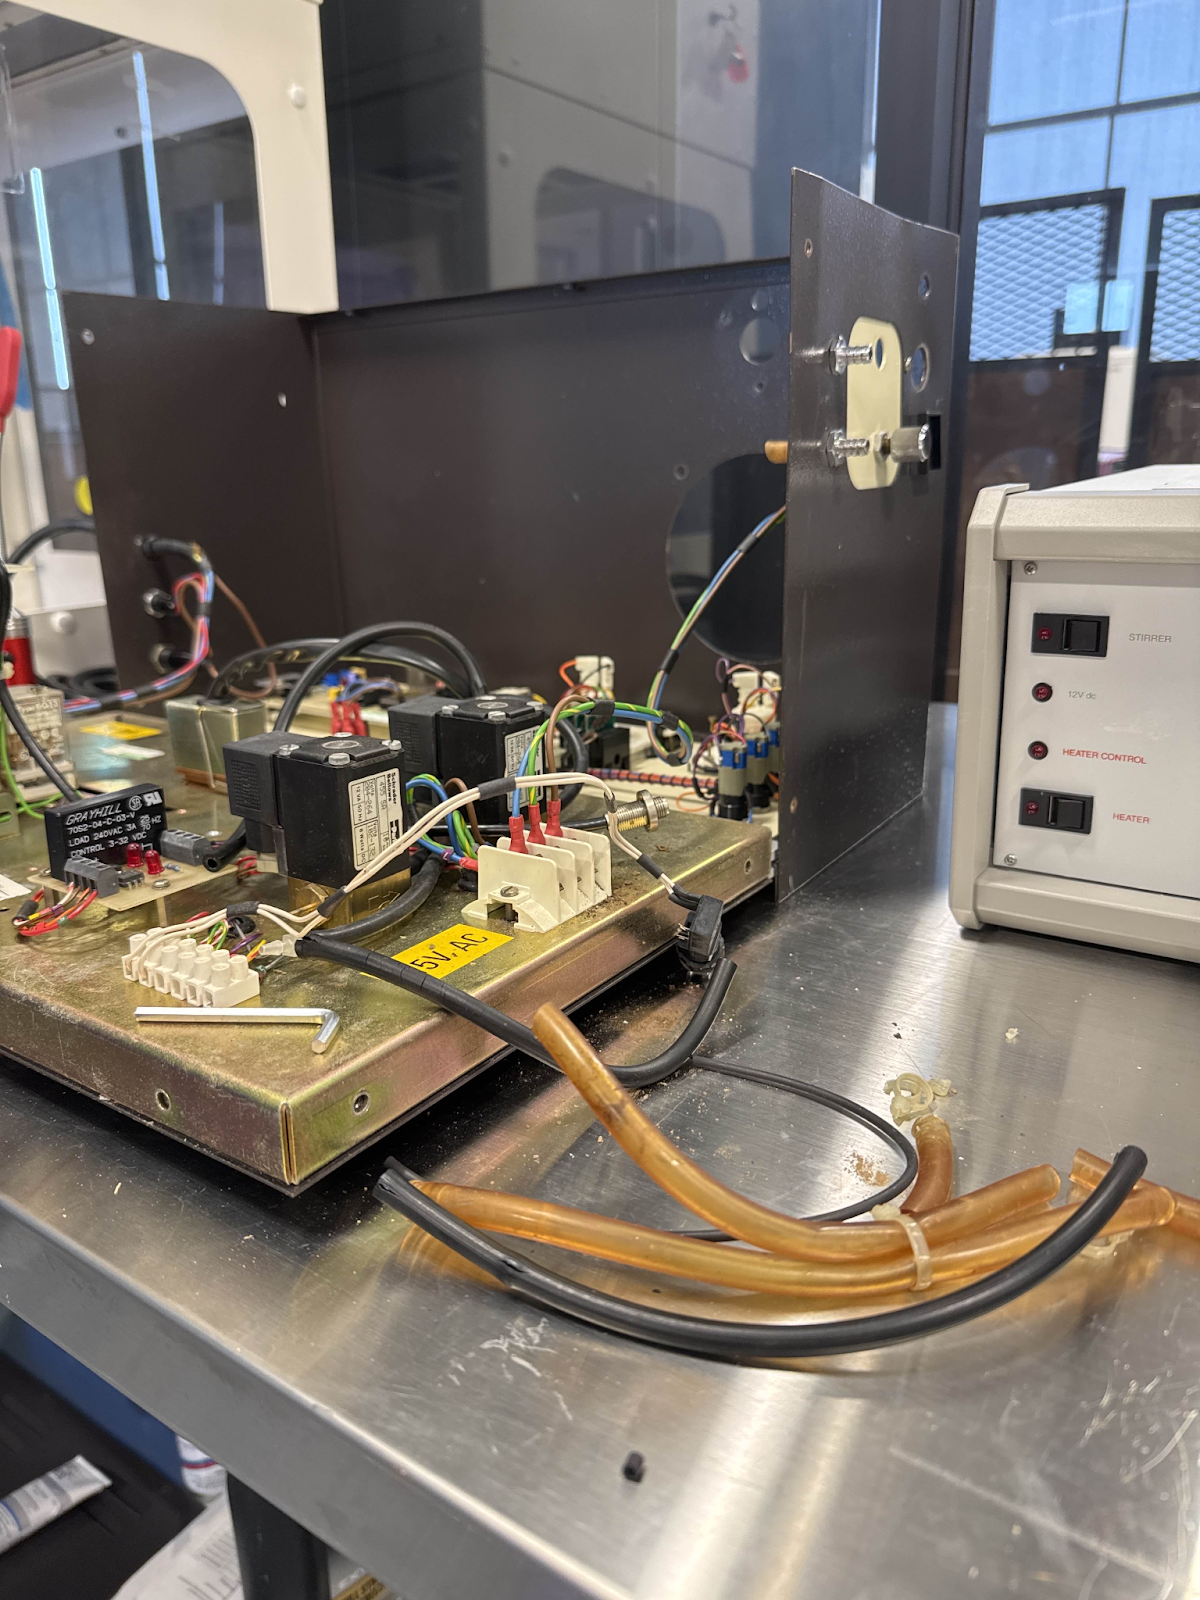
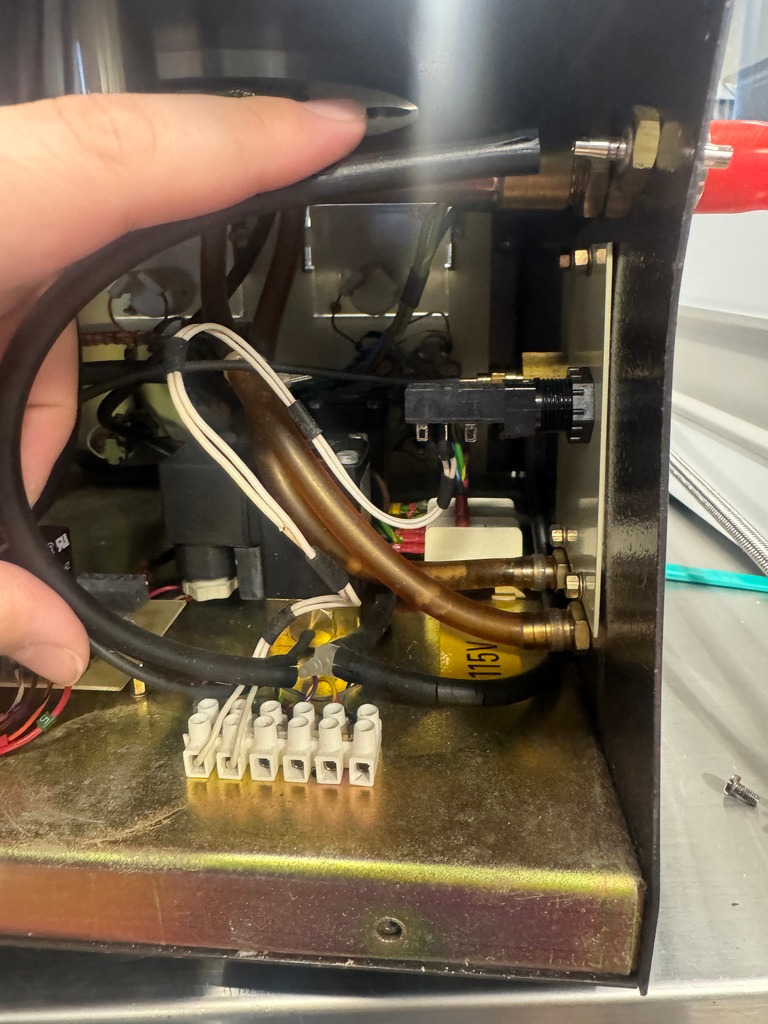
🚧 Dirty Water Lines & No Chiller
The water lines were so full of bugs and debris that they needed to be fully replaced. Currently, we have opened the machine and cut the old lines out.

I ordered some silicone tubing on Amazon to replace the old rotted water lines. These should be the right length and ID to work just fine.
Update 4/10/26
It got here recently, and I was able to perform a test-fit. This stuff works just fine and provides a tight connection around the hose barbs. This + a hose clamp should have us in-business for new water lines!
I will get to cutting these to length and installing them very soon.
Update 4/21/26
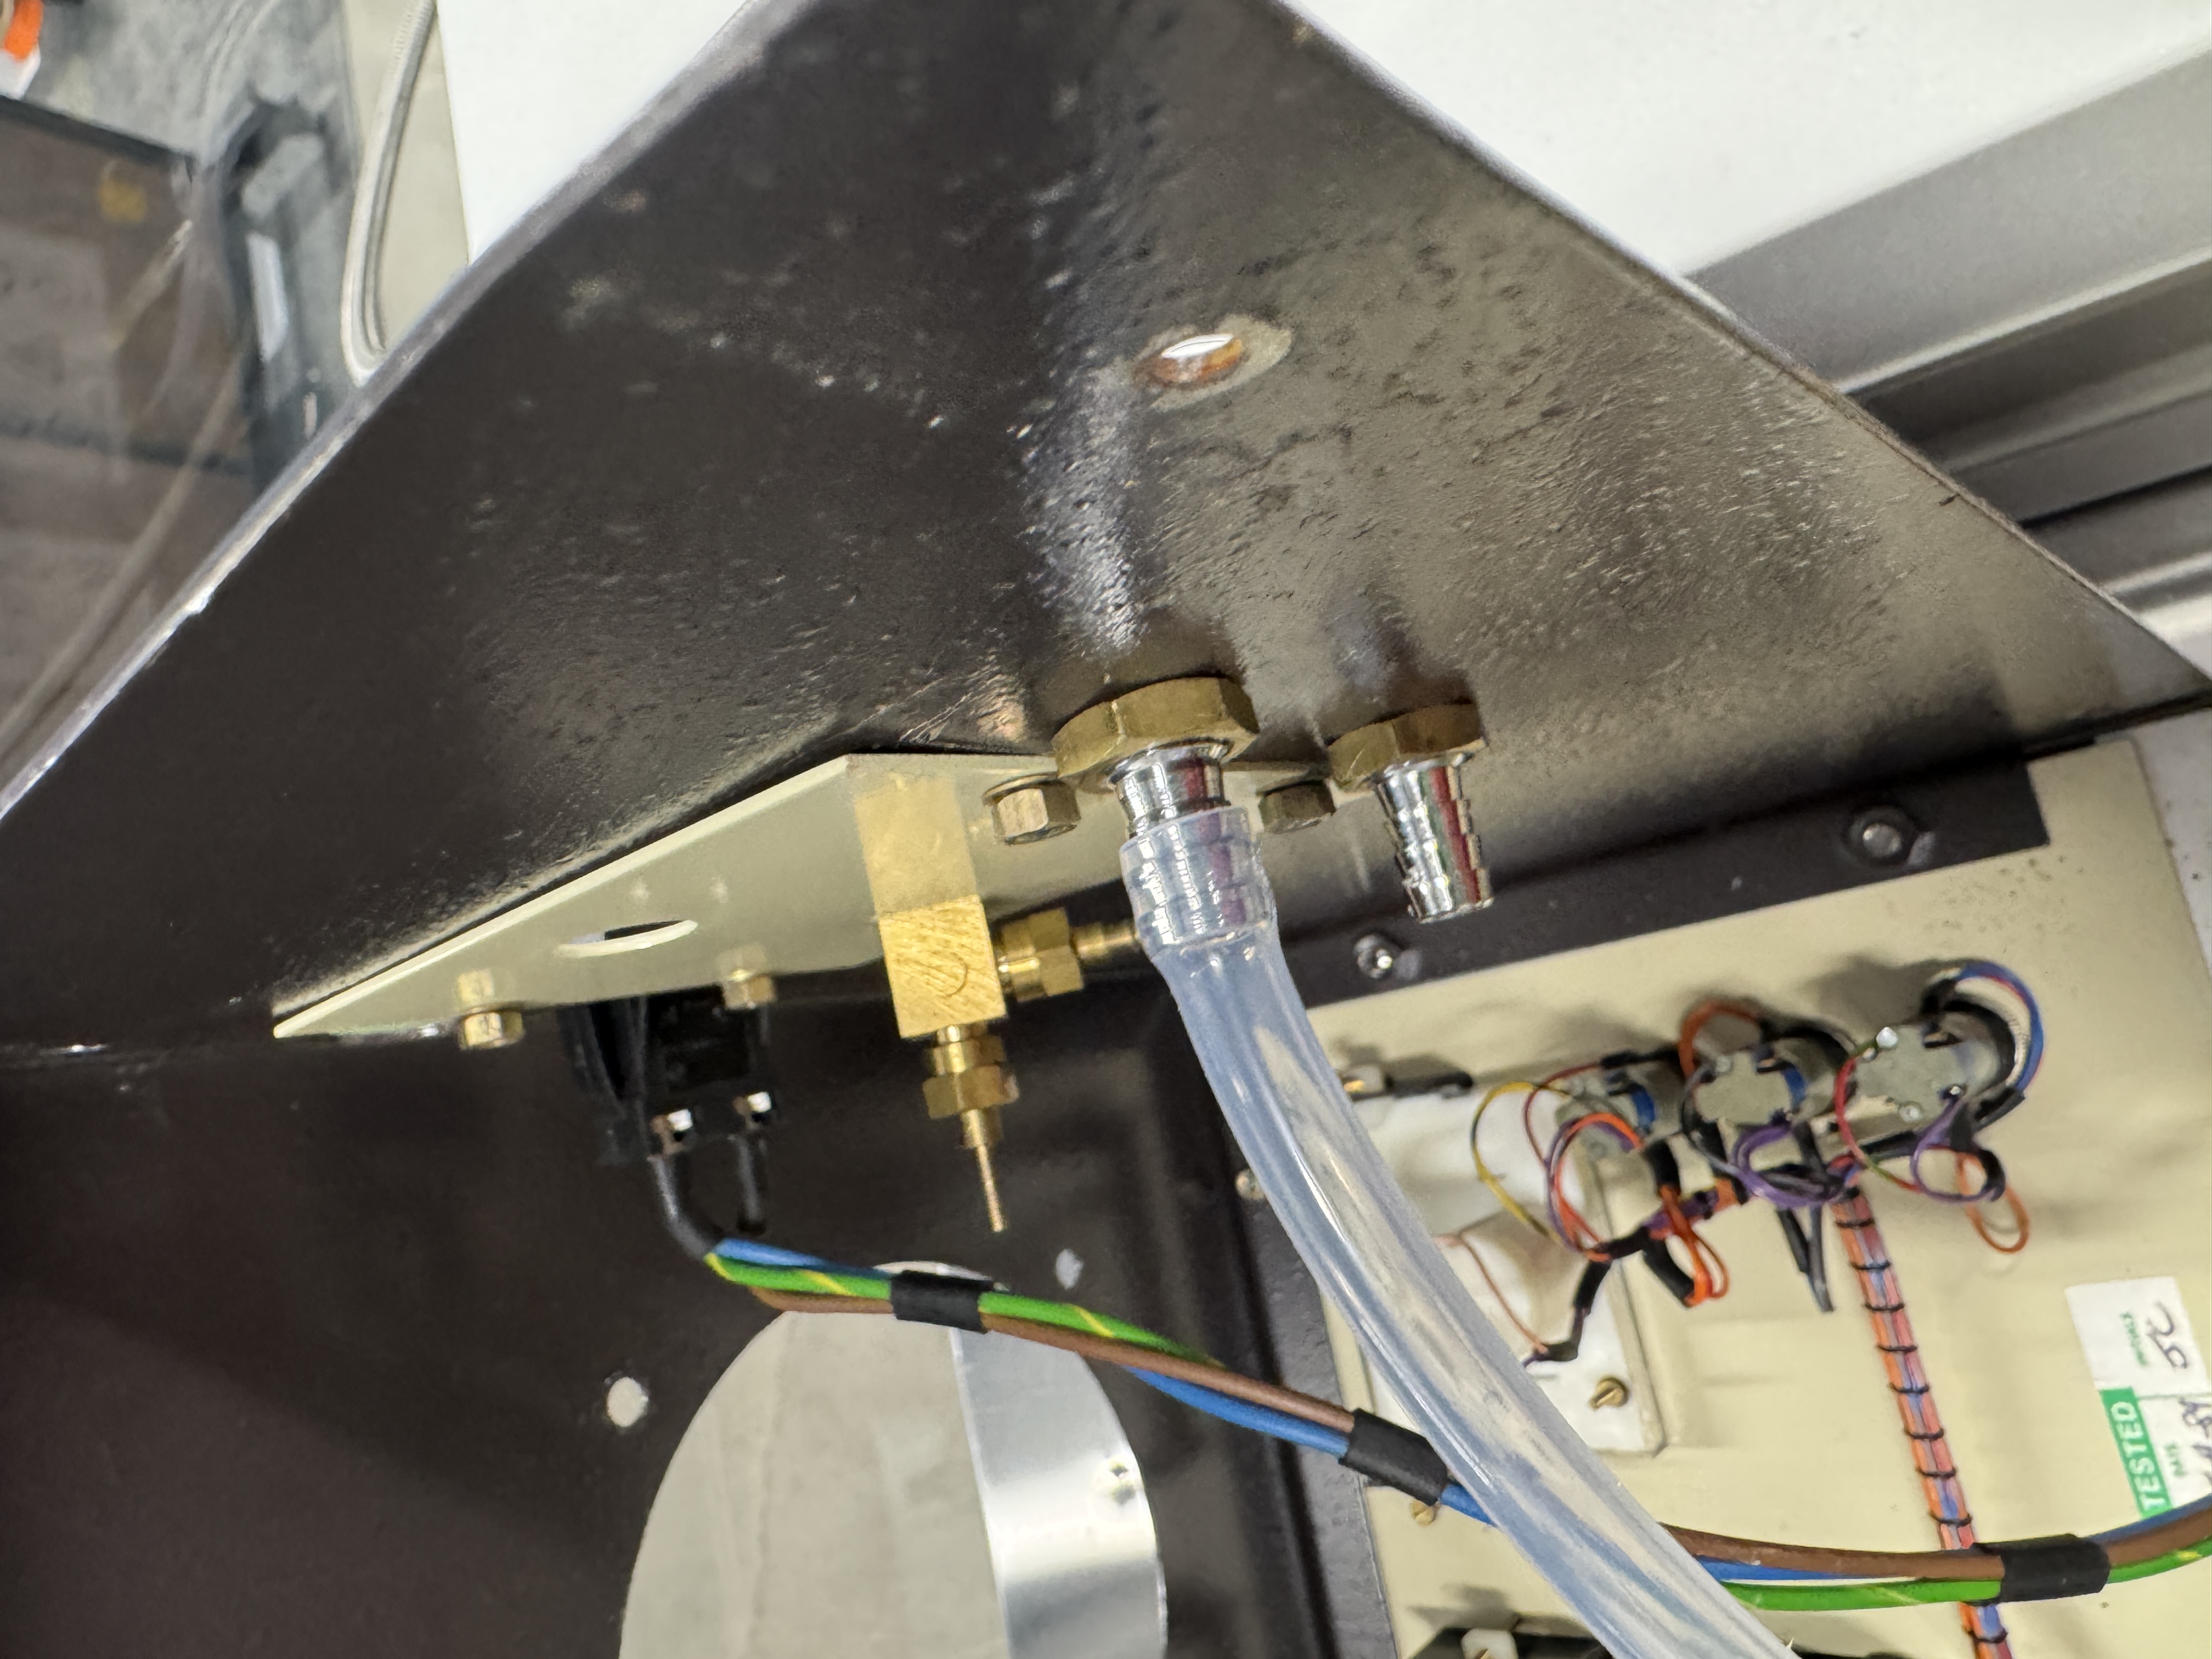
I got the water lines cut to length and installed today! This was a pretty simple one, I just cut the length of silicone tubing we got in the mail in half and stuck one half on each hose barb. This, along with the argon section, makes for quite a cleaned up view of the gas and water feed-through section ✨
When we get the chamber installed, these lines will attach directly to the cooling baffle on the bottom:
With this and the work we did on the Argon hoses today (read below). We have the water and gas delivery pretty much figured out. The main thing we need to do next is source and order any o-rings that are toast (which is probably a lot of them). Stay tuned for that! I am also passively looking for a new water chiller and hope to have that ready to go soon so we can leak check this new tubing. With this and some of the argon hose, we are probably going to need a couple small hose clamps.
Action Items
- Source and order new lines
- Test fit new lines
- Cut and install new lines
- Source water chiller
- Leak check with new lines
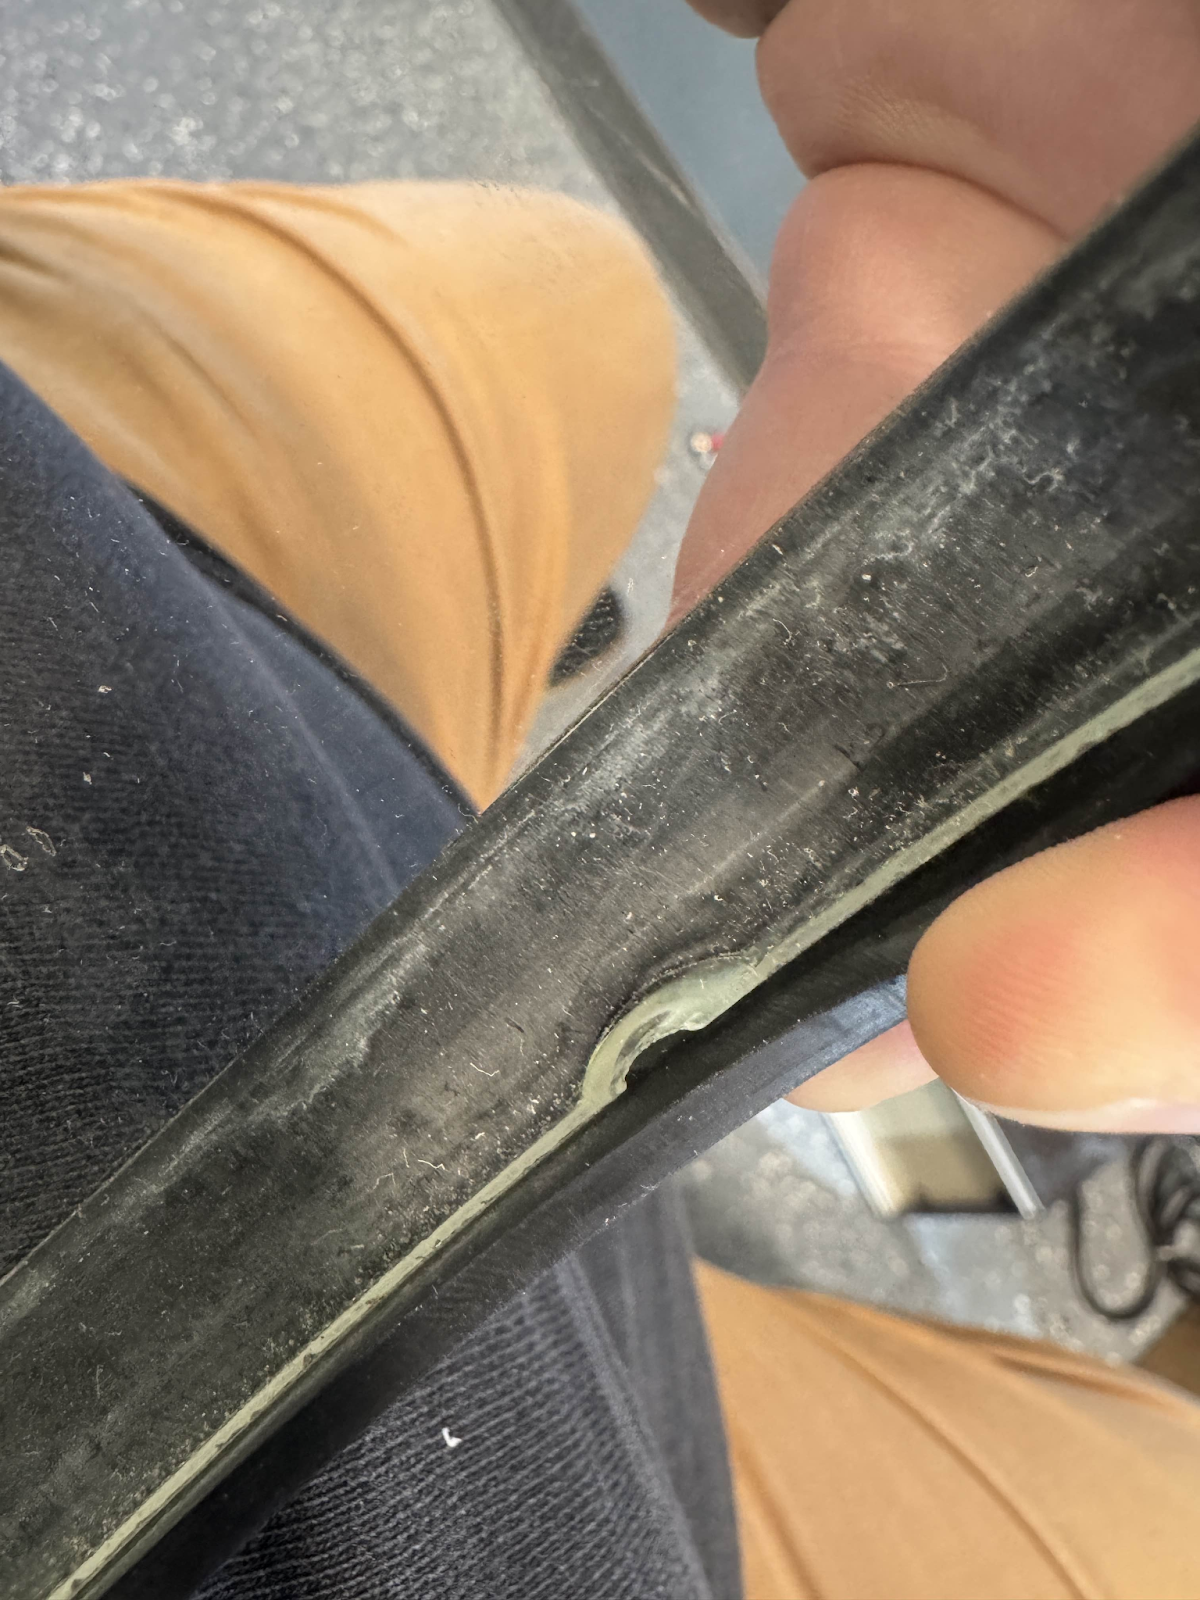
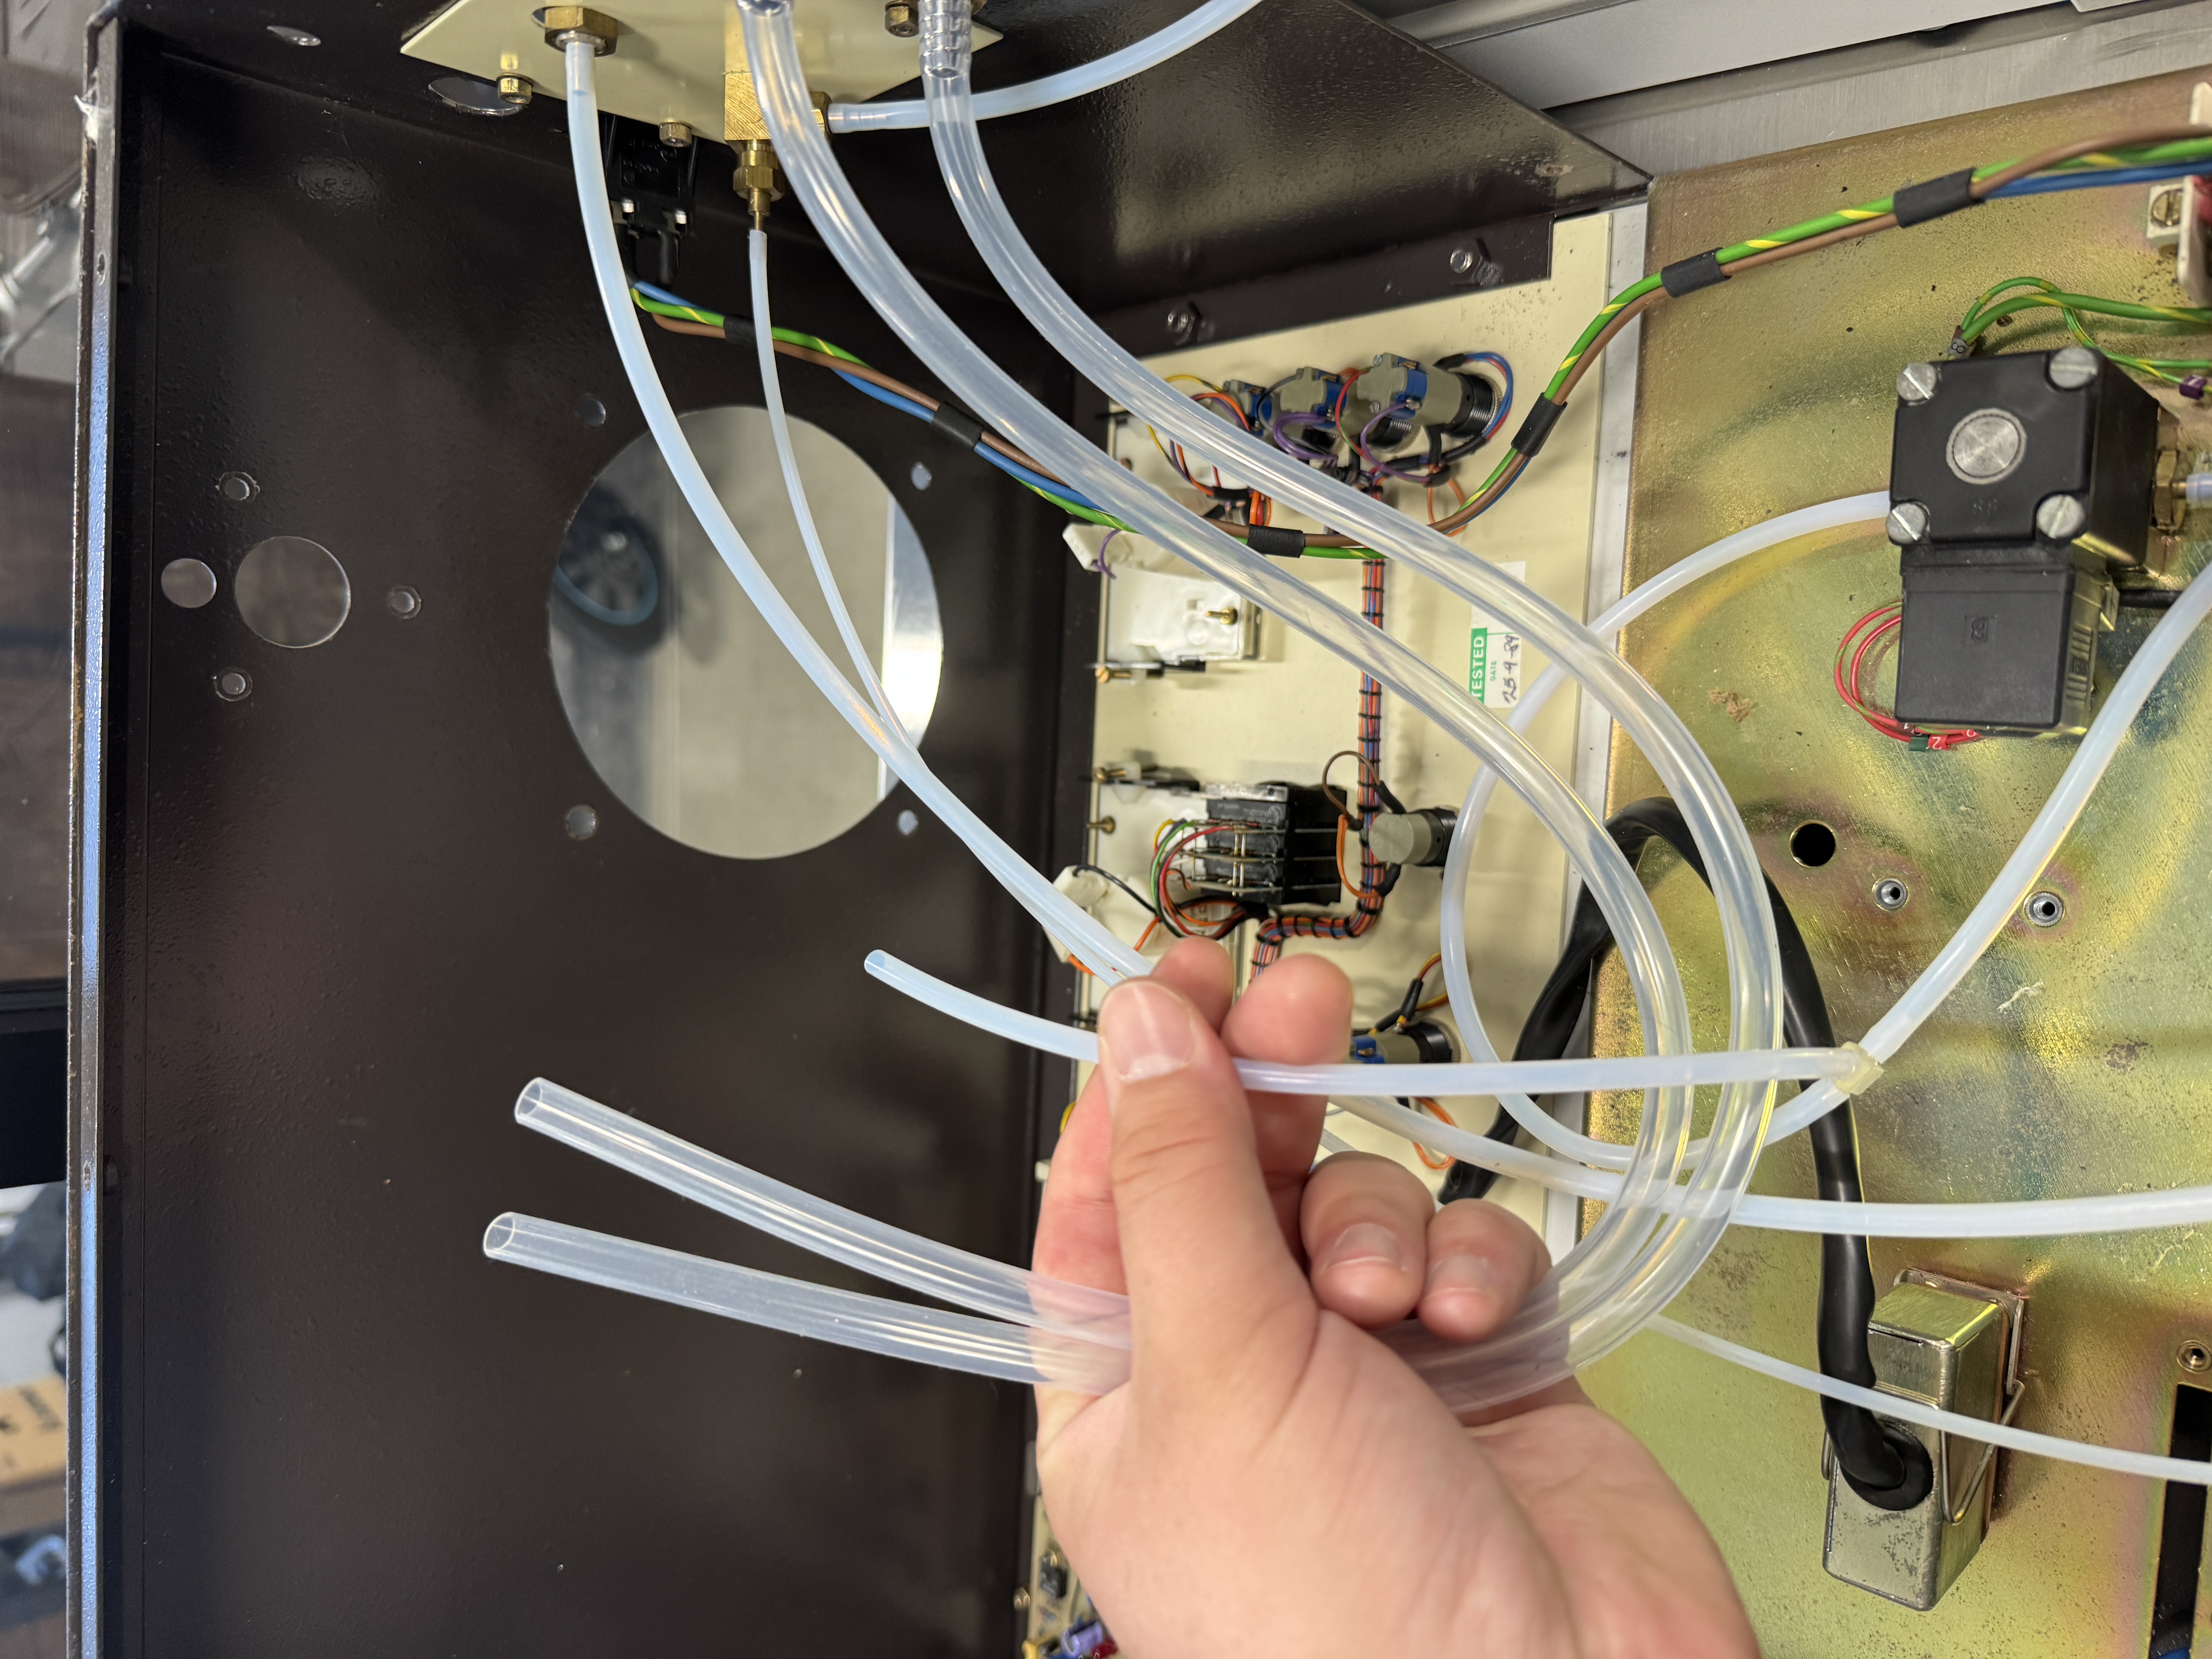
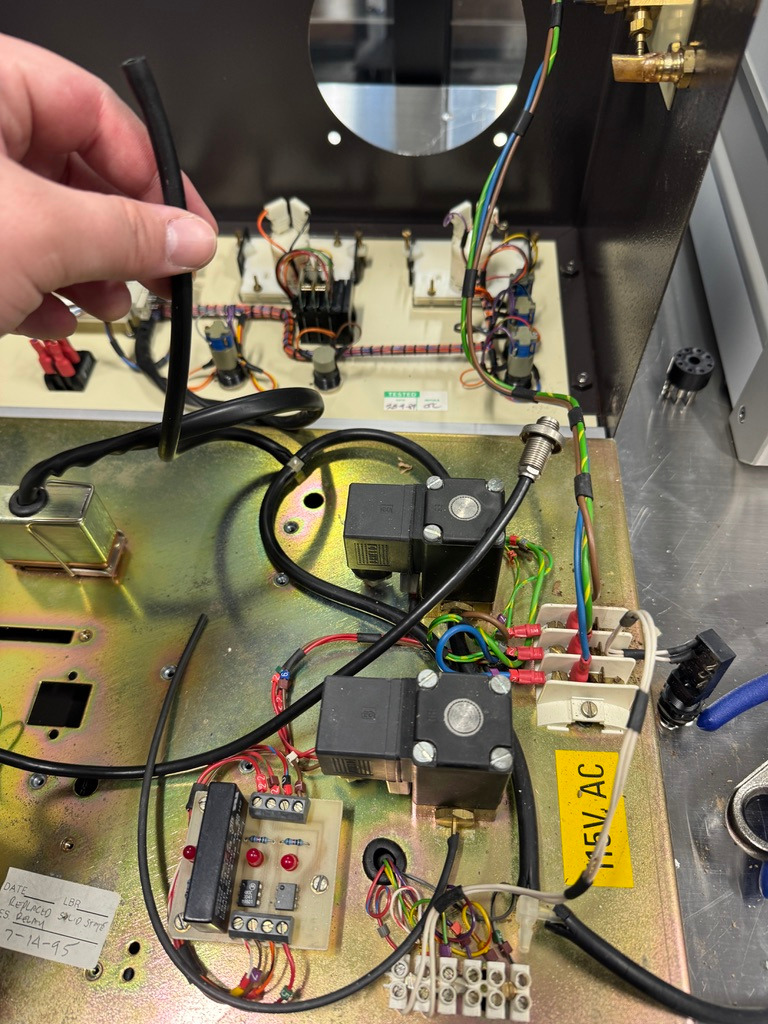
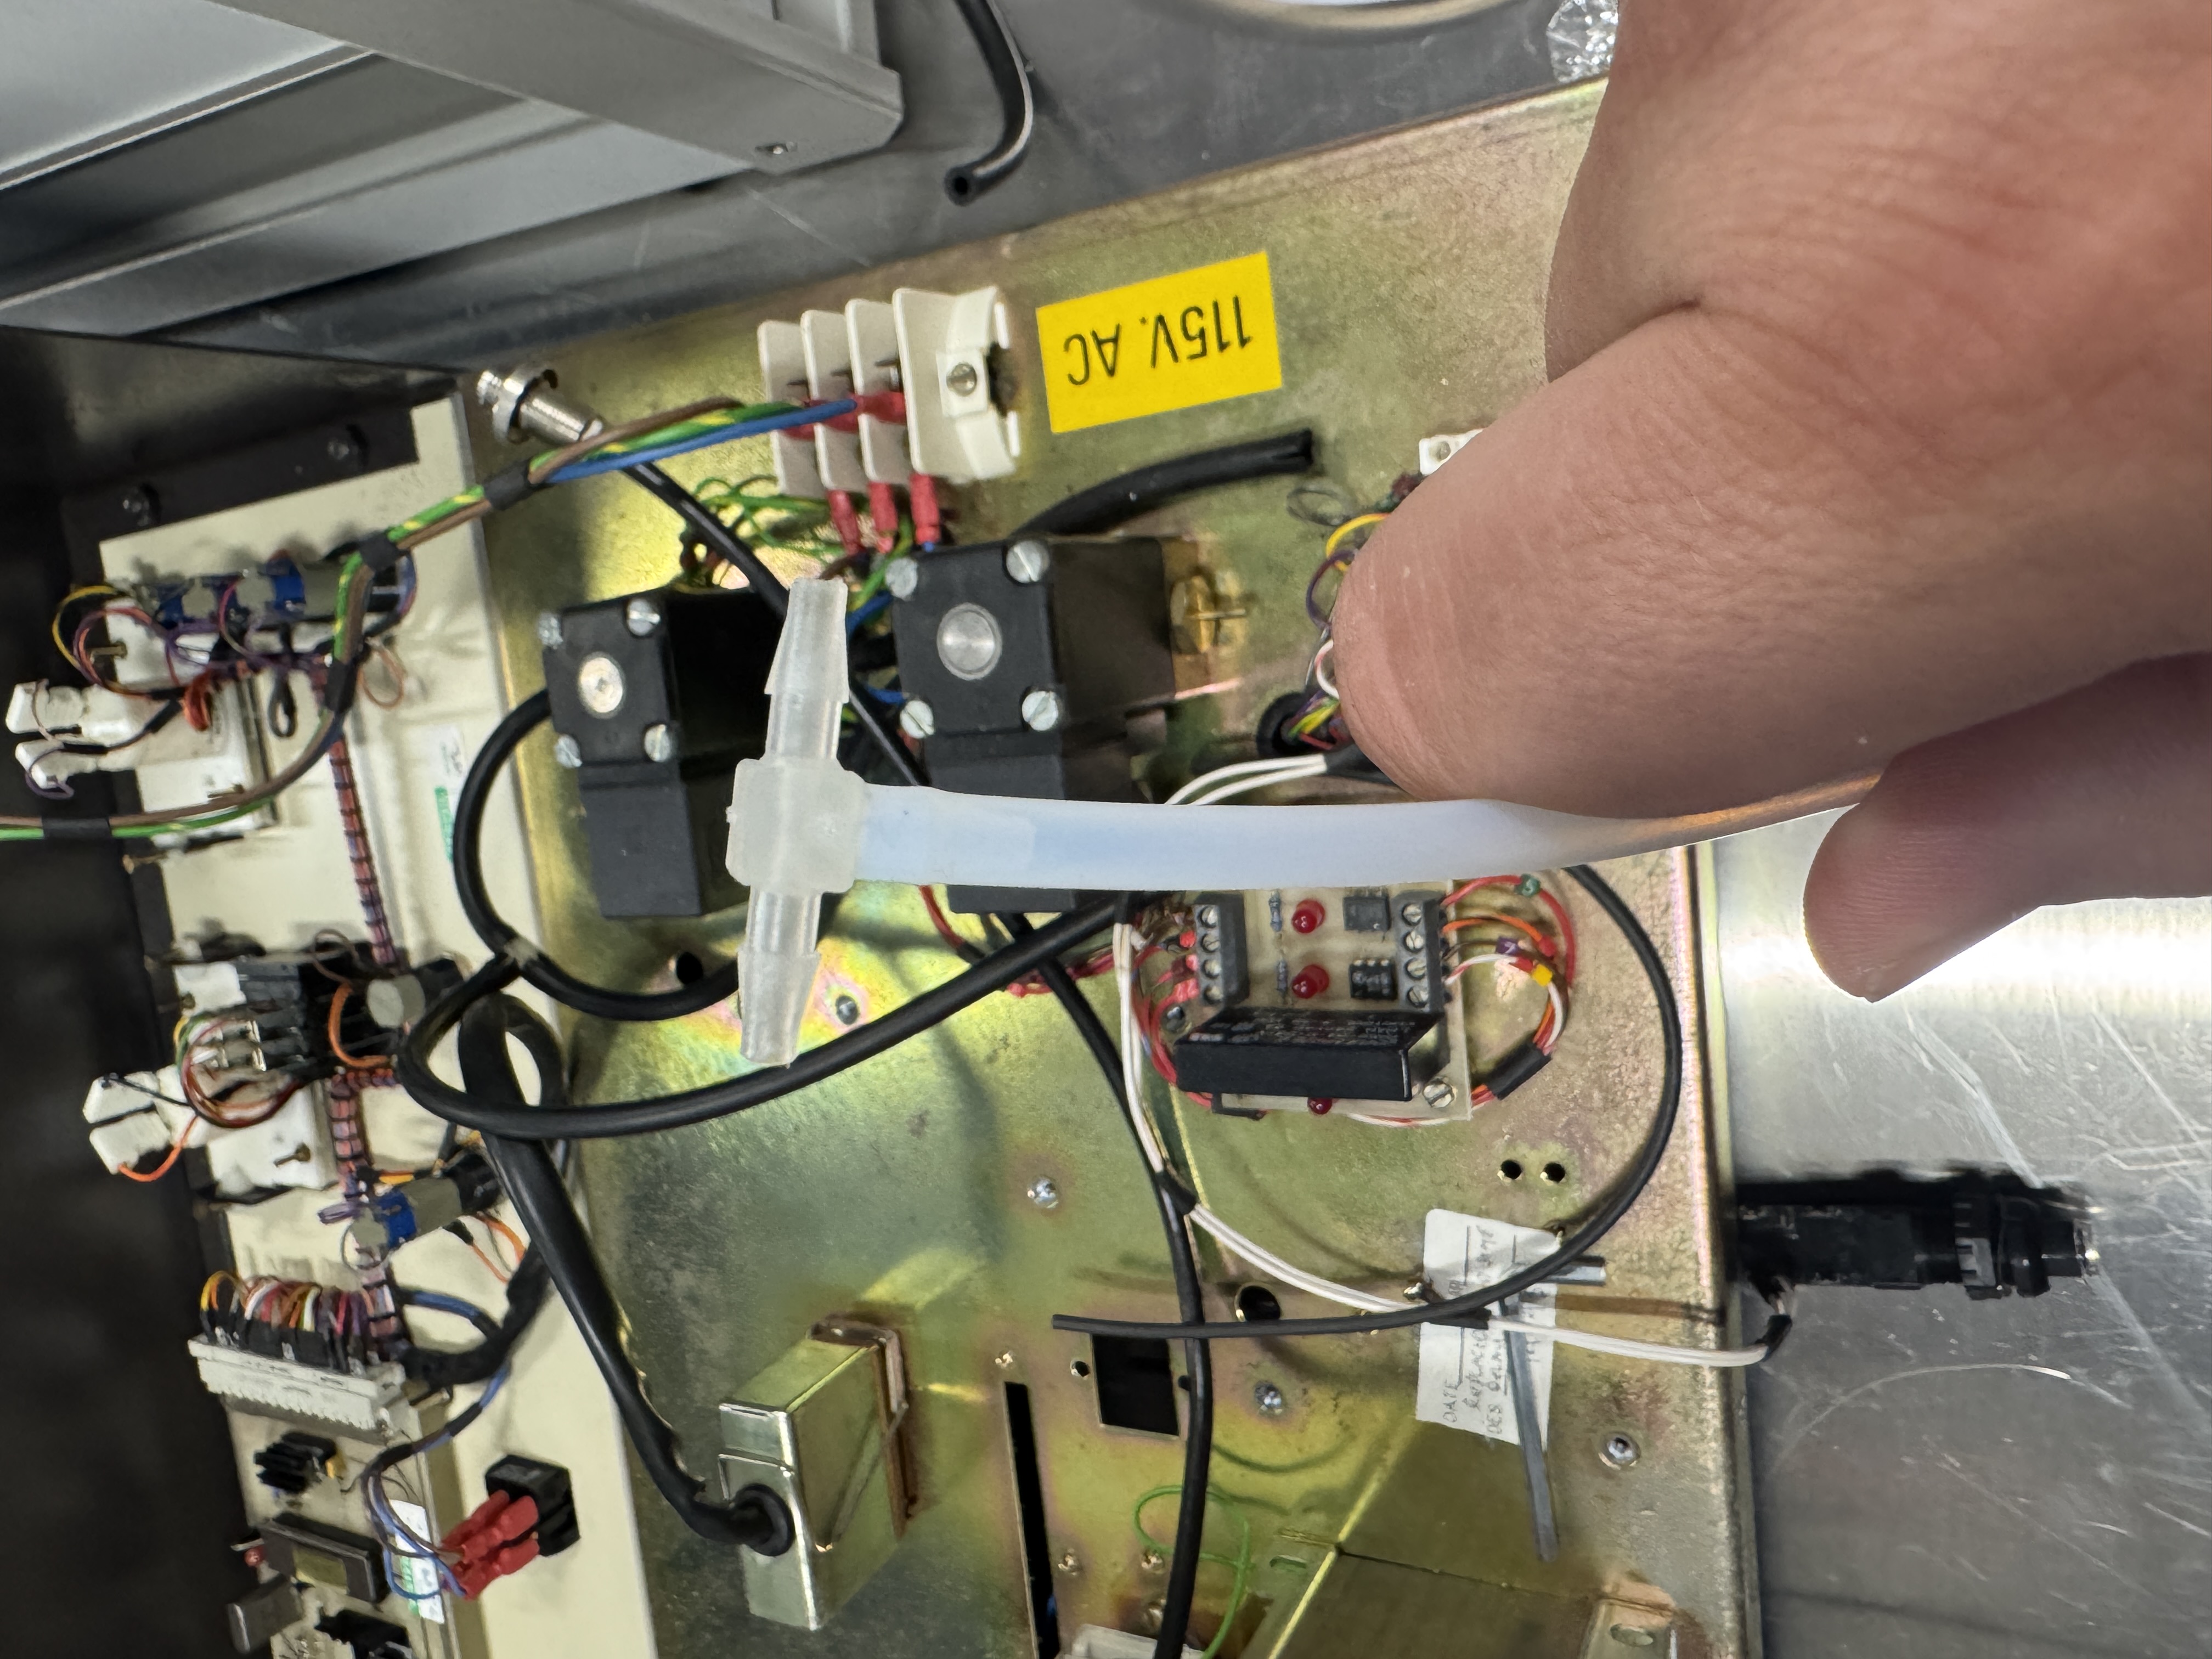
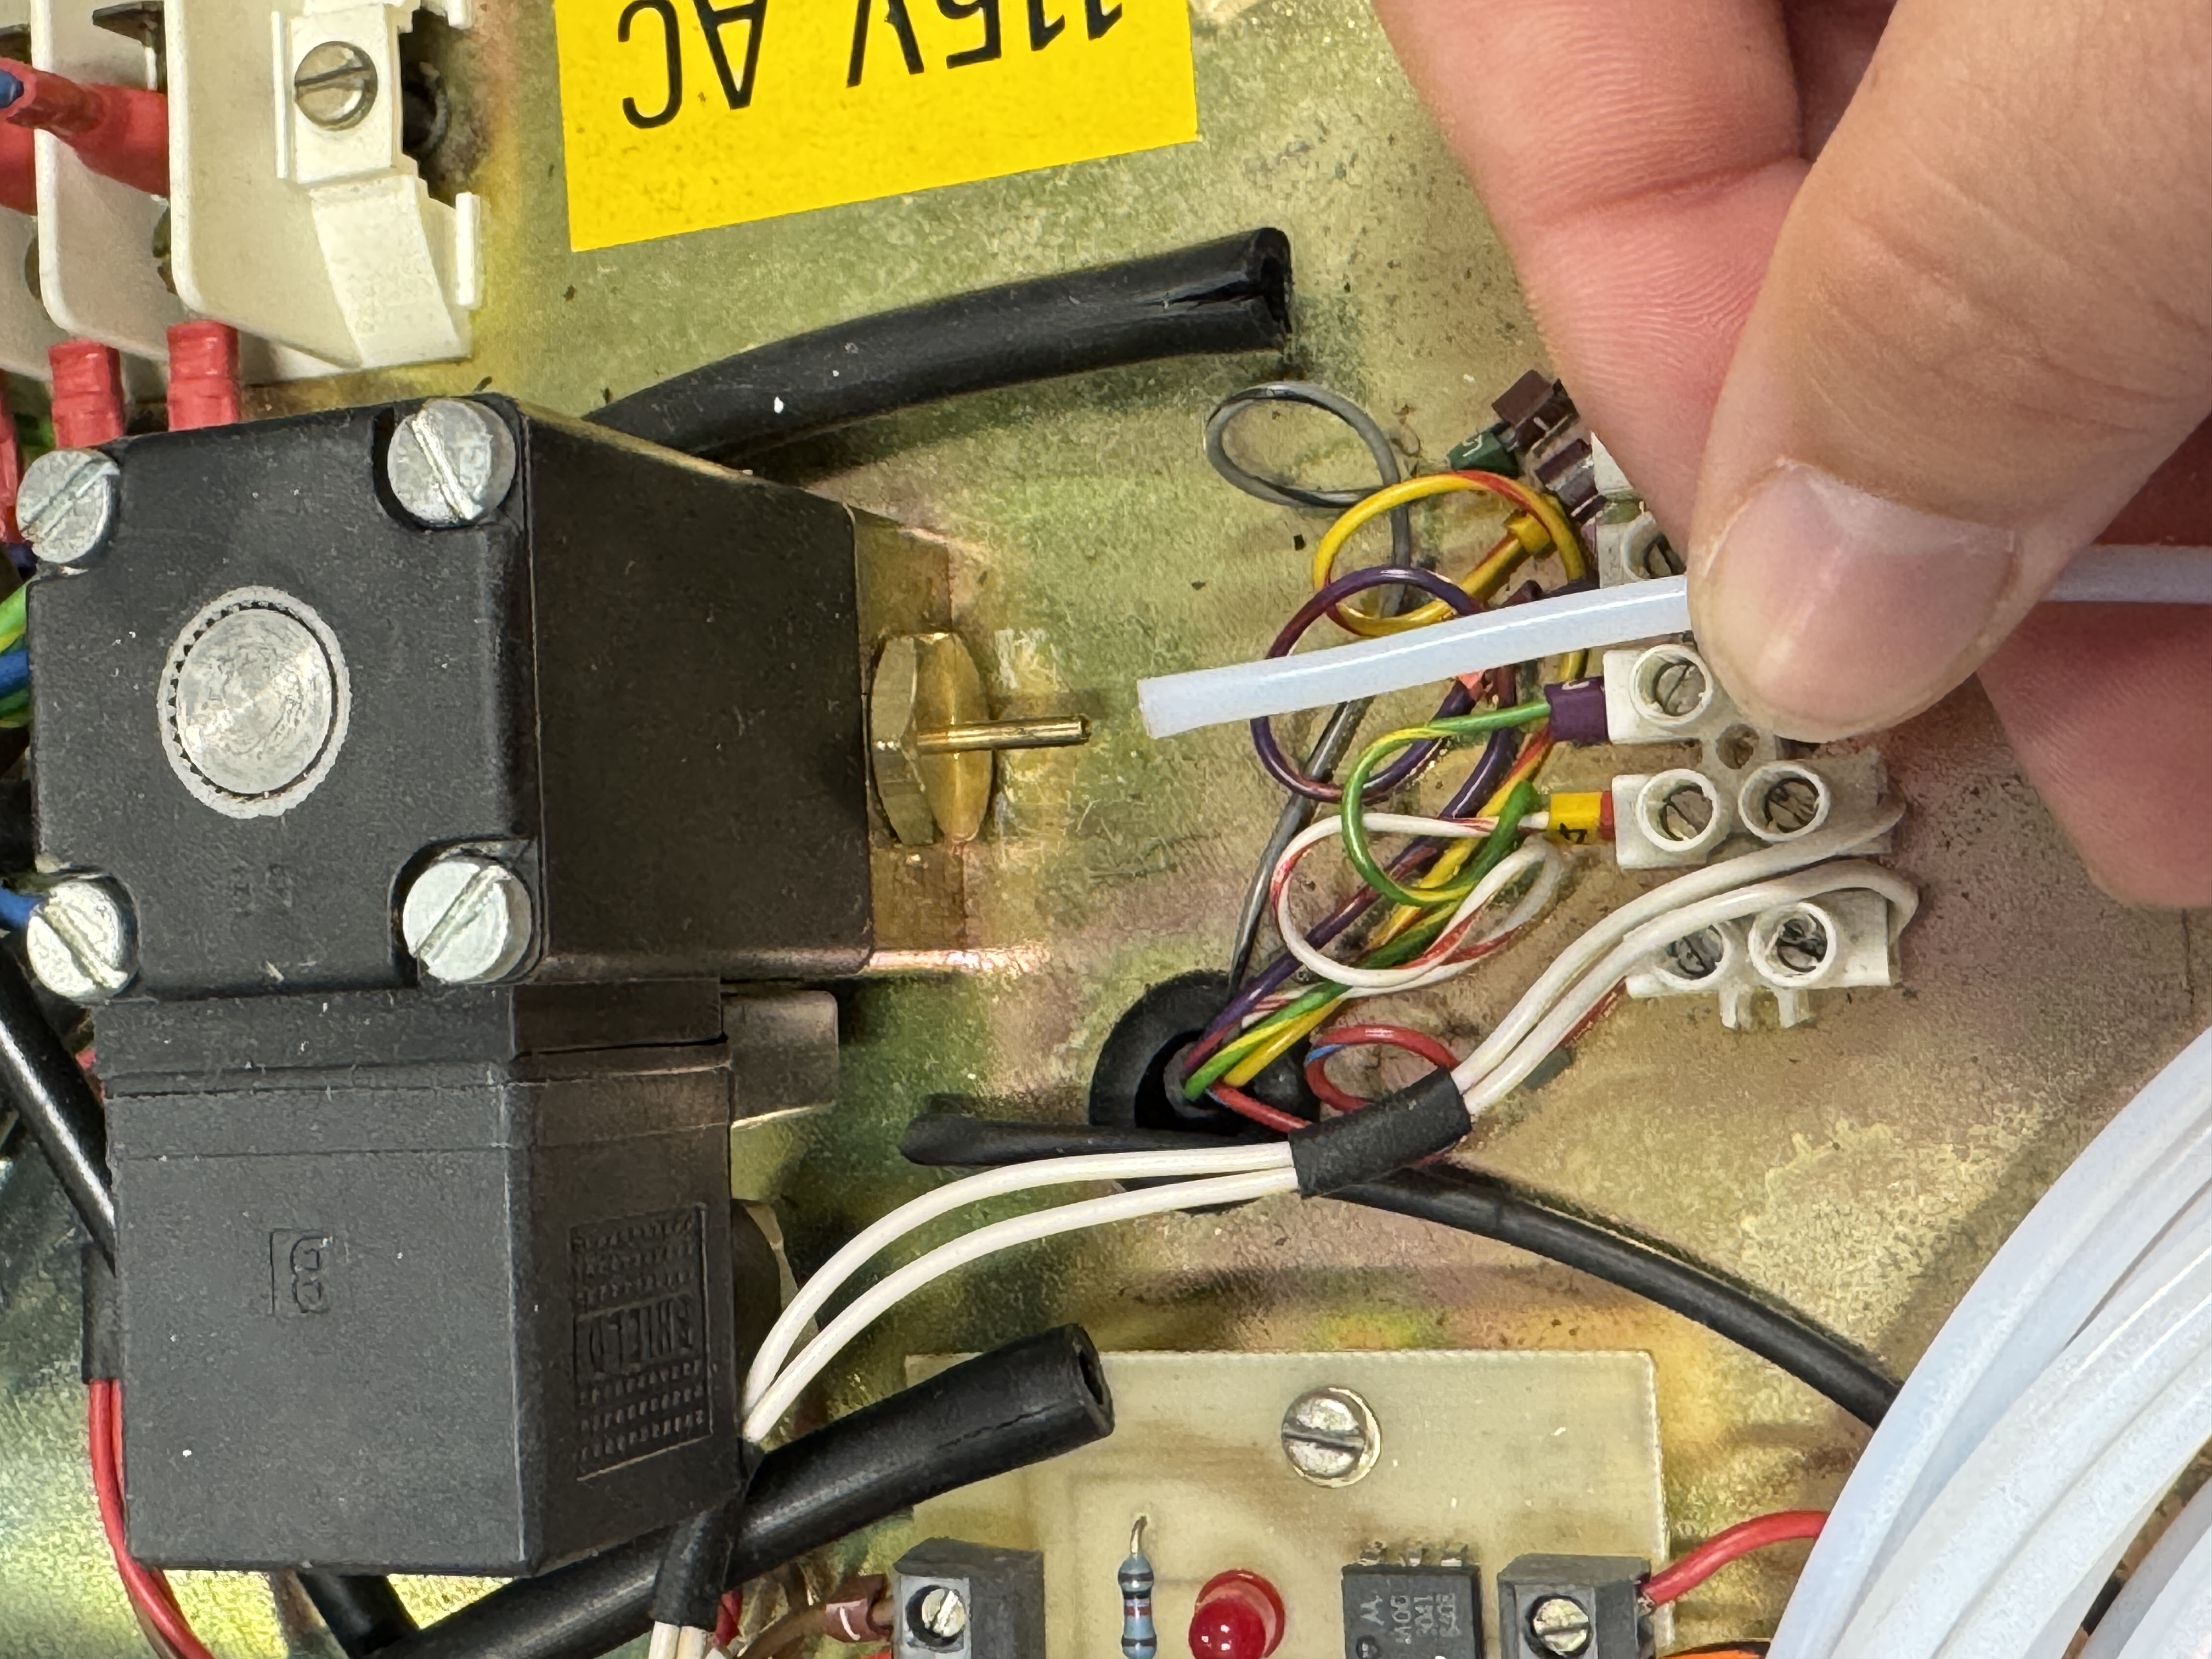
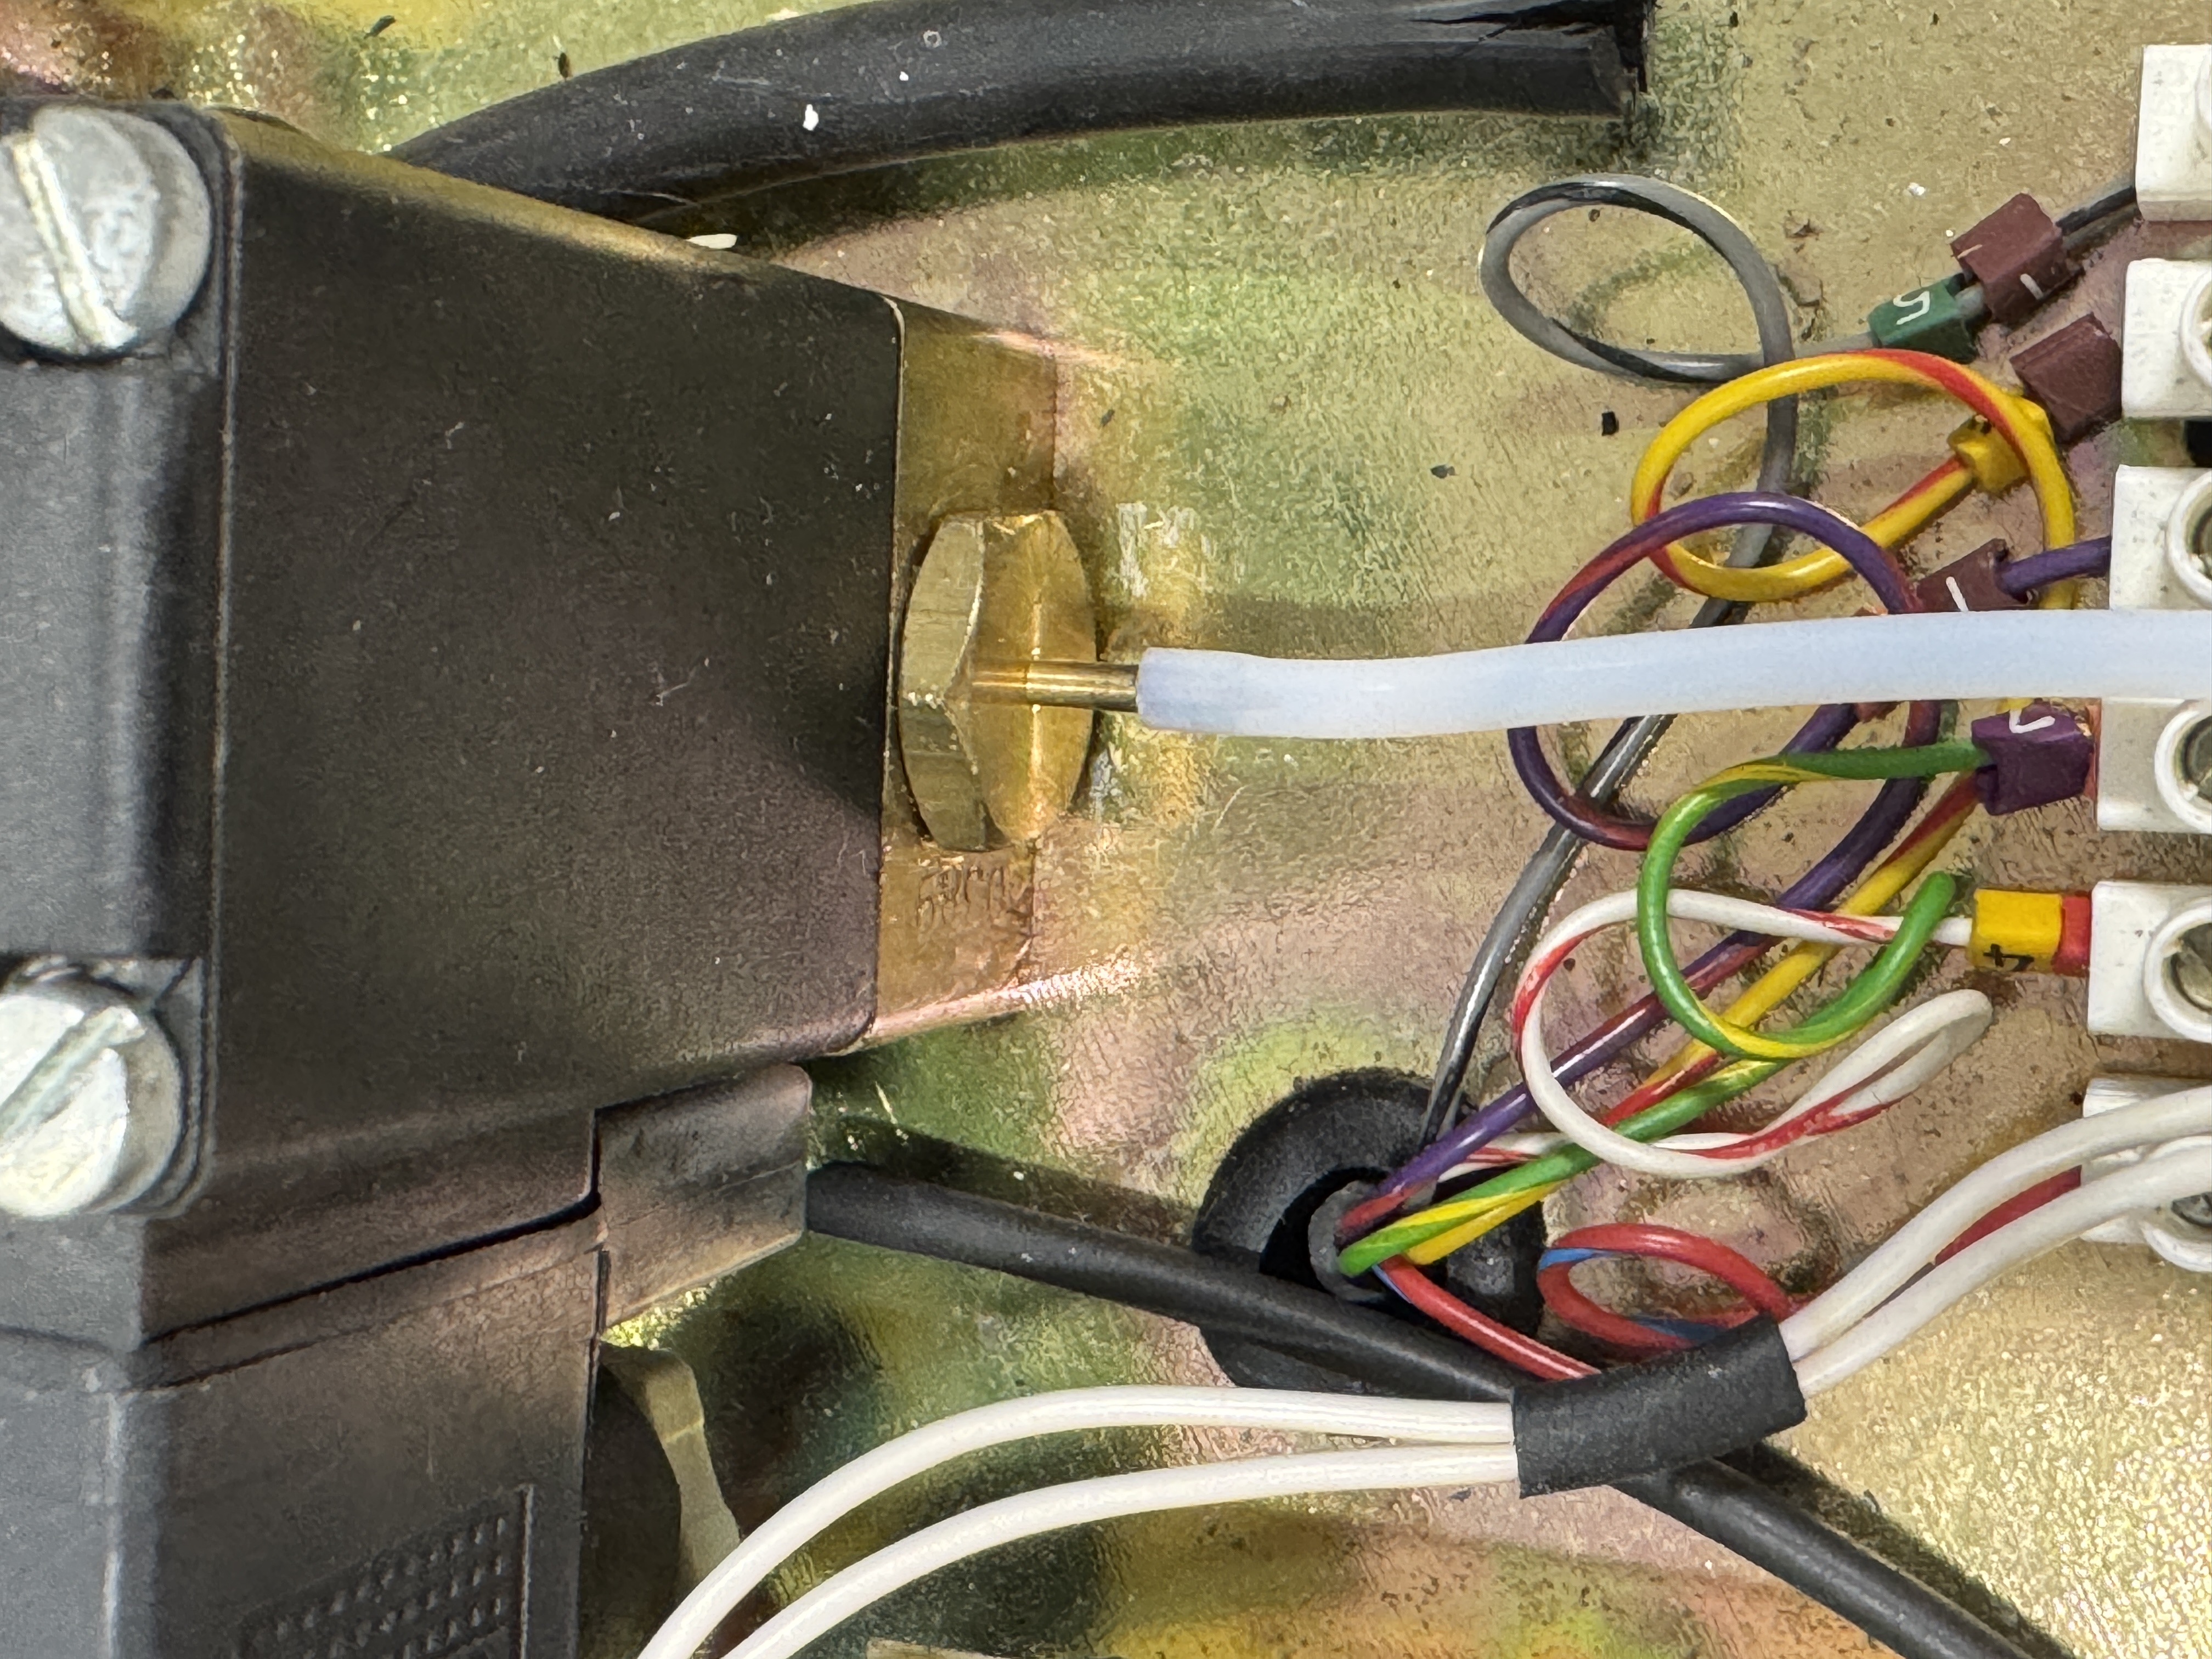
🚧 Cracked Argon Hoses
The argon hoses, pictured here, are decaying and falling out. These must be replaced with PTFE tubing.

When I first cracked open the machine, since some of the hoses were just kinda laying there, I had to spend some time building a mental map and diagram of how they are all supposed to connect.
After tracing everything with my fingers a few times and using a whiteboard to draw out what I found, I was able to make a diagram of the system.
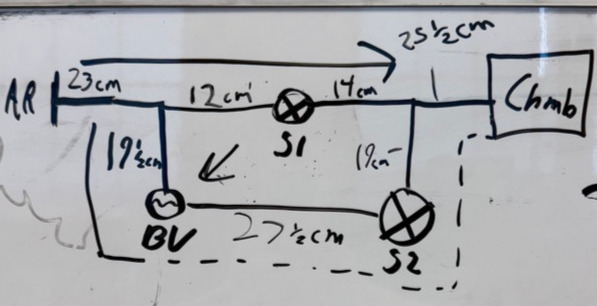
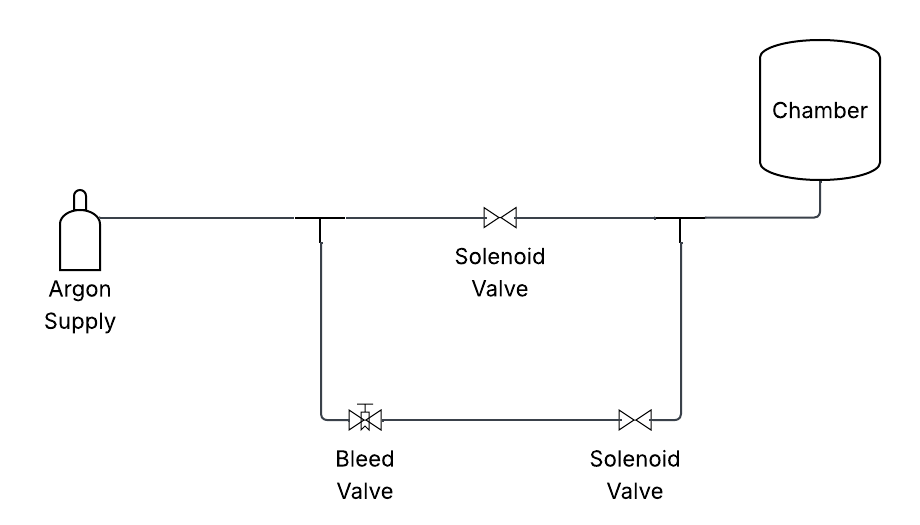
Since I am swapping from a rubber to a PTFE hose, I am choosing the replacement tubing mainly based on the ID of the tube VS the OD of the barbs they are attaching to. Since PTFE doesn’t flex quite as much I am slightly increasing the IDs on the new tubing. For our bleed line, I am going with a 1/16” ID tubing, which is about 1.59mm. The OD of the barbs is 2.1-2.2mm, so it should be a snug fit. For the main lines, our barbs have an OD of 4.6mm, so I am grabbing 4mm ID PTFE tubing. I just placed an order from fluorostore.com for both of these sizes of tubing. Unfortunately the minimum order size is 25 feet of tubing. So we will have some left over for sure. Luckily, 25 feet isn’t that expensive, at less than a dollar per foot for the smaller tubing, and about $1.60 a foot for the larger tubing.
Update 4/10/26
I got the new tubing in the other day, and today I had some time to do a test fit. The 4mm ID tubing is perfect, fits great!
This fits really well, but its ever-so-slightly loose, a hose clamp or zip tie on each connection might be the move for when I install these.
The smaller bleed tubing however is a bit more of a struggle. The 1/16” ID tubing is just slightly too small, even with significant force it didn’t want to fit around the barb. After heating it up with a lighter, I was able to actually get it to interface decently well. We have 25 feet of this tube and we need about 28cm, so we have lots of spare to work with. I think cutting and heating a piece up will work more than enough to get it fit around the bleed valve barbs.
Update 4/21/26
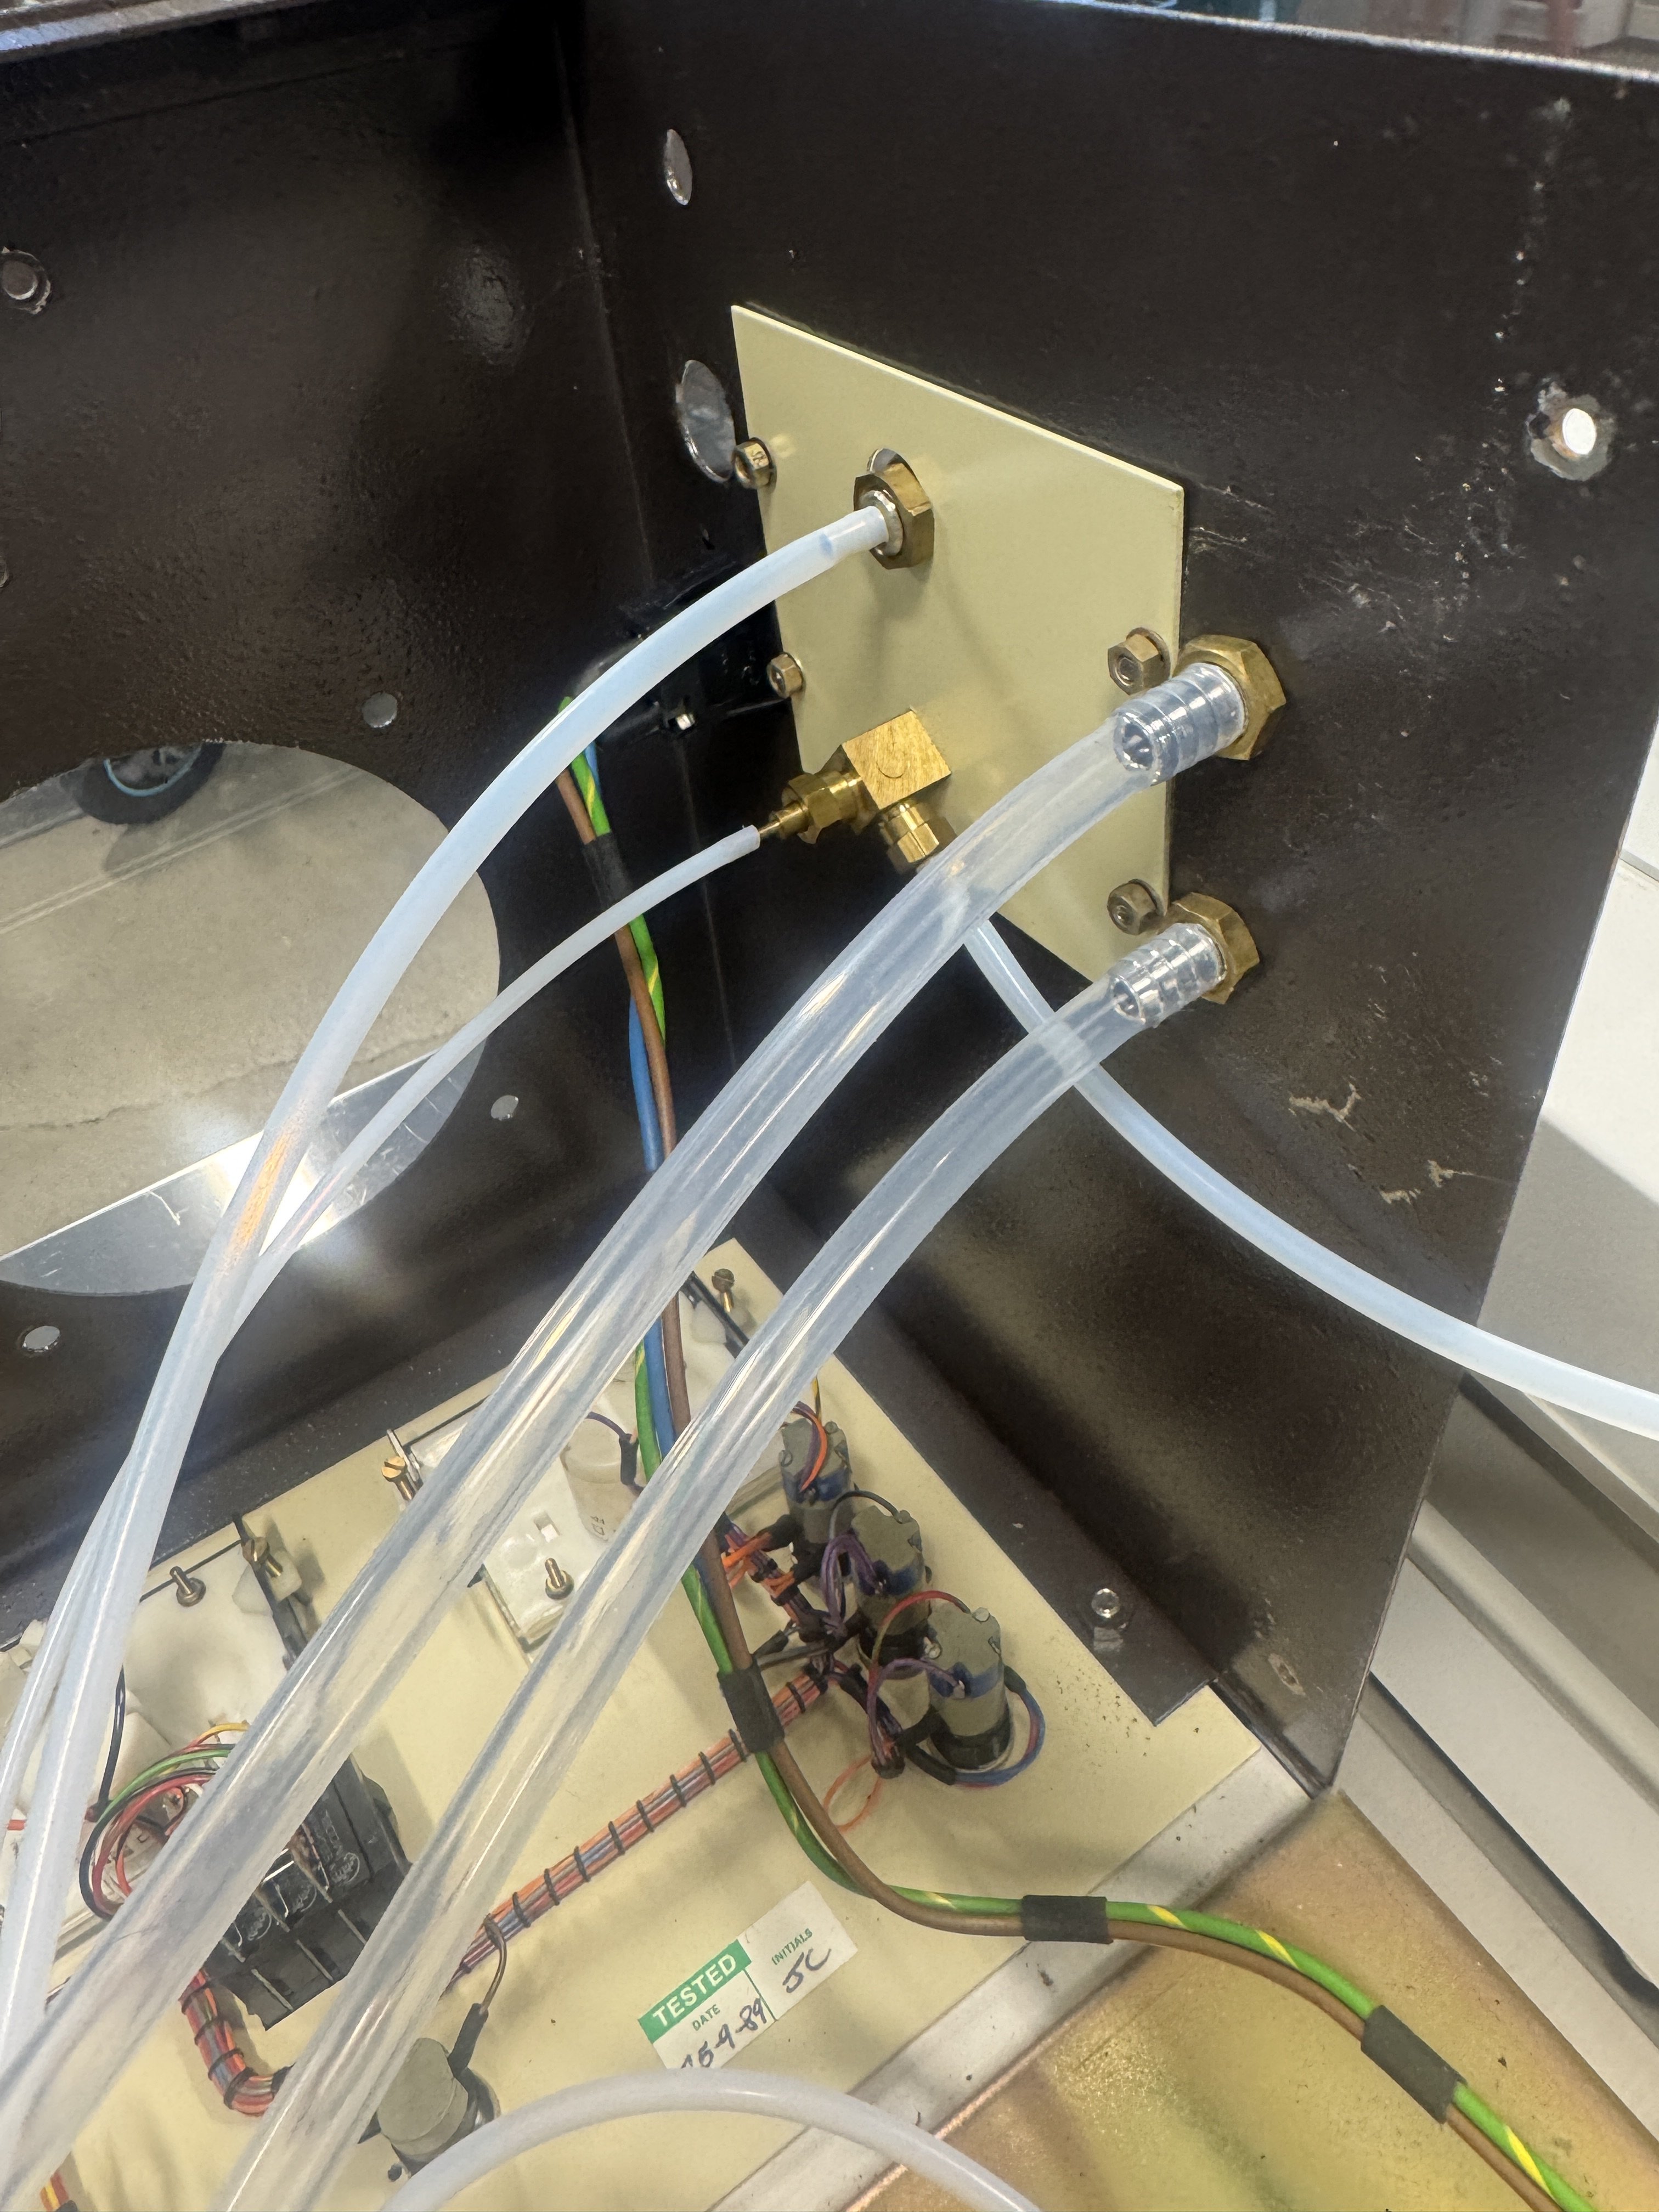
Today we cut the new tubing to length and got it installed in the machine!
I abandoned the idea of cutting the tubing to specific lengths pretty quickly, as I realized the lengths that the tubing were cut to before were not conducive to opening the system up for maintenance. The ones that mostly just stay in place and don’t connect to the top panel, I left short, but anything where the system is going to be opening, I left enough slack to completely flip up the top panel.
Before and After:
The only tubing that isn’t quite connected is the feed-through from the chamber to the rest of the Argon system, but we will install that one the chamber is re-assembled. This pretty much gets us to where we need to be for our Argon delivery, all thats left to do on this sub-system now is test.
Action Items
- Order new PTFE tubing in the correct diameter
- Test fit new tubing
- Cut tubing to proper lengths
- Install new tubing
- Order new bleed tubing in correct diameter
- Test fit new bleed tubing
- Cut to length
- Install new bleed tubing between BV and S2
- Order Argon from Airgas
- Leak check with Argon
🚧 Flattened O-Rings
All of the o-rings on this system are flatter than hell, I need to take inventory of all O-rings, and document them here.
Update 4/22/26
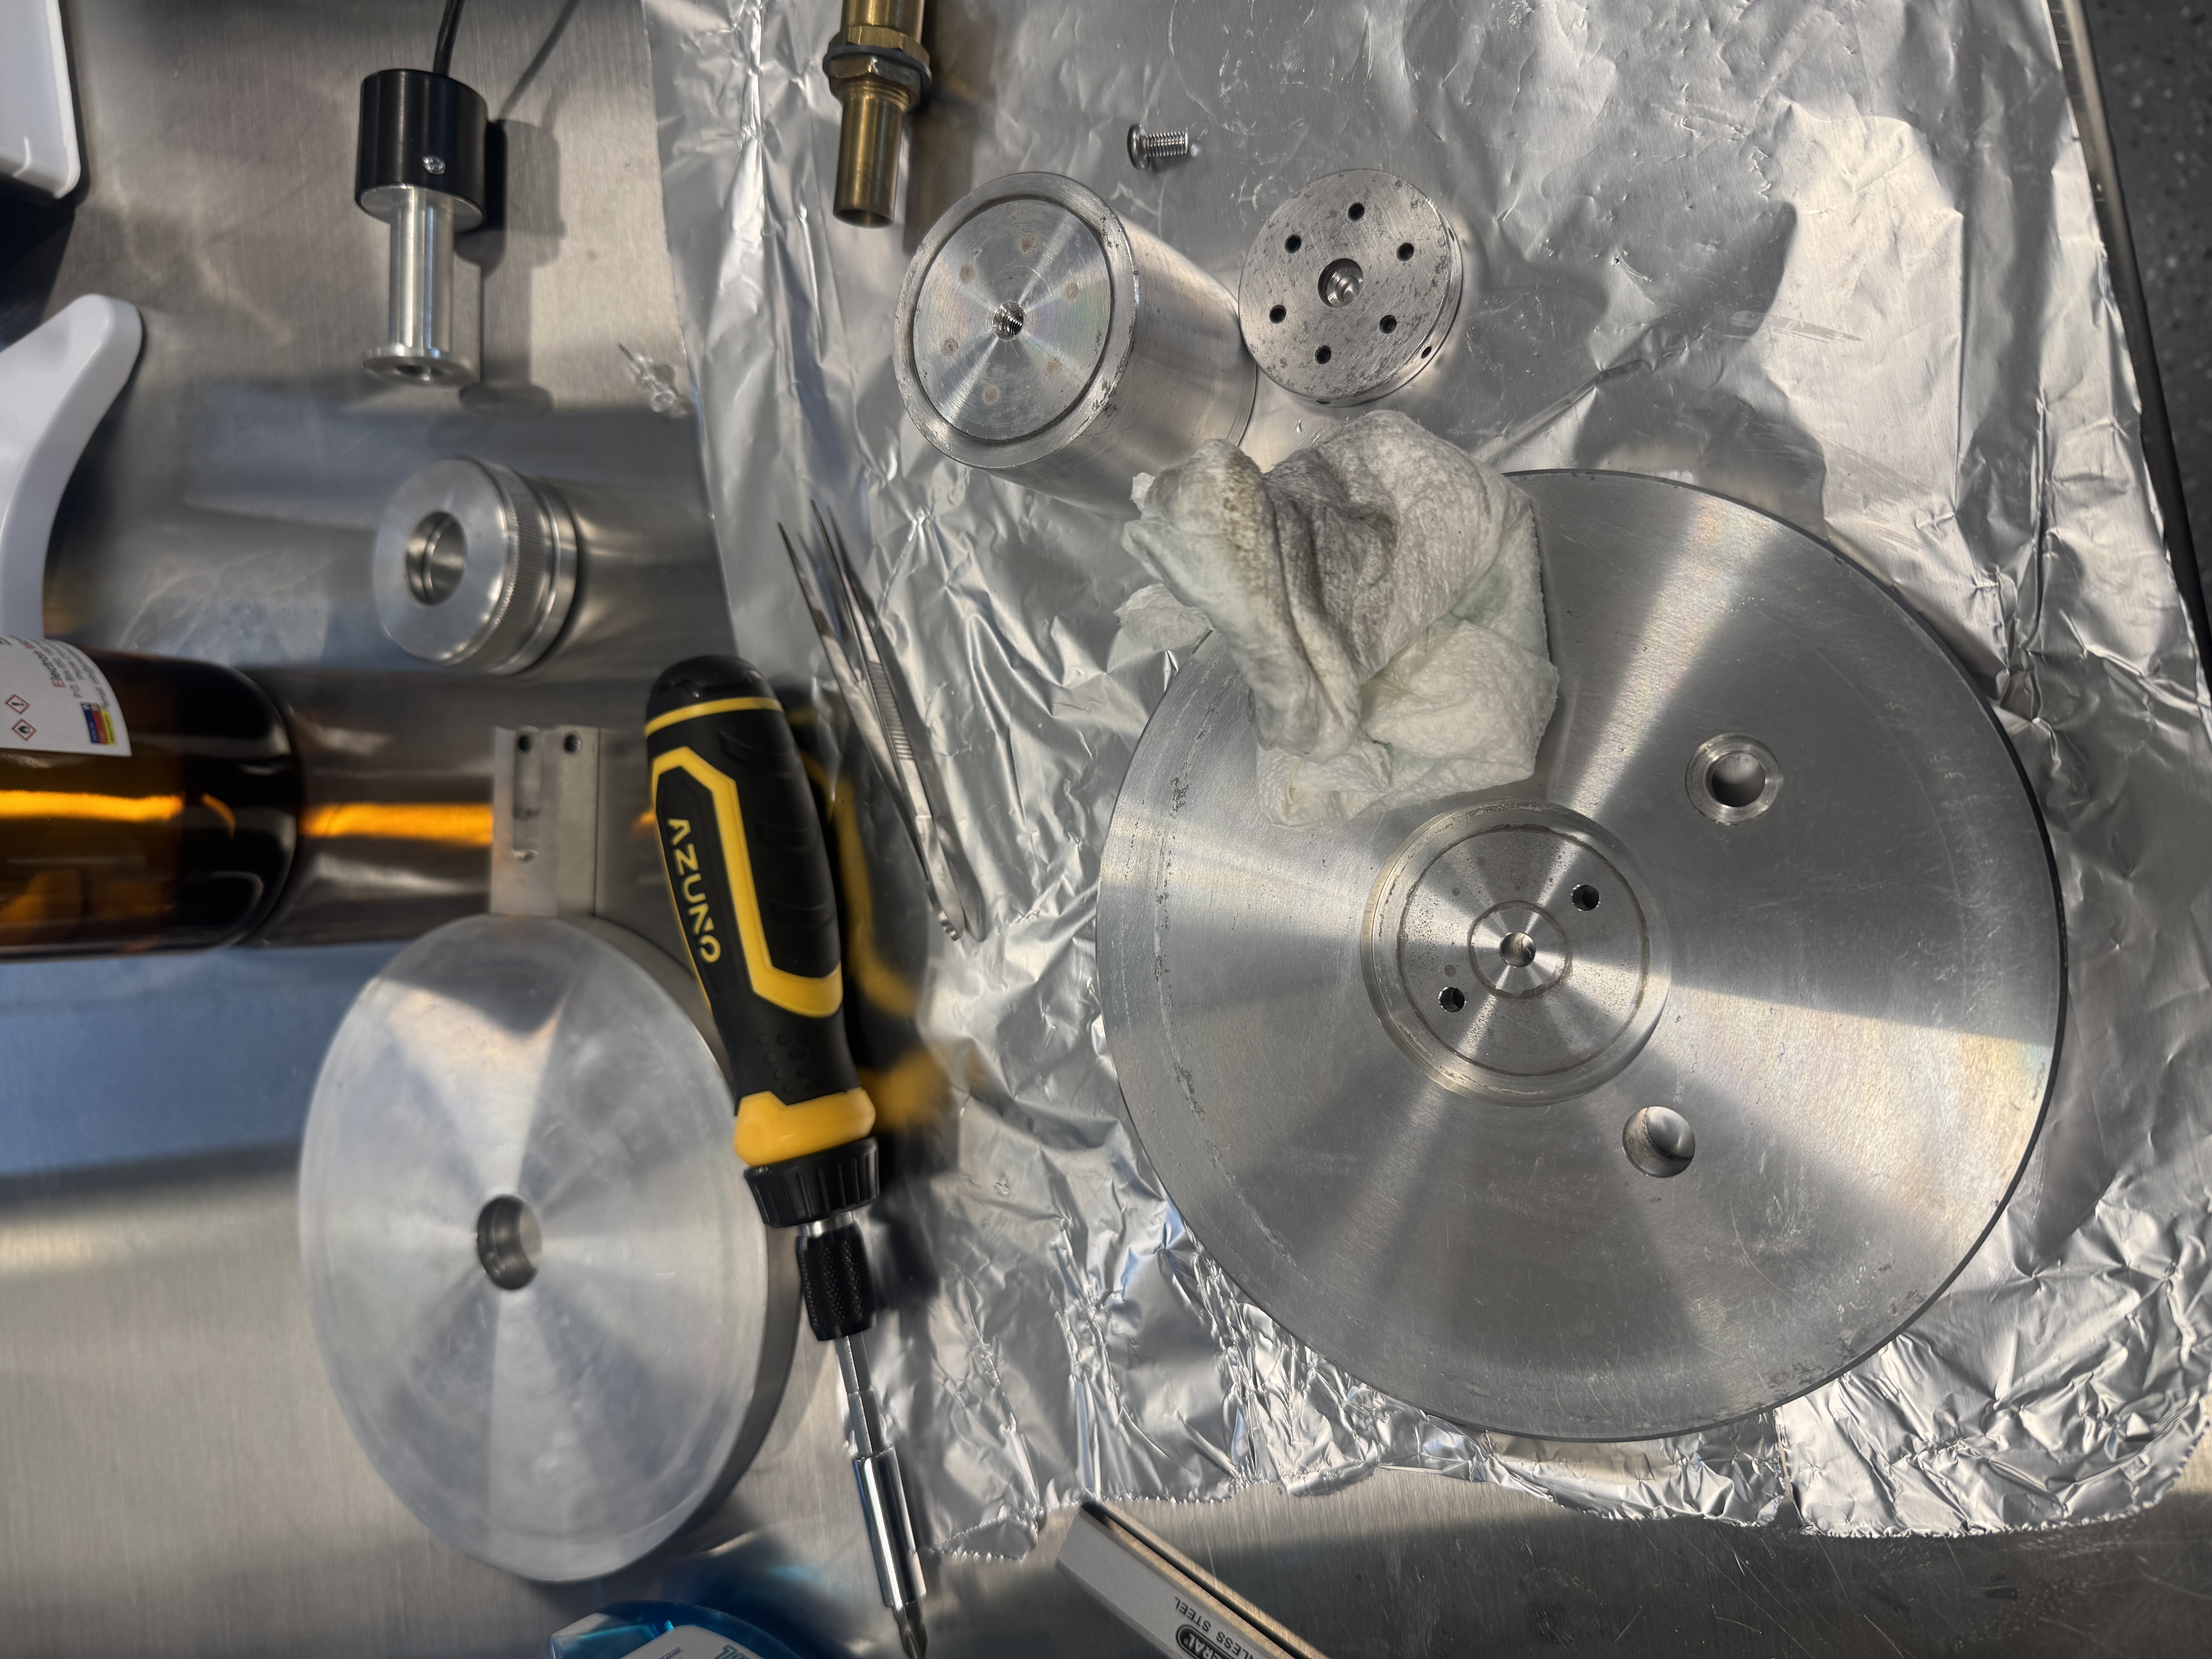
Today I managed to take inventory of all of the internal o-rings, and pull a few out that were hiding within the internals of the machine:
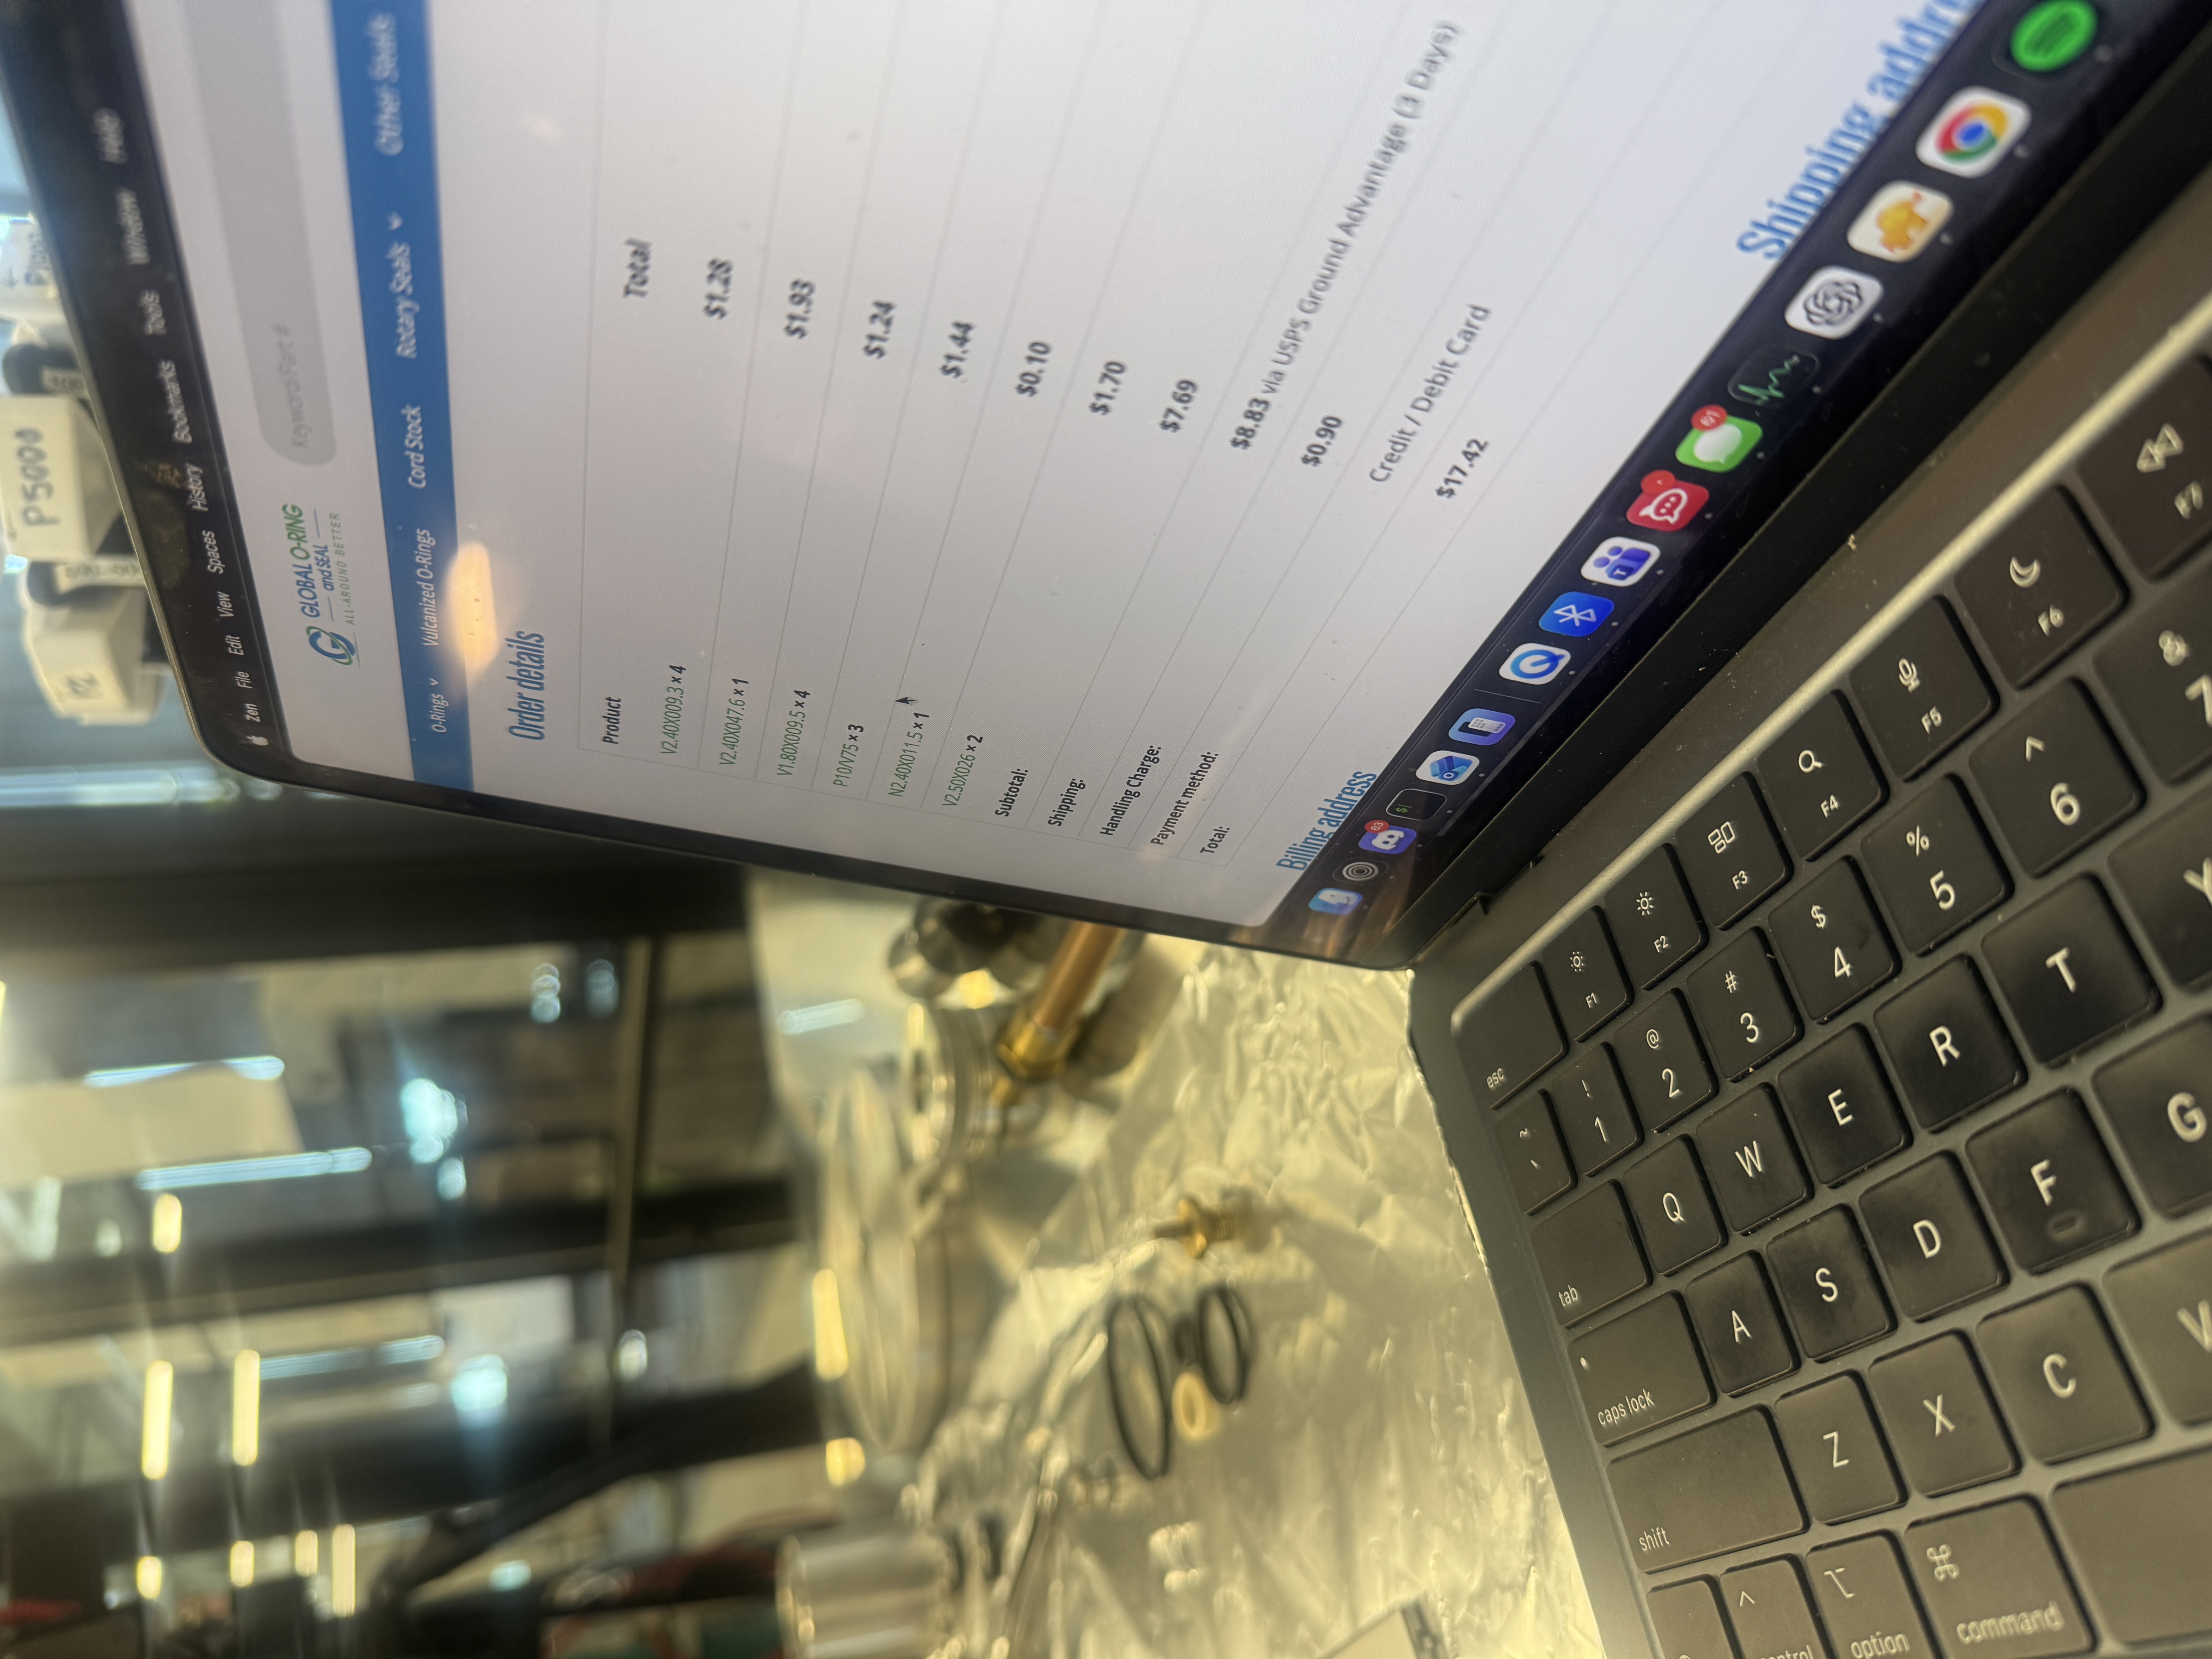
After inventorying all O-Rings I landed on this list:
| Item | Inner Diameter | Cross-Section | Purpose |
|---|---|---|---|
| V2.40X009.3 — Viton 75 Duro | 9.30 mm (0.366 in) | 2.40 mm (0.094 in) | Inner water baffle sealing |
| V2.40X047.6 — Viton 75 Duro | 47.60 mm (1.874 in) | 2.40 mm (0.094 in) | Outer water baffle sealing |
| V1.80X009.5 — Viton 75 Duro | 9.50 mm (0.374 in) | 1.80 mm (0.071 in) | Chamber blank plug sealing |
| P10/V75 — Viton 75 Duro | 9.80 mm (0.386 in) | 1.90 mm (0.075 in) | Argon feed-through chamber sealing |
| N2.40X011.5 — Buna-N 70 Duro | 11.50 mm (0.453 in) | 2.40 mm (0.094 in) | For chamber HV Cable Tower (non-vacuum-sealing) |
| V2.50X026 — Viton 75 Duro | 26.00 mm (1.024 in) | 2.50 mm (0.098 in) | For sealing top chamber door against power conduit |
These are the closest matches I could find to what was currently in the machine. Most of them are within 2%+/- so these should all fit without too much hassle.
The internal KF flanges are KF-10 size, so I ordered a pack of KF-10 centering rings of amazon as well, which should be what we need to fix the internal connections.
Now I just need to work on cleaning the seating surfaces, and wait on my order to come in, and the system should be vacuum tight again.
Action Items
- Inventory all O-rings in this system and document in this section
- Order replacements for all O-rings
- Clean seating surfaces
- Install all new O-rings
⚠️ Dirty Vac System
The vacuum system is in horrendous condition. All linings need cleaned well with a Mr Clean / Windex split. We also do not have an adequate roughing pump for this system. I placed a bid on GovDeals.com today for one, we will see if we get it or not.
Update 4/22/26
I spent a bit of time starting to do a rough-clean on some of the internals today:
After trying everything from acetone to mr clean to windex, I am making very little to no progress on the larger plates.
I threw the smaller pieces into the ultrasonic cleaner for about 15 min to see if it can knock down any of the residues on those:
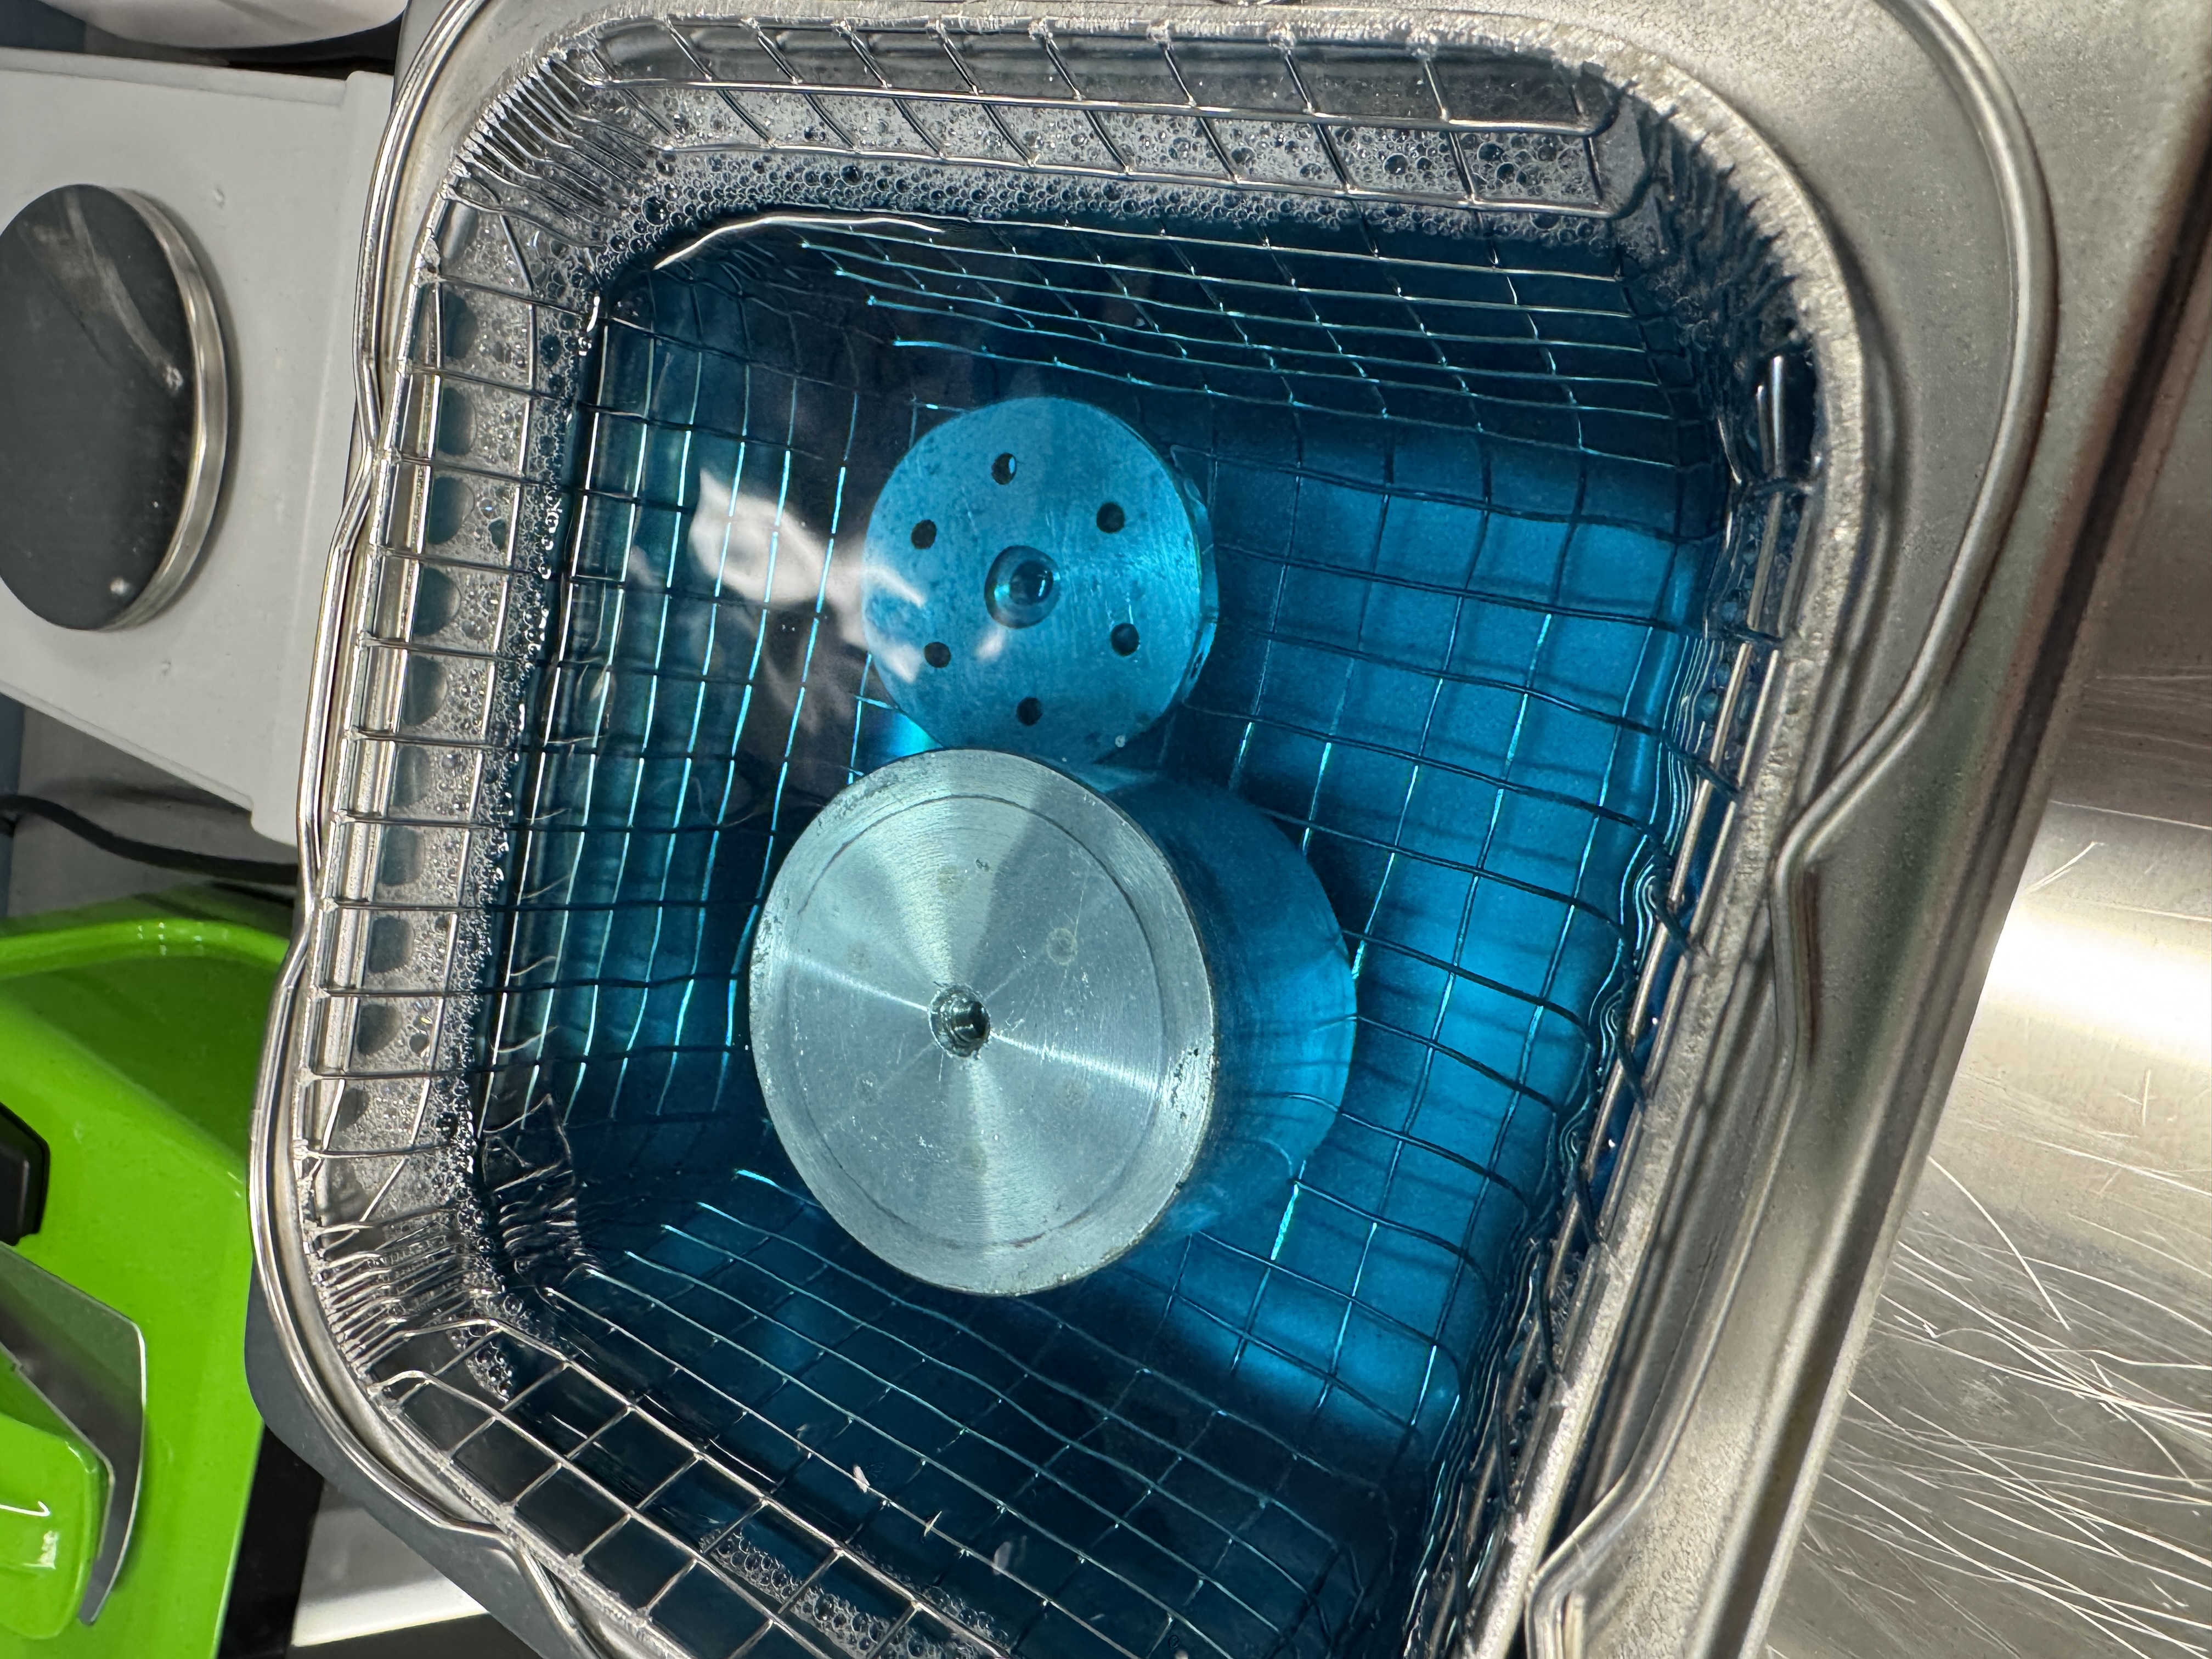
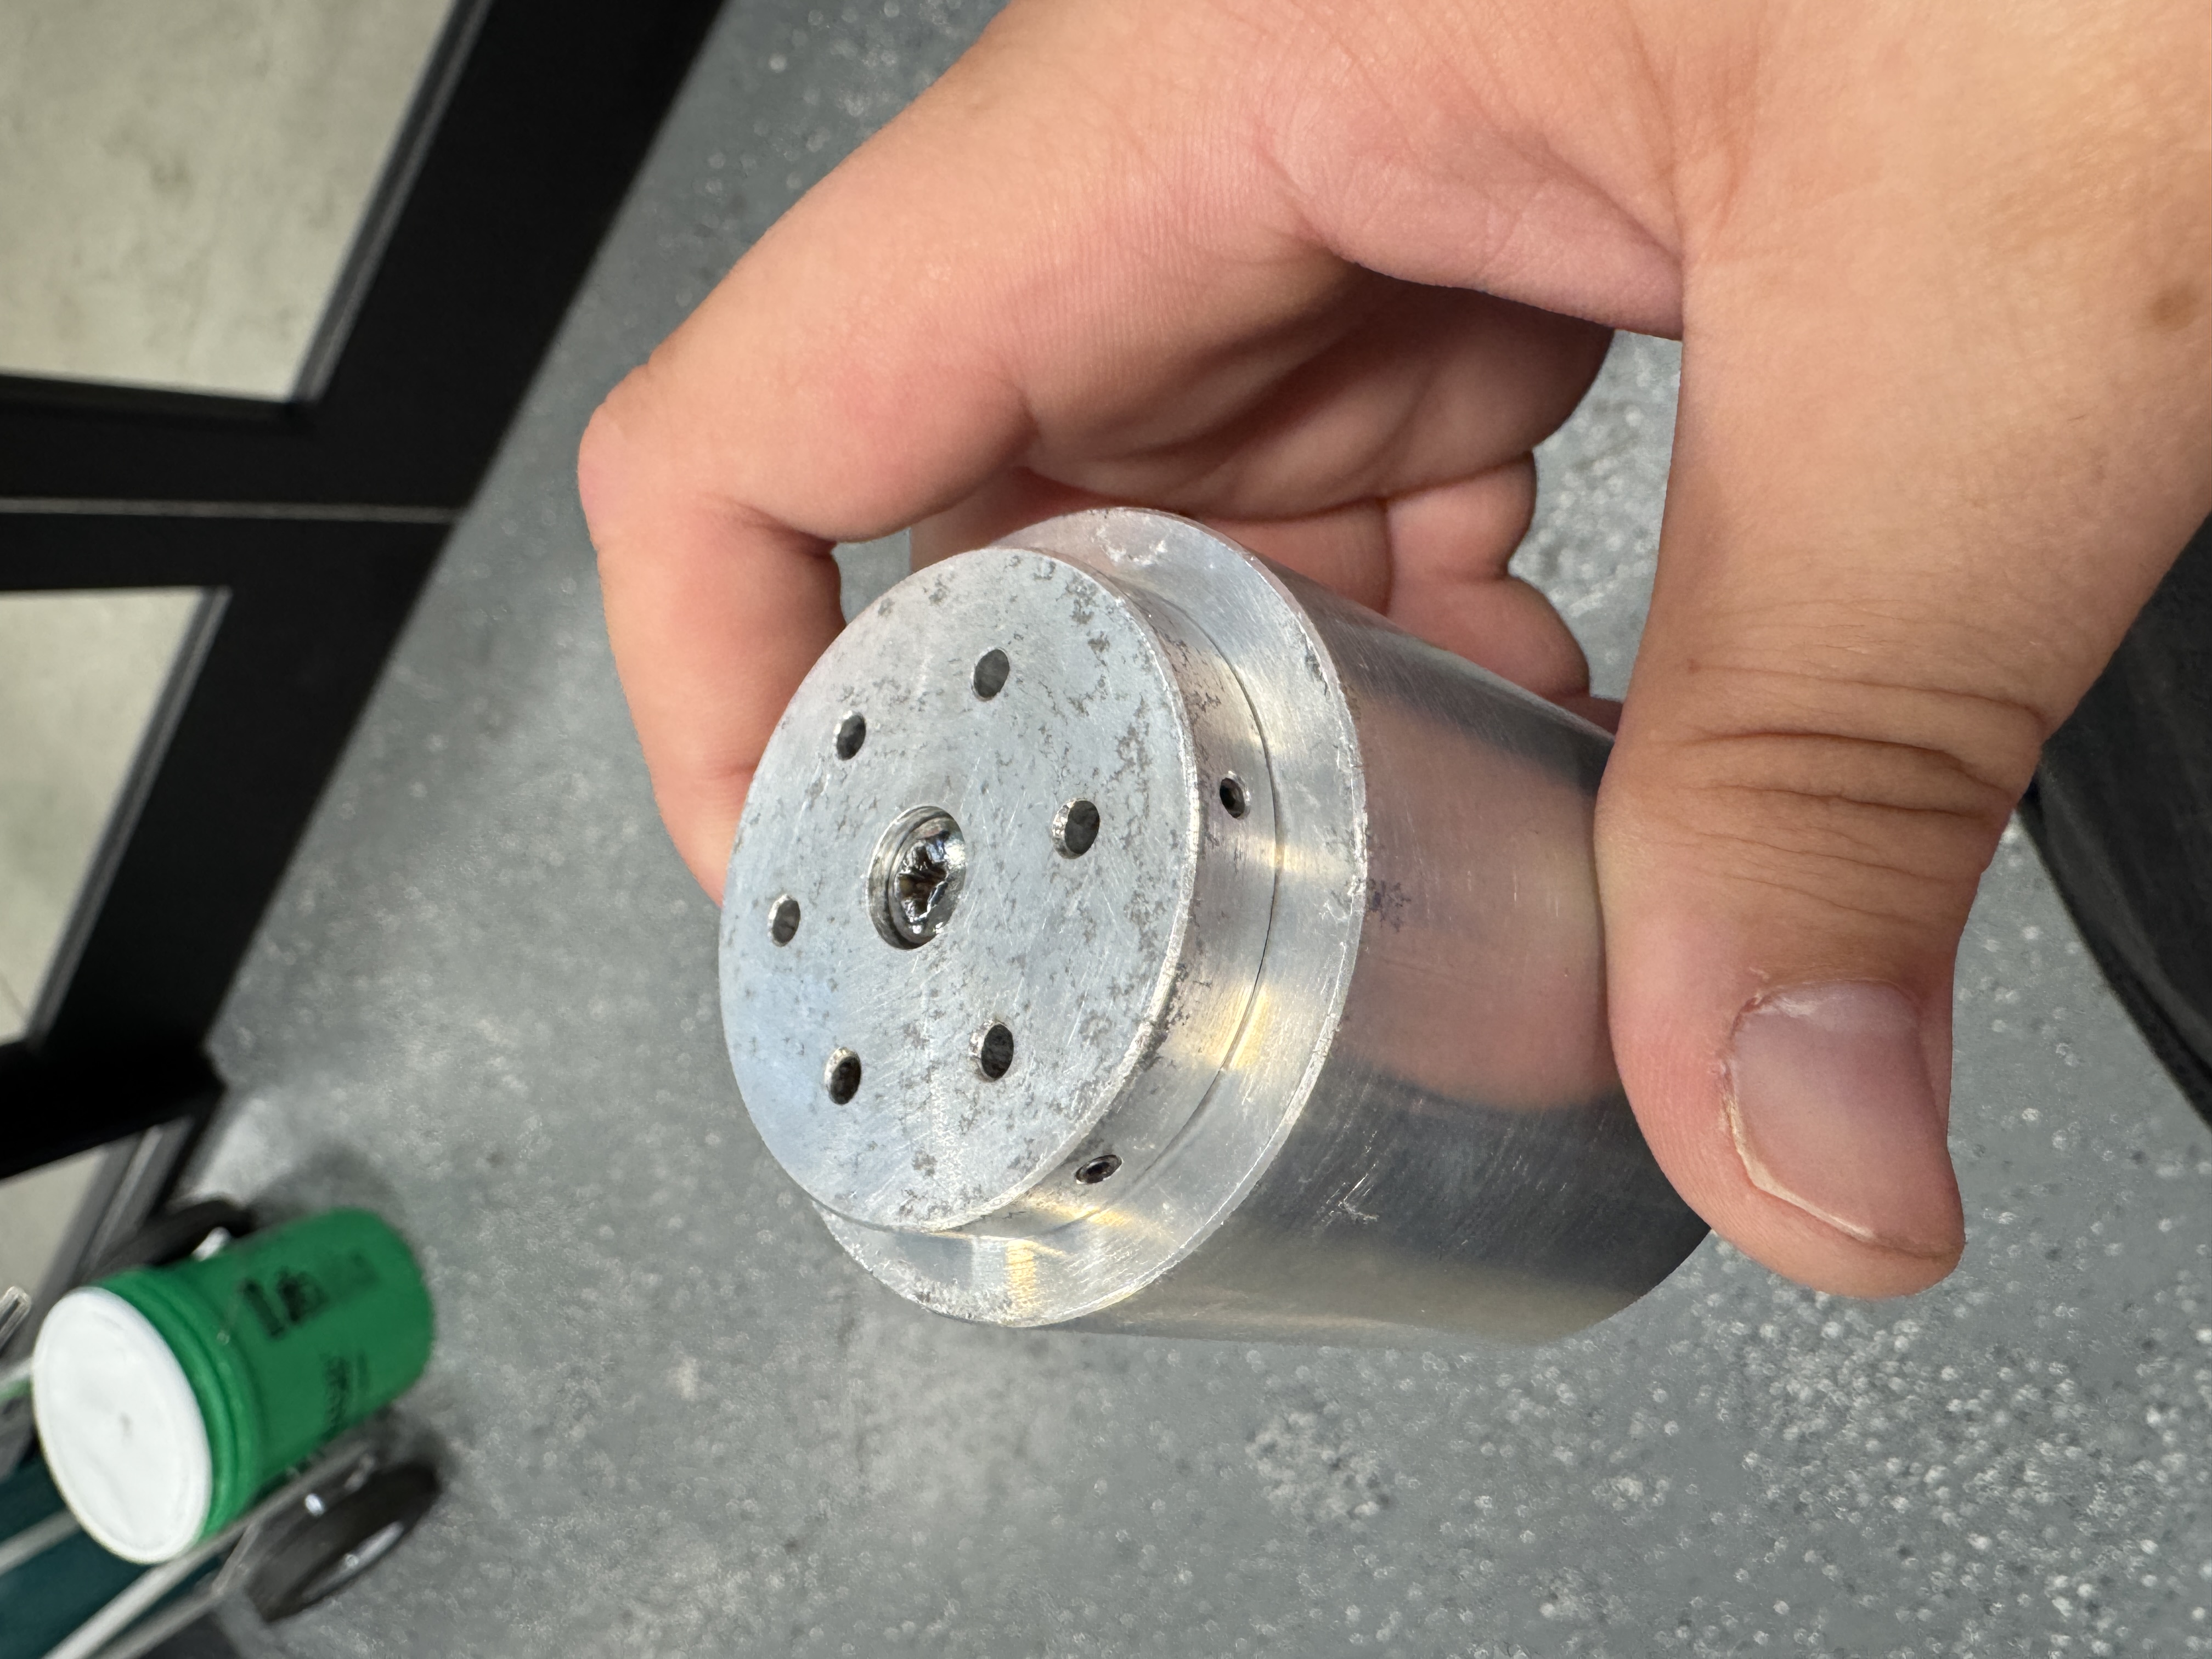
The ultrasonic definitely cleaned off surface grind, and also unfortunately some of the surface of the baffle 😅 this is fine though as the surface that got accidentally polished is not a contact surface with any other components, so this is just cosmetic. This is however a good time to remind myself and everyone reading to never let metal touch metal in an ultrasonic cleaner, it can do a lot of damage very quickly. Always separate parts in plastic bags or do one part at a time in a way where it is not contacting a metal surface of the cleaner. This was something I knew, ignored, and now live to pay the price, luckily that price is just a slightly cosmetically damaged surface. On the upside, it is clean :)
Most of the interior vacuum surfaces are very clean now, but the top and bottom plates gave me a lot of trouble. I am going to have to re-approach those with a different strategy next time I work on this project.
Action Items
- Clean all vacuum tubing with IPA / Acetone soak
- Clean all interior vacuum surfaces
- Order new KF vacuum pump
⚠️ Dirty System Components
The system in general is dirty as heck and every piece needs a wipe down at the bare minimum
Action Items
- Wipe down all exterior surfaces of the machine
- Wipe down internal surfaces that haven’t been touched up by our other fixes
Shopping List
- Gold Target
- PTFE Tubing
- O-Rings (Lots)
- Argon Tank
- Plumbing to attach argon tank
- Water Chiller Circulator
- Associated Plumbing
- Vacuum Pump KF Flange
- Hardware to adapt non KF pump if not
Sources
- Setting Fire to Suburbia w/ Gerould Wilhelm - In this podcast botanist Gerould Wilhelm has referenced an 1874 paper entitled “The Reasons for Climate Change In Illinois” which contains a first hand account of a boy who observed afternoon rainstorms rolling through like clockwork every day between 2 and 3:30, and then watched them disappear and become more sporadic and violent as the wet praries were drained and broken up. I reached out to Gerould to try to get this source, and I will update the article when / if I do.